Showing posts with label facebook tips. Show all posts

Facebook and G-mail Tips--- Account Properly Setup Recovery and Backup Options for Two-Step Verification

I’ve always been a big proponent of two-step verification and it seems these days you really need to use it. Just look at the recent Apple security hole that allowed people to reset your Apple ID password with just your email address and DOB. If you had enabled two-step verification on your account, you would not have to worry about this problem.

Though two-step verification can make your account more secure, it can also cause a lot of problems if you happen to lose the device that generates the codes. Just like there is more upfront setup required to use two-step verification, there is also a bit of backend setup you must do to ensure you can regain access to your account in case of loss or theft.

I currently have 2-step verification enabled on Google, Dropbox, Facebook, Lastpass.com and Apple.com. After doing a little research, I realized I didn’t quite have my backups ready. I actually pretended like I lost my device and wanted to see how easy it would be to get back in. I was surprised. If you don’t have the right stuff setup, you could end up either permanently locking yourself out or having to through through hours or days of trying to convince customer service people you are the real owner of the account.

In this article, I’ll go through those five sites and explain what you need to do in order to ensure that your account remains secure, but is still recoverable in case you lose your phone and can’t generate the codes anymore.

Google
There are a couple of things you should setup in terms of recovery for your Google account. To get started, head over to the account Settings page here:

https://www.google.com/settings/account

First thing you want to do is add a recovery email address. The recovery email address is more often used when you forget your password or your account has been hacked, but it’s still another mechanism that can be used to get back into your account regardless of what’s preventing you from getting in.


Next, click on Security and then click on Settings 2-step verification.


Here is where you need to setup the backup options for 2-step verification or at least make sure everything is up-to-date.


The important aspects here are the backup phones and the printable backup codes. You should definitely have at least one backup phone, which can be another cell phone, home phone, etc. Obviously, make sure this other backup phone is also secure or with someone who you completely trust like your parents or someone. My 2 year old daughter was playing with my iPhone and deleted the Google Authenticator app. I couldn’t restore it from backup and therefore I had to get a call on my backup phone in order to get it.

The nice thing about the backup phone is that if you can’t receive a text message on it, you can have an automated service call you with the code. Secondly, print out the backup codes and do not save them on your computer. It gives you the option, but it’s a terrible idea. You don’t want these codes in digital format. Nor do you want to be carrying the backup codes around in your wallet. They should be kept securely in one location and pulled out only when you need them.

The last thing you can to is make one or two computers Trusted Computers. If you scroll down on the 2-step verification settings page, you’ll see if the current computer is trusted or not:


This basically means you won’t have to type the verification code on that computer for about 30 days or so. After that point, it asks anyway, but if you lose your phone, then you can use a trusted computer to sign in and then move 2-step to another phone or just disable it until you get time to set it up again.

Dropbox
Dropbox 2-step is similar to Google, but doesn’t have as many options. Basically, if you lose your phone, you have to enter a emergency backup code that they give you when you initially setup 2-step verification. If you already enabled it and can’t find the code anymore, you should disable 2-step and then re-enable it in order to generate the new emergency backup code.

Once you log into Dropbox, you need to click on your name at the top and then click on Settings. Then click on Security:


The first thing you want to do is disable 2-step if you don’t have your emergency backup code. Once you have that and have enabled 2-step, go ahead and make sure to add a backup phone number. I use the Google Authenticator app to generate the codes because you can then use your phone as a backup. If you use your phone SMS to get the codes, then your only backup is the emergency backup code. That’s why it’s better to install the Google Authenticator app and then use your phone number as a backup. Then you’ll have two backups in case something goes wrong.

It’s also worth nothing that Dropbox has trusted computers also and if you do lose your phone and you don’t have any backups available, you can still login on a trusted computer. But if you lose your phone and don’t either have the emergency code or a backup phone, then you’re screwed. Or at least you’ll have to call Dropbox and pray they believe you.

Apple
When it comes to Apple, you can log into your account as long as you have two of the three items below:

1. Apple ID password

2. Access to a trusted device

3. Your recovery key

As long as you have any combination of 2 of these items, you can get back into your account. Once you have logged into your Apple ID account, click on Password and Security to manage your trusted devices and your recovery key. It’s a good idea to add several trusted devices like your phone, spouse’s phone, etc. Currently, trusted devices have to support SMS, so you can’t add an iPad or anything like that.


The next thing is to print out your recovery key or click the Replace Lost Key if you forgot to print it out the first time when you setup 2-step verification. Again, it’s best it just print this out and not save it in any type of digital format. It’s a lot easier for digital data to be stolen than a piece of paper in a safe or stuffed in some strange location only you know.

LastPass
LastPass is fairly straight-forward in terms of not having access to your codes; they basically have a link that will send you an email, which will then disable Google Authenticator temporarily so you can log in.


LastPass is the only place where you don’t have to actually do anything extra in order to gain access back to your account.

Facebook
Facebook has Login Approvals, which is the same as 2-step verification. It’s not as stringent as Google’s 2-step verification, but it’s still pretty useful and can prevent hackers from gaining access to your account. Login Approvals either sends you a SMS on your phone or you can use Code Generator in the Facebook app.


The reason I said Facebook is less stringent is because it won’t ask you for that code when logging in from any of your recognized devices, which is pretty much every device you have ever used to log into the site. If you lose your phone and you don’t have the Facebook app installed on any other device, you’ll have to login from a recognized device. If you don’t have any way to login from a recognized device, you have to file a report and wait forever to get access back.

So I would install the Facebook app on at least two devices, maybe your phone and a tablet and then make sure you have a couple of computers that are recognized devices.

Hopefully this article gives you a little more idea on how to ensure you are using 2-step verification properly and not potentially locking yourself out with the extra security. If you haven’t enabled 2-step verification at all, I strongly recommend it along with making sure your backup and recovery options are set. This way you’ll have more peace of mind when everything is working and peace of mind even when your device is lost or stolen. Enjoy!


"Computer Tips--- New feature Google Analytics Reports makes viewing customized reports a lot easier"


Reference : online-tech-tips.com


Facebook,Google or Twitter Tips: Is It Better to Log Into Websites using Facebook,Google or Twitter Accounts

Over the years, you may have noticed that a lot of websites let you use your Facebook, Google or Twitter account to log into their websites. 

You don’t have to create a new username or password and a lot of the sites will automatically share your activity on Facebook if you give authorization.

This makes logging into those websites very convenient because you don’t have to create another set of usernames and passwords that you have to remember. For example, you can log into sites likerottentomatoes.com, sears.com, citysearch.com, stackoverflow.com, friendfeed.com, getsatisfaction.com and a million other sites using Facebook, Google or Twitter.

Facebook,Google or Twitter Tips: Is It Better to Log Into Websites   using Facebook,Google or Twitter Accounts

By far, the most popular option is Facebook. Facebook released a set of APIs in 2008 called Facebook Connect that changed how people log into third-party websites. Just about every major sites now lets you use Facebook Connect to log into their websites.

Facebook,Google or Twitter Tips: Is It Better to Log Into Websites   using Facebook,Google or Twitter Accounts

The idea has exploded in popularity and you might be logging into a lot of websites using Facebook without even thinking about it. However, like with everything in the world, there are advantages and disadvantages to this type of login.

Advantages

The advantages of logging into multiple websites using the same credentials are fairly clear. Here’s what I find to be most useful:

1. No need to remember multiple sets of usernames and passwords for each site.

2. Credentials are less likely to be hacked since they are securely stored with Facebook, Google, or Twitter.

3. Sites are customized to use the Facebook API and therefore make it super easy to share your activity on those sites with your friends and family.

These are the three main advantages to using your current Facebook, Google or Twitter account to log into a third-party website. One of the main benefits I see is the fact that your credentials are more secure with the likes of Google and Facebook. There are a lot of websites that have great services, but don’t follow strict security procedures and can lose your information to hackers. I’ve gotten many emails over the years from companies that had their databases hacked and therefore my account was compromised.

Disadvantages

You probably have heard the phrase “Don’t keep all your eggs in one basket” and you’ve probably read online at least once not to use the same password for every website you log into. There are reasons why you hear these statements over and over again.

The disadvantages to using Facebook Connect to login to every website you visit or comment on also are pretty clear:

1. Facebook, Google, Twitter become a single point of failure. If you lose access to any of those accounts, you lose access to all of the sites that rely on that account.

2. Similarly, if your account is hacked, the hacker could potentially see what apps you use on Facebook, etc and then log into those websites as you.

That’s basically the only disadvantage, but it’s a really big one.The fact that you are entrusting that much information to one particular site or service could cause privacy issues later on. Does Facebook, Google and Twitter get to keep all of that information about your activity forever? What happens if they sell it to someone else later on? It’s definitely risky if you don’t like one company to have access to so much information about you.

Conclusion

In the end, you want to diversify. I personally have some websites where I login using Facebook Connect, others using Twitter, others via Google and the rest using the regular website login. This way you’re not relying on one service or company for logging into a bunch of different sites.

Also, note that using Facebook to log into other sites will reduce your privacy because of how data can be posted back and forth between the site and Facebook. If you log into a website using Google or Twitter, there is less chance of that activity being posted to your Twitter feed or on Google+. For whatever reason, Facebook apps that you authorize tend to collect a lot more information and also post that info to your Facebook account.

Even though you probably haven’t heard of many horror stories yet, there are bound to be cases of hacking, theft, outages, lost access, etc as this type of login option becomes more popular. As with everything, try to stay diversified and you’ll be safer on the Internet. Do you use Facebook, Twitter or Google to log into websites? Let us know in the comments. Enjoy!


"Facebook,Google or Twitter Tips: Is It Better to Log Into Websites   using Facebook,Google or Twitter Accounts"


Reference : online-tech-tips.com


Facebook Apps Tips: Disconnect Facebook from Skype, Instagram, Spotify and Other App

Over the years, I have installed various Facebook apps and didn’t even know what was connected to my account until recently.I am a person who very rarely installs Facebook apps, but I was surprised to find that I still had well over 20 apps connected to my account!

When you connect an app to Facebook, it usually has access to a pretty much everything in your Facebook account. The apps can access your data at any time, even when you’re not using it and they can post to your wall. 

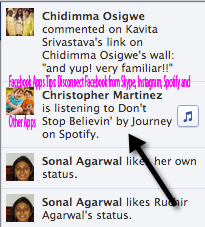
I had apps like Instagram, Skype, Spotify, Twitter, Goodreads, etc installed and my activity was automatically being posted whenever I used the service! At first, I didn’t mind this, but then I realized I don’t really want everyone to know what I’m reading or what songs I’m listening too anymore. Here’s an example of a friend below:

 Facebook Apps Tips: Disconnect Facebook from Skype, Instagram, Spotify and   Other App


In this article, I’ll show you how to disconnect Facebook from apps so that you can control whether or not they can access your data or post to your wall. To start, go ahead and open Facebook.com.

Next, under Apps, click on App Center in the left-hand menu section:

 Facebook Apps Tips: Disconnect Facebook from Skype, Instagram, Spotify and   Other App

In the left-hand menu that shows up here, click on My Apps at the very bottom:

 Facebook Apps Tips: Disconnect Facebook from Skype, Instagram, Spotify and   Other App

Now you will see a list of all the apps connected to your Facebook account. A lot of them I don’t even know how they got installed because I don’t remember manually allowing that many apps. Either way, it was really annoying because if I used Pinterest or Bing or even played Doodle Jump on my iPhone, it would automatically get posted! I don’t mind a little sharing, but not this much!

There are two things you can do at this point.You can either remove the app altogether from your Facebook account by hovering over the app and then clicking on the X.

 Facebook Apps Tips: Disconnect Facebook from Skype, Instagram, Spotify and   Other App

The second thing you can do is to click on the Settings link below the app.

 Facebook Apps Tips: Disconnect Facebook from Skype, Instagram, Spotify and   Other App

This will bring up the settings dialog for that particular app. Here you can control exactly what the app can and cannot do.By default, pretty much every app can post on your behalf, which is pretty much the point of installing the app in the first place.However, if you decide you really don’t want to post that content anymore, you can click on the X next to the permission to revoke it.

 Facebook Apps Tips: Disconnect Facebook from Skype, Instagram, Spotify and   Other App


Some apps also can access your data at any time, which I don’t really like.I have no idea what that means, but it seems like they can grab whatever data they want whenever they want. I don’t see why Instagram or any other app would need that kind of access, so I revoke it.You can also control who sees the posts that are made on your behalf and change that to whatever you like.

You can also see when the service last accessed your data and see what data they requested. You can click on See details to get more information.


 Facebook Apps Tips: Disconnect Facebook from Skype, Instagram, Spotify and   Other App


For example, Spotify accessed my data about 2 months back and grabbed my birthday, education history, hometown, likes, music, TV, movies, books, quotes, current city and work history! And they also grabbed data from  my news feed.

 Facebook Apps Tips: Disconnect Facebook from Skype, Instagram, Spotify and   Other App

I think most people are in the same boat as me. You really don’t think about this stuff because you don’t even know it’s happening. The problem is not that Spotify is accessing this data, it’s the fact that they probably have it stored in some database and if that database gets hacked by someone later on, then your personal info is going to be out there on the Internet.

 The more access these apps have to your account, the more data they can capture.Managing your apps in Facebook is important not only to prevent accidental sharing or over-sharing of your activity, but it’s also important for protecting your privacy on the Internet. Don’t trust anyone, especially Facebook apps. Enjoy!


"Facebook Apps Tips: Disconnect Facebook from Skype, Instagram, Spotify and Other Apps"


Reference : online-tech-tips.com

Facebook Tips: Remove the News Ticker and Sidebar in Facebook

Along with the forced migration to the new Timeline feature of Facebook, you also have to deal with that annoying sidebar that is split into two sections: one is a streaming news ticker and the other is a chat window. I use a desktop app to chat with Facebook friends and I never use the news ticker that shows all kinds of useless info about what my friends are doing every second.

If you want to remove that sidebar or modify it, there are a couple of things you can do. In this article, I’ll walk you through the various options that you have in Internet Explorer, Google Chrome and Firefox. If you employ a different method to customize Facebook in your browser, feel free to a post a comment here and let us know what you use.

First off, there are no add-ons for Internet Explorer currently that support removal of the News Ticker in Facebook completely. Instead, for IE, you only have one option and that is to hide the sidebar, which thankfully Facebook gives you the option to do!

Facebook Tips: Remove the News Ticker and Sidebar in Facebook

You can also just press that button on Chrome or Firefox also. It’s a feature of Facebook, so it’s available on all browsers. Now that’s easy enough if you just want to hide the sidebar, but if you want to remove the News Ticker and just be left with the chat window, you have to install some extensions. Again, this will only work for Chrome and Firefox as there are no add-ons for IE yet to do this.

Remove News Ticker in Google Chrome
For Chrome, there are two extensions that I tried and that work really well. The first one is Facebook News Ticker Remover.

Facebook Tips: Remove the News Ticker and Sidebar in Facebook

Once you install it, reload the Facebook tab and you’ll see that the sidebar now just has the chat option and the news ticker is gone.

Facebook Tips: Remove the News Ticker and Sidebar in Facebook

You don’t have to do anything else, it just hides the news ticker automatically! The other extension that works fine is Hide Facebook Ticker (by SachinKRaj). Once installed, you’ll see a new icon in your toolbar and a message saying the extension is disabled.

Facebook Tips: Remove the News Ticker and Sidebar in Facebook

Just click on the icon and it will be enabled. Then reload the Facebook tab and you should be good to go, again with just the chat part of the sidebar and the news ticker gone. For Firefox, you can download a plugin called Hide FB Ticker.

Facebook Tips: Remove the News Ticker and Sidebar in Facebook

I like this one because you don’t have to install Greasemonkey or any userscripts. Just install this add-on and you’re good to go. It works just like the extensions in Chrome. That’s about it. Enjoy!


"Remove the News Ticker and Sidebar in Facebook"


Reference : online-tech-tips.com


Computer Tips: Delete Messages on Facebook


Hmm, so you sent an inappropriate message to someone on Facebook two years ago and now it’s coming back to haunt you? Well, that’s Facebook! They will keep every last detail you ever click or type into their website. Since the launch of messages on Facebook, you can view your chat/message history all the way back to the beginning. This is great most of the time, but there are instances when you really need to get rid of a conversation to save yourself.

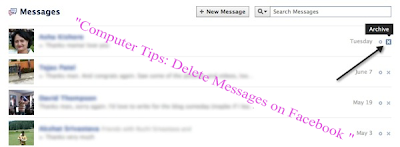
By default, when you want to delete a message in Facebook, it actually just archives it. Yes, they try their best to make it hard for you to actually delete anything from their massive database. So let’s say I’m looking at a message and I click on the little X at the far right:

Computer Tips: Delete Messages on Facebook

As you can see, a big Archive appears at the top indicating this won’t really be deleted. For example, go ahead and archive the message. Note that this will remove the entire conversation you have had with this person, even if it’s over several weeks, months, or years.

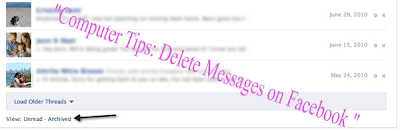
Now in order to see the archived messages, you have scroll all the way down to the bottom while on the messages screen. What’s really annoying is that when you get to the bottom, 

Facebook automatically loads another set of older message and then you have to scroll more to get to the bottom. I believe it does this twice before it finally lets you click on a link if you want to see even older messages.

Computer Tips: Delete Messages on Facebook

Go ahead and click on the Archived link and you’ll only see the archived messages now.


Computer Tips: Delete Messages on Facebook


I thought once it was archived, I might have an option to delete the message here, but that was not the case. Then it kind of clicked that maybe there is no way to delete an entire message history with one person since it combines everything from the past into one giant chat window. Instead, I realized, Facebook probably lets you delete individual entries in a conversation with a person. And that’s exactly how it works.

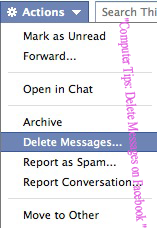
So if I really wanted to delete that message in the example above, I go to Messages and then click on the name of the person. Here I’ll see the conversation with that actual person and you’ll see a drop down at the top called Actions.

Computer Tips: Delete Messages on Facebook

Click on the Actions button and you’ll see a list of options, one of them being Delete Messages.

Computer Tips: Delete Messages on Facebook

Click on that and now you’ll get the option to select individual entries in the chat history and delete them or you can click the Delete All button and that will delete the entire conversation you’ve had with that person since the beginning of Facebook.

Computer Tips: Delete Messages on Facebook

And that’s it! Now once you delete it, it’s really gone! Well, I’m sure Facebook keeps a backup for a certain time, but you won’t be able to see that message in your account anymore. Questions? Post a comment! Enjoy!


"Computer Tips: Delete Messages on Facebook "


Reference : online-tech-tips.com


Facebook Tips: Levels of Privacy


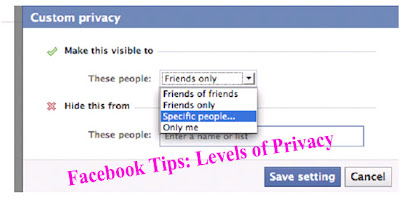
You’ll notice, as you change these settings, that there are four main  levels of privacy available.

Facebook Tips: Levels of Privacy

Here’s w hat they mean:

Everyone:  "Absolutely everyone, on Facebook or not. Includes your ex-boyfriend, grandmother, future boss, stalker, strangers, etc.

Friends of Friends:  "The people your friends are friends with but you haven't directly called a friend yourself. Includes people at the same party as you last week, best friend's co-workers, your high school friend's aunty,etc. 

Friends Only:  "Just the people who you have called a "friend" on Facebook.Customise " Here you can set a more fine-grained control over your privacy.Using names or friend lists, you can make things visible to only certain friends, limit access for certain friends or a particular setting viewable to "only me".

Facebook Tips: Levels of Privacy

Don't forget: "Posts by me" includes your status updates,links you share, photos you upload and anything else you might "post" to your wall from applications.There are good reasons for limiting all of your "posts by 
me", including:

1-Ensuring your basic priv acy is maintained even if you forget.

2-Not clogging up the new s feed of people you don’t really know.


"Facebook Tips: Levels of Privacy"


References: netsavoir.com 


Facebook Tips: Customise and Preview Settings


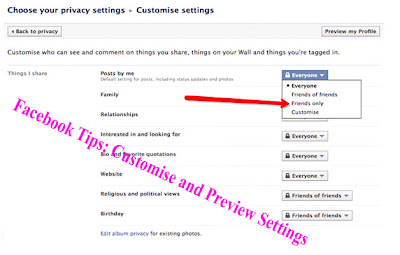
To customise your basic settings, click on "customise settings" in the low er part of the page:

Facebook Tips: Customise and Preview Settings


On the "customise settings" page, the current privacy level of each setting is show n to the right of each option. Clicking it will reveal a menu where you can choose an option. These are your basic privacy controls.

Facebook Tips: Customise and Preview Settings

While you're learning about priv acy settings it's good to check that you understanev erything. There is a tool here that can help: "Preview my Profile".

Facebook Tips: Customise and Preview Settings

This prev iew shows you w hat a normal v isitor to your profile will see. If you type a friend's name in the search box it w ill show you exactly w hat that person sees when they view your profile.

GO TO HOME

This w ill come in v ery handy w hen you start experimenting with controlling privacy information. 


"Facebook Tips: Customise and Preview Settings"


References: netsavoir.com 


Facebook Tips: Friends Only-A Quick Universal Setting


Overwhelmed  already? Well, if you don’t w ant to spend a lot of time messing around with settings, the "Friend’s Only" option is a great first step.Make this change and only people you’v e allowed to see your 
profile will be able to do so.

 Browse to  Account > Privacy Settings , then click on "friends only" on the left hand side follow ed by "apply these settings".

Facebook Tips: Friends Only-A Quick Universal   Setting

This is the quickest and easiest w ay to protect your basic privacy needs on Facebook.There are many other important security features and privacy concerns to note, but this is decent, quick solution.

On the other hand, you can’t necessarily trust your friends to not share information.Always be careful about w hat you write online.


"Facebook Tips: Friends Only-A Quick Universal Setting"


References: netsavoir.com 


Facebook Tips: Remove Yourself From Facebook Search


Search Results & Google

By default, all adults can be found in search results within Facebook and v ia search engines such as Google. I f your basic privacy settings are set to "Friends Only" you’re already covered; if not, there’s a simple fix.


Remove Yourself From Facebook Search 


Go to Account > Privacy Settings, then choose "View Settings" from "Basic Directory Information". 

Facebook Tips: Remove Yourself From Facebook   Search

Under "Search for me on Facebook", choose "Friends Only" to be as secure as possible or "Friends of Friends" if you prefer. 

Either of these options will remove you from public Facebook search results, as w ell   as Google search results.

Facebook Tips: Remove Yourself From Facebook   Search


"Facebook Tips: Remove Yourself From Facebook Search"


References: netsavoir.com 


Facebook Tips: Remove Yourself from Google Search Results


I f your Facebook search availability is set to "Everyone" you can still choose to remove yourself from Google search results.

Facebook Tips: Remove Yourself from Google Search   Results


To remov e yourself from Google search results, go to you r  Account > Privacy Settingsand choose "Applications and Websites". Choose the "Public Search" section, then "Edit Settings".

Facebook Tips: Remove Yourself from Google Search   Results


Deselect the option to "Enable Public Search".


"Facebook Tips: Remove Yourself from Google Search Results"


References: netsavoir.com 


Facebook Tips: Controlling “Places”


Facebook Places is Facebook's geolocation feature. When it w as deployed, all Facebook users were automatically set to publicly reveal their location.

Not only that, but friends are able to tag users as being at a certain location, meaning even users not intending to tag themselves could suddenly find their location is public on Facebook

Go to Account > Privacy Settings, then change your setting for "Places I check in to" 
to whatever you're comfortable with.

Then uncheck the option to "Include me in 'People here now' after I check in". 

Facebook Tips: Controlling “Places”


Facebook Tips: Controlling “Places”


"Facebook Tips: Controlling “Places”"


References: netsavoir.com

Facebook Tips: Managing Friends With Lists


Friends lists can be used to filter your new s feed, choose who you want to chat with, make event invitations easier and filter your updates and personal information from certain people. They're extremely useful and best set up as soon as possible , so that you can add friends to the right lists as you connect with them on Facebook. From the home page, click on the "Friends" application. Then, at the top you'll see "Create a List". 


Facebook Tips: Managing Friends With Lists


A few lists you'll probably w ant to make:Relationship to you: Friends; Family; Professional; Acquaintance. 
How much you like them: Best friends; People you w ant to hear from; People you don't w ant to chat to often.

How you know them: Clubs & Associations; School/University; Conference; Mutual Interest; Social Circle. 
These groups are just recommendations; you’ll discov er what’s useful for you as w e continue.


"Facebook Tips: Managing Friends With Lists"


References: netsavoir.com


Facebook Tips: Changing privacy settings for certain friend lists


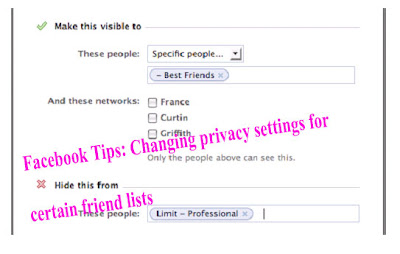
Almost ev ery privacy setting and update on Facebook can be fine-tuned to be controlled by friends list. I t's a very powerful privacy tool.For example: whenever you update your status, add photos or add a link you should see a little padlock. Click this to set the security level for just that update, overriding general privacy settings.  

Facebook Tips: Changing privacy settings for certain friend lists

Then choose "specific   people".


Facebook Tips: Changing privacy settings for certain friend lists


You can then choose w ho CAN see the update and w ho CANNOT see the update, using lists. This means that people you'v e forgotten to add to the appropriate lists can't see the element in question by default, but that’s better than a message going out to everyone!

Facebook Tips: Changing privacy settings for certain friend lists


Note that the method for filtering priv acy settings by friend list is much the same as it is for an update. When you save the settings you can continue to post the update as normal. Click on the padlock if you w ant to re -enter the settings we've just been through. Once posted, you can check the settings by hov ering over the padlock symbol.


Facebook Tips: Changing privacy settings for certain friend lists


"Facebook Tips: Changing privacy settings for certain friend lists"


References: netsavoir.com


Facebook Tips: Viewing filtered news feed & editing lists,Using friends lists to manage chat privacy


Go to the Friends application from your home page, then click on the list you need to edit. Note that this is also how you v iew filtered news feeds. Click "edit list" in the top right and click on whoever you need to add to or remove from the list.


Facebook Tips: Viewing filtered news feed & editing lists,Using friends lists to manage chat privacy


Using friends lists to manage chat privacy


Facebook Tips: Viewing filtered news feed & editing lists,Using friends lists to manage chat privacy


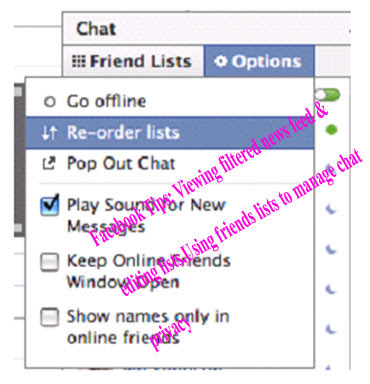
Facebook Chat is handy, but if you hav e 500 friends you m ight not w ant all of them demanding access to your brain. Manage it all with lists. To edit your lists, click on chat then click on "Friends lists". I f the w indow pops up and you'v e run out of space, the hack to get around this is to pop out the chat w indow. Go to options, then choose "Pop out window".

Facebook Tips: Viewing filtered news feed & editing lists,Using friends lists to manage chat privacy


From there, simply ensure the lists you w ant hav e ticks next to them. Decide w ho you want to talk to most, who you w ill only talk to if you're bored and chatty and w ho you'd like to filter out on occasion. For example: Best friends; Family; Professional contacts; Overly chatty people. Re-order the lists. 

Facebook Tips: Viewing filtered news feed & editing lists,Using friends lists to manage chat privacy

Drag them around and click "Finished Re -ordering".


Facebook Tips: Viewing filtered news feed & editing lists,Using friends lists to manage chat privacy

Now you can be online to some people and offline to others. To the right of each list is a green symbol –  click to appear offline to all on the list.


Facebook Tips: Viewing filtered news feed & editing lists,Using friends lists to manage chat privacy


The grey symbol means that you're now offline for those people. 


Facebook Tips: Viewing filtered news feed & editing lists,Using friends lists to manage chat privacy


"Facebook Tips: Viewing filtered news feed & editing lists,Using friends lists to manage chat privacy"


References: netsavoir.com