Computer Tips Step 4 – Secure Your Network


The other major aspect of security you want to take into account is the network you are using for communication with the outside world. Is your home wireless network secure? Is it using WEP or WPA or WPA2? Are you regularly using insecure networks at hotels, airports, coffee shops?

The first thing you want to do is lock down your wireless network since that is probably where most of your computer activity takes place.You want to enable security and choose the highest possible security. Check out my article on which WiFi encryption protocol is best.


Computer Tips Step 4 – Secure Your Network


There are also a lot of other things you can do, such as:

A - Disabling SSID Broadcast

B - Enabling MAC Address Filteirng

C - Enabling AP Isolation

You can read up online about these other types of security. The second thing you want to do (actually maybe the first) is change the username and password used to access your wireless router. So it’s great if you setup WPA2 with AES, but if someone just types in the IP address of your router and can login using the default username and password for the router (which can be found on the Internet in seconds), then they can actually change everything and lock you our of your own router!

Luckily, you can always reset your router and gain access, but it’s still very risky because someone can log into your router and then access everything else that is connected to your network. Logging into the router is nice because it can tell you all the clients connected to the router and their IP addresses. It’s never a good idea to buy a new wireless router, bring it home and just connect it up without setting up the security on it first.

Lastly, it’s definitely necessary to enable the firewall on your router and your computers. This will prevent applications from communicating on certain ports on your computer.


"Computer Tips Step 4 – Secure Your Network"


Reference : online-tech-tips.com

Computer Tips Step 5 – Antivirus Software


 Computer Tips Step 5 – Antivirus Software

Computer Tips Step 5 – Antivirus Software


Again, you can do steps 1 thru 4, but it can all be useless if a virus or malware gets installed on your computer and someone can remotely control it or remotely transfer data from your computer to their servers. Antivirus is essential today and also good browsing habits.

I personally recommend Microsoft Security Essentials for Windows as it’s free and does a very good job of detecting viruses and malware. If you suspect you already have something, read my previous post on removing malware and spyware.

Implementing these five practices will greatly reduce your chances of being hacked and your data being stolen. There are still ways for hackers to get around even the most secure networks and encryption, but there’s no harm in making it really hard for them to do. What are your thoughts? How do you protect your digital data.


" Computer Tips Step 5 – Antivirus Software"


Reference : online-tech-tips.com

Windows 8 Tips-- Mac OS X Mountain Lion Requirements and Windows 8


Being mid June, we’re already half way through the year. For many tech gurus and everyday consumers alike, the next half of the year will be a time of operating system updates. With Mac OS X Mountain Lion due in July and Windows 8 due by Q4 of this year, PC and Mac users have some exciting things to look forward to. However, will your current computer meet the requirements to run the next gen operating systems from Microsoft and Apple.

Windows 8 Tips-- Mac OS X Mountain Lion Requirements and Windows 8

Normally when a new operating system is released, it offers a significant redesign and several new features. This is definitely the case with Windows 8, but Apple’s OS X Mountain Lion won’t feature as many drastic changes.Windows 8 Requirements Microsoft, being mainly a software company (as far as Windows is concerned), has made significant efforts to keep the requirements for running Windows 8 low. This way, the company will simply be able to sell more copies of Windows 8 to more customers, without customers having to purchase new computers in order to run the operating system.

 The Windows team’s optimization efforts have been able to keep Windows 8 system requirements to a quite similar recommendation of Windows 7.Microsoft recommended system requirements for running Windows 8 are as follows:

Processor (CPU) – 1GHz processor or faster
Graphics (Video) – DirectX 9 graphics device with WDDM 1.0 drive or greater
RAM memory – 1GB (32-bit), 2GB (64-bit)
Hard drive – 16GB (32-bit), 20GB (64-bit)

Keep under consideration that those are the minimum requirements that are recommended for a Windows 8 based computer. A machine with the above specs is capable of using Windows 8 as an operating system, but it may not be the smoothest experience.

I tried running Windows 7 on a computer with a > 1GHz processor (Pentium 4), a decent graphics card, 1GB of RAM and a hard drive beyond 20GB. It worked, but it was incredibly slow.As mentioned above, Microsoft’s requirements seem a bit low, but if they market Windows 8 with those requirements, it will help sales.

 For a more optimal Windows 8 environment, you may want to consider…Recommended specs:

Processor (CPU) – Core Duo, Core 2 Duo, Core 2 Quad, i3, i5, i7
Graphics (Video) – Dedicated Graphics or newer model Integrated graphics. 128 MB of video RAM and up.

RAM memory – 2GB (32-bit), 4GB (64-bit)
Hard drive – 64GB or higher (32-bit), 64GB or higher (64-bit)
Mac OS X Mountain Lion

Mac OS X operating system releases can be a bit different than Windows, as far as system requirements. For Mac OS X Mountain Lion, Apple recommends the following system requirements:
OS X 10.6.8 (Snow Leopard) or later (upgrade from…)
2GB of RAM memory
8GB of available hard drive space
Some features require an Apple ID

Some features require an internet connection Apple specifically lists compatible Mac computers that can run Mountain Lion. Because OS X is made specifically for Mac computers only, Apple has provided the following…

Mac OS X Mountain Lion is compatible with the following Mac products:

iMac – mid 2007 models and newer.
MacBook – late 2008 aluminum, early 2009 and newer.
MacBook Pro – mid/late 2007 and newer.
MacBook Air – late 2008 or newer.
Mac mini – early 2009 or newer.
Mac pro – early 2008 or newer.
Xserve – early 2009.

These supported Mac OS X Mountain Lion compatible models are likely specified due to tech specs; and as you can tell from the above list, each particular Mac has different compatibilities with Apple’s next gen OS.
Additionally, specific features that will be offered by Mountain Lion will only be supported by newer Mac computers also:

Windows 8 Tips-- Mac OS X Mountain Lion Requirements and Windows 8

Thank you for stopping by the site for today’s post. If you plan on installing Windows 8 on your PC, you very likely won’t have to purchase a new PC; and if you want to install Mac OS X Mountain Lion on your Mac, it will have to be a 2007 or newer model (depending on specific Mac).


"Windows 8 Tips-- Mac OS X Mountain Lion Requirements and Windows 8"


Reference : online-tech-tips.com


Windows 8 Tips-- Assign Static IP Address Windows 8


So what is a fairly simple task in Windows 7 turns out to take a bit of time in Windows 8. What task might that be? Hmm, maybe changing the IP to a static IP address! Granted, 80% of the extra time it takes to do it in Windows 8 is because of the new Metro UI, which makes it difficult to even get to the Control Panel easily.

In this article, I’ll walk you through the steps necessary to configure a static IP address in Windows 8. Along the way, I’ll mention a few things about Windows 8 and how you can make it a little less frustrating. For example, it’s nice to just add the Control Panel to your desktop rather than going through the whole Metro UI.

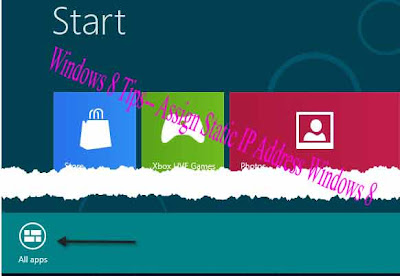
To get started, let’s go to the Start Screen. You can do that by moving your mouse to the lower left part of the screen (where the start button used to be), opening the charms bar by moving your mouse to the upper right corner of the screen and clicking on Start, or by simply clicking on the Windows key on your keyboard.Once on the Start Screen, right-click on a blank space and you’ll see the All Apps icon appear at the bottom.

Windows 8 Tips-- Assign Static IP Address Windows 8

Now you will see Control Panel if you scroll to the right side.

Windows 8 Tips-- Assign Static IP Address Windows 8

Go ahead and right-click on Control Panel and you’ll see it gets checked and a few options appear at the bottom of the screen. Go ahead and click Pin to Start and Pin to Taskbar. You may have to right-click on it again to do both.

Windows 8 Tips-- Assign Static IP Address Windows 8

Now you can open the Control Panel from the Windows 8 desktop or from the Start screen. Open the Control Panel and click on Network and Sharing Center.

Windows 8 Tips-- Assign Static IP Address Windows 8

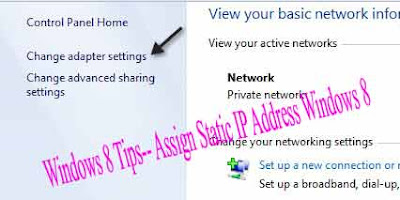
Now click on Change Adapter Settings in the left-hand pane.

Windows 8 Tips-- Assign Static IP Address Windows 8

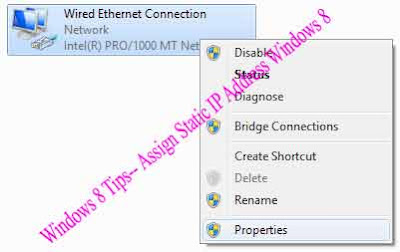
Right-click on the network adapter you want to make static and click on Properties.

Windows 8 Tips-- Assign Static IP Address Windows 8

Now click on Internet Protocol Version 4 (TCP/IPv4) and then click on the Properties button.

Windows 8 Tips-- Assign Static IP Address Windows 8

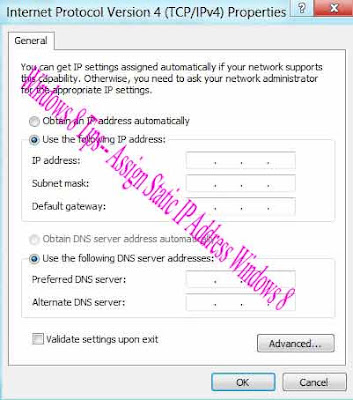
Finally, click on Use the following IP address and type in your static IP address. Whew!! That’s a long process for something so simple.

Windows 8 Tips-- Assign Static IP Address Windows 8

And that’s it! Yes a little long and drawn out, but it’s the same process once you get into the Control Panel. If you have any issues or problems, post a comment and we’ll try to help.


"Windows 8 Tips-- Assign Static IP Address Windows 8"


Reference : online-tech-tips.com


Windows 8 TIPS: Troubleshoot Adobe Flash Player Has been crashing Stopped Working


Upon upgrading to the latest version of Adobe Flash Player on my windows computer, Flash Player has been crashing randomly, but more so when I use a web browser. Each time it crashes, it prompts an error message similar to Adobe Flash Player has stopped working. This is quite annoying, but it’s not too difficult to troubleshoot.

Windows 8 TIPS: Troubleshoot Adobe Flash Player Has   been crashing Stopped Working


Clicking the Check online for a solution and close the program button wasn’t able to fix the Adobe Flash Player 11.3 r300 code.

To get the Adobe Flash Player has stopped working error problem solved, there are a few basic steps that you can take that should fix the problem the majority of the time.

1. Restart Windows

Simply restarting Windows seems to fix basic error messages a lot of the time. By performing a Windows reset, you are clearing your computer’s RAM memory and also restarting many core services, programs and applications. 

Whenever some stupid error message pops up on the screen, for any program, one of the first things that you can do to troubleshoot the problem is to restart your PC.

Windows 8 TIPS: Troubleshoot Adobe Flash Player Has   been crashing Stopped Working

2. Edit Flash Player Settings and Permissions.In Windows, you can edit Adobe Flash Player settings from a web browser using the Flash Player Help website.Using the Settings Manager, located towards the left of the screen, begin checking Flash Player settings for Global, Website, Protected etc.

Windows 8 TIPS: Troubleshoot Adobe Flash Player Has   been crashing Stopped Working


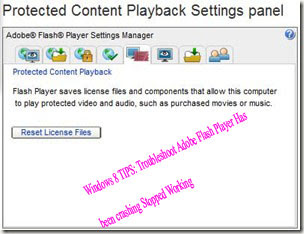
Try toggling on/off some of the settings. Under the Protected Content Playback Settings panel, try Resetting License Files. You may also want to try Deleting all sites under the Website Storage Settings panel.

Windows 8 TIPS: Troubleshoot Adobe Flash Player Has   been crashing Stopped Working


3. Reinstall Adobe Flash Player

Reinstalling Flash Player is usually effective in fixing random error messages. This worked for the Adobe Flash Player error that kept popping up on my PC. You can uninstall Flash Player from the Windows Uninstaller pane, located at Start > Control Panel > Uninstall a Program.However, Adobe recommends that you uninstall Flash Player using a specific uninstaller which you can download

The Uninstall Flash Player for Windows website provides a link for the uninstaller and some additional steps for completely uninstalling the software in Windows.

Windows 8 TIPS: Troubleshoot Adobe Flash Player Has   been crashing Stopped Working

Once you have completely uninstalled Adobe Flash Player, the next step is to check for any new available Windows Updates. If Windows does find updates, install them prior to reinstalling Flash Player.

To reinstall the software, jump to the Adobe Downloads page and download the latest version. Proceed to reinstall Flash Player on your PC.The above Adobe Flash Player has stopped working troubleshooting steps should hopefully help you to get Flash Player up and running without crashing on your Windows PC. If Flash Player is still not operating correctly, you may also want to try running a full virus scan on your computer. If 
you have a malware or virus program on your PC, it can stop programs like Flash Player from operating correctly.

Thank you for stopping by the site for today’s post. The above steps should fix Adobe Flash Player errors the majority of the time, but if Flash Player on your PC is still getting errors, you can leave a comment .


"Windows 8 TIPS: Troubleshoot Adobe Flash Player Has been crashing Stopped Working"


Reference : online-tech-tips.com


Windows 8 TIPS: Identify Your Intel Processor-CPU in Windows


So you’re running Windows on some machine you got 3 years ago and you want to know a little bit about the processor installed, right, Well, you can always go to the system information screen in Windows by clicking on Start and typing in msinfo32. This is what you will get.

Windows 8 TIPS: Identify Your Intel Processor-CPU in  Windows


It gives you some very basic info about your CPU, but nothing very special or detailed. If you want to get extensive information about your CPU, which can come in handy in making sure your PC doesn’t get an incompatible CPU error when you install Windows 8 on it in the future! So instead, you can download the Intel Processor Identification Utility.

The utility supports everything from Windows 2000 onward. Once you install it, go ahead and run it and you’ll get a window with three dialogs. The first one is the Frequency Test. It tells you the expected and reported speed, system bus speed, and the L2 Cache Memory.

Windows 8 TIPS: Identify Your Intel Processor-CPU in  Windows


If you are over clocking your PC, then you might be different values for expected and reported speeds. The system bus is the same as the front side bus.Next, if you click on CPU Technologies, you’ll get detailed information about what your CPU supports.


Windows 8 TIPS: Identify Your Intel Processor-CPU in  Windows

Here you can see if your processor supports Intel Virtualization Technology, Intel Hyper-Threading Technology and the Intel 64-Architecture. Also, worth nothing is whether your Intel processor supports SpeedStep and SSE2. SSE2 is important because this has to be supported by the processor in order to run Windows 8. The last tab is the CPUID Data tab, which has more details about your CPU.

Windows 8 TIPS: Identify Your Intel Processor-CPU in  Windows

Here you can see the CPU Type, CPU Family, CPU ModelCPU Stepping, CPU Revision, the Level 1 and 2 caches and whether your processor supports Execute Disable Bit and Enhanced Halt State. Again, the CPU needs to support Execute Disable Bit in order to run Windows 8.Overall, the tool is very accurate and does a very good job of identifying your processor and giving you a lot of useful information. Note that trying to run this utility in a virtual machine does not seem to work so well. I tried it in a Windows 7 VM in VMWare Fusion and it returned some sort of error. If you have any questions about your processor, post a comment.


"Windows 8 TIPS: Identify Your Intel Processor-CPU in Windows"


Reference : online-tech-tips.com


Windows 8 Tips-- Windows 8 full-screen Mail Metro app – First Look

When I first installed Windows 7, I remember trying to find the Mail app and then realizing that it was no longer included in the operating system, Instead, you had to download Windows Live Mail if you wanted to use a Microsoft email client other than Outlook on Windows 7.Windows Mail was included with Windows Vista,but for whatever reason,it was removed from Windows 7.

Now Windows 8 is coming and Windows Mail is coming back! Actually, I should say the Mail Metro app is coming, Yes, it’s going to be a full-screen Metro app in the new Windows 8 and from looking at the screenshots,it looks pretty awesome. Here’s how I would look at the new UI: if you liked when Gmail got redesigned last year with the new clean look,then you will like the new Mail app too.

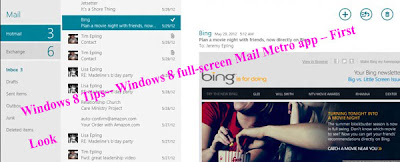
Firstly,the Mail app is designed with a 16:9 aspect ratio,making it really easy to view your accounts in one pane, emails in another,and the entire reading pane also.


Windows 8 Tips-- Windows 8 full-screen Mail Metro app – First Look

As you can see, the interface is like other Metro apps and has a very pleasing and clean look.A lot of the controls have been removed so you see the most important aspects of your email. What’s nice is if you have multiple email accounts,you can easily switch between them without having to open another tab or click on anything.

The new compose email screen is split into two panes,one for the To and CC fields and one for the subject and content of the email. At the bottom,you’ll see the virtual keyboard if you’re using Windows 8 on a tablet,for example.


Windows 8 Tips-- Windows 8 full-screen Mail Metro app – First Look

What’s also neat is how the Mail app intelligently brings up commands based on what you are doing.For example,if you select some text in the email body,it will bring up the formatting bar.


Windows 8 Tips-- Windows 8 full-screen Mail Metro app – First Look


You can then change the font, bold,italicize,underline,change the font color,highlight text,add emoticons and more.But this is not the coolest aspect of Windows 8 Mail app.What I really find neat is how you can snap the entire email app into another Metro app,so you could for instance read news in the News app and keep an eye on your email too.

Windows 8 Tips-- Windows 8 full-screen Mail Metro app – First Look

Pretty nice eh- And it lets you switch accounts and folders from within the snapped view so you’re not just stuck looking at your Inbox.And what’s even cooler is that you can copy and paste stuff from one app into an email your composing,for example. This is really useful and now instead of having to switch back and forth between the two apps,you can do it all on one screen.

And if you’re used to sharing links on Facebook,you know how when you paste a link,it converts it into a nice looking box with a title, description and an image from the URL.Now when you share something from another metro app like IE,it’ll also do that for you in Mail.

Windows 8 Tips-- Windows 8 full-screen Mail Metro app – First Look

Overall,the new Windows 8 Mail app is a big step forward from previous versions.And if you never wanted to use Outlook or have to buy it,then this is a great option.Of course,zathere are still some problems such as support for POP3,IMAP,lack of threaded conversations,inability to import/export from Outlook into Mail, etc.Hopefully,a lot of these issues get fixed or added before Windows 8 is released, but so far it’s looking pretty good.What do you think of the new Mail metro app in Windows 8,Let us know in the comments.


"Windows 8 Tips-- Windows 8 full-screen Mail Metro app – First Look"


Reference : online-tech-tips.com


Windows 8 Tips-- Windows Defender Offline Tool to Fix an Infected PC

I had a client the other day whose PC was practically dead because they clicked on one of those pop up ads while on some sketchy website. Something got downloaded and their computer was infected with malware and would n’t load properly.When trying to log into Windows, they kept getting some error like Interactive logon process initialization has failed.

Who knows what that means. Anyway, they could no longer get into their Windows 7 machine and because of that there was no way to remove the spyware from the computer. They could not even log into Safe Mode to run an anti-spyware program. So the only options were to delete everything, reinstall and start fresh or try to use some offline spyware scanning tool to remove the malware before Windows even loads up.

Luckily, Microsoft released a cool offline version of Windows Defender that scans your system outside of Windows and removes any infections.Then you can start up your computer and the malware will be gone and hopefully your system will start up normally That’s pretty cool and definitely better than having to reinstall everything.

To get started, go ahead and download the Windows Defender Offline tool here:

http://windows.microsoft.com/en-US/windows/what-is-windows-defender-offline

The way it works is that you download a program that will help you create a CD/DVD or USB bootable media that runs Windows Defender. You’ll create the media and then boot your computer from the CD or USB drive, which will then scan your system and fix any problems.

Once you download the 32 or 64-bit version, run the program and you’ll see the welcome screen:


Windows 8 Tips--  Windows Defender Offline Tool to Fix an Infected PC


Go ahead and click Next to get started creating the offline media. Once you accept the license agreement, you’ll be given the option to install Windows Defender Offline on a CD/DVD, USB flash drive, or to download an ISO file.

Windows 8 Tips--  Windows Defender Offline Tool to Fix an Infected PC

I installed it on a flash drive, which will have to be reformatted in order to install Windows Defender Offline. You only need about 250 MB of free space on the flash drive, but it will still format the entire thing.

Windows 8 Tips--  Windows Defender Offline Tool to Fix an Infected PC

Click Next and the process will start. It will download, then process the files, then format the USB drive and then install the files.


Windows 8 Tips--  Windows Defender Offline Tool to Fix an Infected PC

Once it’s complete, you will see the instructions for how to use the new media:


Windows 8 Tips--  Windows Defender Offline Tool to Fix an Infected PC

Now you can boot up using the media and you’ll get the familiar Windows Defender screen. Note that all the definition files are downloaded when you use the install tool. You don’t need an Internet connection or anything in order to update the definition files. If you need to run the tool again at a later time, you need to create the media again because it will download the latest files and then create the bootable media.


Hopefully, the next time you have a problem with your computer and you know it’s spyware or malware, you can use the offline tool to disinfect your system. If you have any questions or problems using the tool, feel free to post a comment.


"Windows 8 Tips--  Windows Defender Offline Tool to Fix an Infected PC"


Reference : online-tech-tips.com


Windows 8 Tips-- Fix Delay When Typing keyboard Characters in Windows


I recently ran into a very annoying problem while using Microsoft Word on my Windows 7 machine.Firstly,it’s a fairly fast machine and so I kind of knew it was not a hardware issue when I saw there was a delay between typing characters on the keyboard and them showing up on the screen.Some times there was no delay,but randomly the delay would jump to a second or even several seconds.

I was pretty sure it wasn’t related to the processing power of the machine because it’s a Core i5 laptop running Windows 7,After doing a lot of research,I finally managed to figure out what the issue was and now I don’t have any more lag between typing and characters showing up on the screen.However,depending on your system,you may or may not be able to fix the problem.

In this article,I’ll try to go through all the different reasons why you could be having this problem and how to solve it,if possible.

Hardware – Graphics Card

Even if you have a fast processor,the delay between your keyboard and screen could be caused by having an integrated graphics card. Integrated graphics cards are much cheaper than a dedicated graphics card and can be the bottleneck in the whole transfer of your typing into words on the screen. This is especially true if you type really fast, i.e. 40+ words a minute. If you didn’t have this problem before and now you’re having it all of a sudden, then it’s probably not the graphics card, so keep reading.

Hardware – Memory Module

Even though this is rare, if you have a faulty memory module or a memory module that is not properly seated, then one of the manifestations of that could be delayed typing. If you know how to check your memory, it’s a good idea to take the chips out and put them back in one by one and see if makes any difference.

You can also run a memory diagnostic on your compute using a free program called Memtest86. You can download it here:

http://www.memtest.org/

Software – Lack of Resources

The other main culprit is simply lack of system resources. It doesn’t matter how much memory or how fast your processor is, if all the RAM is being used and the CPU is running at 100% utilization, then you’ll see lag not only if typing, but in doing normal computer activities. On a Windows machine, go ahead and open task manager by pressing CTRL + SHIFT + ESC.

Windows 8 Tips-- Fix Delay When Typing keyboard Characters in Windows


Go ahead and click on the Performance tab and you’ll see a few graphs for CPU Usage and Memory. Make sure are not completely green, meaning being completely utilized. If you see your CPU usage is anything over 50% consistently, then you have to determine which program(s) are causing the spike and either remove them or disable them.

This can also be caused on systems that have a lot of malware installed or have a virus. If you suspect any type of computer infection, try to remove that first.

Lastly, make sure you disable any CPU-intensive programs like anti-virus software. A lot of times anti-virus software can go crazy and start scanning everything under the sun and it can really slow the system down. If you have anti-virus running, try disabling it and see if the delay in typing goes away.

Software – Clean Boot

If you have determined that it’s something to do with Windows, then the next step is to perform a clean boot. A clean boot basically disables all startup items and all non-Microsoft services and then starts up the computer. You can read step by step instructions on how to perform a clean boot here:

http://support.microsoft.com/kb/929135

If you find that there is no typing delay after a clean boot, then you know either a service or a startup program is causing the problem. You’ll have to follow the directions on how to enable items one by one to figure out what specific process or service is slowing down the system. It’s a little time intensive, but it’s better than having to reinstall Windows.

If you have a computer from HP or Dell, it’s probably full of bloat-ware. It may be a good idea to simply perform a clean install of Windows if you have the time, patience and knowledge. You can go through and uninstall all that extra stuff too, but it usually ends up staying in your registry.

Both WiFi and LAN Enabled

It has also been confirmed that this issue can occur if you have both WiFi and LAN enabled on your Windows PC. Go ahead and disable one network connection, then restart and see if the issue occurs.

Other Issues

1- Make sure you are not running out of hard disk space. If you are low on hard disk space, go ahead and use a program like CCleaner to delete temp files, etc. Uninstall some programs to free up space.

2- Update all drivers on your computer. A few people have said updating their graphics card and other hardware drivers fixed the problem. If you are using a special keyboard of some sort, make sure you download the latest driver for that.

3- If you’re using a wireless keyboard, try a keyboard that plugs in directly to the computer and see if the issue goes away. It could be a problem with the wireless keyboard.

4- If you’re using a laptop and getting the delay, try taking out the battery and see if the delay in typing goes away. Oddly, some people said taking the battery out fixed the issue.


"Windows 8 Tips-- Fix Delay When Typing keyboard Characters in Windows"


Reference : online-tech-tips.com

Facebook Tips: Levels of Privacy


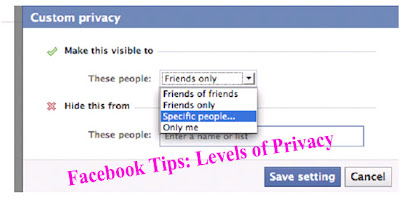
You’ll notice, as you change these settings, that there are four main  levels of privacy available.

Facebook Tips: Levels of Privacy

Here’s w hat they mean:

Everyone:  "Absolutely everyone, on Facebook or not. Includes your ex-boyfriend, grandmother, future boss, stalker, strangers, etc.

Friends of Friends:  "The people your friends are friends with but you haven't directly called a friend yourself. Includes people at the same party as you last week, best friend's co-workers, your high school friend's aunty,etc. 

Friends Only:  "Just the people who you have called a "friend" on Facebook.Customise " Here you can set a more fine-grained control over your privacy.Using names or friend lists, you can make things visible to only certain friends, limit access for certain friends or a particular setting viewable to "only me".

Facebook Tips: Levels of Privacy

Don't forget: "Posts by me" includes your status updates,links you share, photos you upload and anything else you might "post" to your wall from applications.There are good reasons for limiting all of your "posts by 
me", including:

1-Ensuring your basic priv acy is maintained even if you forget.

2-Not clogging up the new s feed of people you don’t really know.


"Facebook Tips: Levels of Privacy"


References: netsavoir.com 


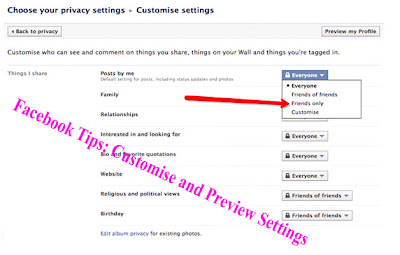
Facebook Tips: Customise and Preview Settings


To customise your basic settings, click on "customise settings" in the low er part of the page:

Facebook Tips: Customise and Preview Settings


On the "customise settings" page, the current privacy level of each setting is show n to the right of each option. Clicking it will reveal a menu where you can choose an option. These are your basic privacy controls.

Facebook Tips: Customise and Preview Settings

While you're learning about priv acy settings it's good to check that you understanev erything. There is a tool here that can help: "Preview my Profile".

Facebook Tips: Customise and Preview Settings

This prev iew shows you w hat a normal v isitor to your profile will see. If you type a friend's name in the search box it w ill show you exactly w hat that person sees when they view your profile.

GO TO HOME

This w ill come in v ery handy w hen you start experimenting with controlling privacy information. 


"Facebook Tips: Customise and Preview Settings"


References: netsavoir.com 


Facebook Tips: Friends Only-A Quick Universal Setting


Overwhelmed  already? Well, if you don’t w ant to spend a lot of time messing around with settings, the "Friend’s Only" option is a great first step.Make this change and only people you’v e allowed to see your 
profile will be able to do so.

 Browse to  Account > Privacy Settings , then click on "friends only" on the left hand side follow ed by "apply these settings".

Facebook Tips: Friends Only-A Quick Universal   Setting

This is the quickest and easiest w ay to protect your basic privacy needs on Facebook.There are many other important security features and privacy concerns to note, but this is decent, quick solution.

On the other hand, you can’t necessarily trust your friends to not share information.Always be careful about w hat you write online.


"Facebook Tips: Friends Only-A Quick Universal Setting"


References: netsavoir.com 


Facebook Tips: Remove Yourself From Facebook Search


Search Results & Google

By default, all adults can be found in search results within Facebook and v ia search engines such as Google. I f your basic privacy settings are set to "Friends Only" you’re already covered; if not, there’s a simple fix.


Remove Yourself From Facebook Search 


Go to Account > Privacy Settings, then choose "View Settings" from "Basic Directory Information". 

Facebook Tips: Remove Yourself From Facebook   Search

Under "Search for me on Facebook", choose "Friends Only" to be as secure as possible or "Friends of Friends" if you prefer. 

Either of these options will remove you from public Facebook search results, as w ell   as Google search results.

Facebook Tips: Remove Yourself From Facebook   Search


"Facebook Tips: Remove Yourself From Facebook Search"


References: netsavoir.com 


Facebook Tips: Remove Yourself from Google Search Results


I f your Facebook search availability is set to "Everyone" you can still choose to remove yourself from Google search results.

Facebook Tips: Remove Yourself from Google Search   Results


To remov e yourself from Google search results, go to you r  Account > Privacy Settingsand choose "Applications and Websites". Choose the "Public Search" section, then "Edit Settings".

Facebook Tips: Remove Yourself from Google Search   Results


Deselect the option to "Enable Public Search".


"Facebook Tips: Remove Yourself from Google Search Results"


References: netsavoir.com 


Facebook Tips: Controlling “Places”


Facebook Places is Facebook's geolocation feature. When it w as deployed, all Facebook users were automatically set to publicly reveal their location.

Not only that, but friends are able to tag users as being at a certain location, meaning even users not intending to tag themselves could suddenly find their location is public on Facebook

Go to Account > Privacy Settings, then change your setting for "Places I check in to" 
to whatever you're comfortable with.

Then uncheck the option to "Include me in 'People here now' after I check in". 

Facebook Tips: Controlling “Places”


Facebook Tips: Controlling “Places”


"Facebook Tips: Controlling “Places”"


References: netsavoir.com