Windows 8 Tips-- Change Lock Screen Image in Windows 8


I’ve been playing around with Windows 8 and one thing that kind of bothers me is the fact that there are two sets of settings/features: one for Windows and one for the Metro UI. It’ almost like two different versions of Windows mushed into one.

For example, there is a Metro version of Internet Explorer and also a regular Windows Desktop one that we are all used too. Two versions of IE in Windows 8! I don’t see how people are not going to get super confused. Anyway, they also have two sets of settings, one for Metro and one for Windows. So when I wanted to change the lock screen image on the Metro UI, I naturally went to the desktop and right-clicked and chose Personalize. Unfotunately, there was nothing there about a lock screen image.


Change Lock Screen Image in Windows 8

These are apparently just the Windows settings, so you can change the desktop background here, the sounds, the screen saver and the way the dialog boxes and windows look, but nothing related to the Metro interface. In order to do that, you have to open the Charms bar by pressing Windows Key + C or moving your mouse to the upper right hand corner. Then go ahead and click on Settings:

Change Lock Screen Image in Windows 8

At the very bottom, click on Change PC Settings. You’ll see there is an option at the top called Personalization, but that will just take you to the Windows settings dialog I took a screenshot of above.

Change Lock Screen Image in Windows 8

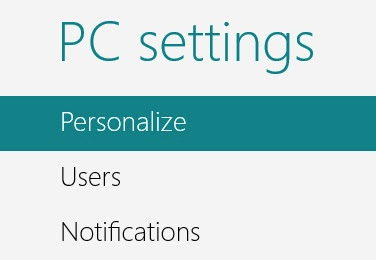
Now on the left, you should be under the Personalize option. Yes they called it Personalize too! So now people are really going to get confused.
 Change Lock Screen Image in Windows 8

On the right hand side, you’ll see an option for Lock Screen. This is where you can actually change the Lock Screen image in Windows 8.

 Change Lock Screen Image in Windows 8

You can either pick one of the images that they already have or you can go ahead and select your own image by clicking on the Browse button. Here is where you can also control which apps are able to display notifications even when Windows 8 is locked.

Change Lock Screen Image in Windows 8

Click on the + icon and you’ll get a list of apps that support sending notifications. As of right now, it’s just a few of the default Metro apps that ship with Windows 8, but eventually as developers write more Metro apps, you’ll be able to add those to your lock screen. So again, remember that everything is Windows 8 is split between the normal desktop and the new Metro UI and pretty much all their settings and features are separate too. Enjoy!


"Windows 8 Tips-- Change Lock Screen Image in Windows 8"


Reference : online-tech-tips.com


Windows 8 Tips-- Shutdown and Restart Windows 8


I need to actually write a post about how to shutdown and restart a PC. That’s pretty sad, but required. With Windows 8, turning off your PC or restarting it is not as simple as it used to be. Actually, it takes a lot more effort to restart/shutdown in Windows 8 than it ever did in Windows XP, Vista, or 7. Not really sure why Microsoft made it that way, but I’m guessing it’s because of the whole Metro interface.

Everything is full-screen and looks nice and clean with very little clutter. However, now you have to go searching for options and settings that used to be one click away. In this article, I’ll quickly show you how to get to the right place to restart or shutdown your PC. One way is the Charms bar, which is very slow. I’ll also mention how you can add Shutdown and Restart shortcuts to the Start Screen.

Basically, the Charms bar is where you need to go in order to power down the machine. You can get to the Charms bar from any full-screen app, from the desktop or from the Start Screen itself by hovering your mouse in the top-right corner of the screen. If you prefer a keyboard shortcut, press Windows Key + C.

Once the Charms bar shows up, go ahead and click on the Settings button.

Shutdown and Restart Windows 8


Then at the bottom of the settings screen, click on the Power button at the bottom:


Shutdown and Restart Windows 8

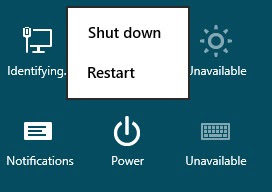
Then you’ll see two options, Shutdown and Restart!


Shutdown and Restart Windows 8

Ok so that’s the lame way to restart and shutdown your PC. You would think Microsoft would have thought to add the options to the Start Screen since that is the central point of the operating system! But they didn’t! Luckily, we can add them ourselves. Here’s how. Right-click on the desktop and choose New – Shortcut.

Shutdown and Restart Windows 8

Then in the location field type the following to shutdown the computer:

shutdown /p
to restart the computer, type:

shutdown /r /t 0
Click Next and give your shortcut a name that is appropriate like Shutdown or Restart.

 Shutdown and Restart Windows 8


Now all you have to do is right-click on the new shortcut and choose Pin to Start.


 Shutdown and Restart Windows 8

Now when you go to your Start Screen, you’ll see it added there. You can also simply drag it if you want it in a different position.

 Shutdown and Restart Windows 8

And if you take my suggestion, go ahead and add it to your taskbar. That way you if you are in a full-screen Metro app, you can restart or shutdown by going to the Start Screen and if you’re on the desktop you can do it via the taskbar quickly. Enjoy!


"Windows 8 Tips-- Shutdown and Restart Windows 8"


Reference : online-tech-tips.com


Windows 8 Tips-- Adjust Windows 8 Firewall Settings


In Windows 8, the Windows Firewall hasn’t changed very much. Overall, it’s pretty much the same. Inbound connections to programs are blocked unless they are on the allowed list. Outbound connections 
are not blocked if they do not match a rule. You also have a public and private profile for the firewall and can control exactly which program can communicate on the private network as opposed to the Internet.


In this article, I’ll go through the various options and settings for the Windows 8 firewall and talk about how you can adjust them to your desire. Even though outbound connections are not blocked by default, you can configure your own firewall rules in Windows 8 to block outbound connections. This can be useful if you want to block an IM app from being able to communicate with the server, even if someone installs the 
program on the computer.


To get started, let’s talk about how to bring up the firewall settings in Windows 8. First, go to the Start Screen or the desktop and open up the Charms bar. You can press Windows Key + C or you can move your mouse to the top right corner of the screen. Then click on Search and type firewall in the search box.


 Adjust Windows 8 Firewall   Settings

Then click on Windows Firewall in the search results on the left hand side. This will bring up the Windows Firewall Control Panel dialog. Here we can adjust just about all of the settings related to the firewall.

 Adjust Windows 8 Firewall   Settings

On the right hand side, it splits the view into Private networks and Guest or public networks. Your home wireless network should show up under Private networks, but if it doesn’t, then you will probably have to manually tell it that the network is a Home network and not a Public network. 

The main thing people will want to do with the firewall is allow an inbound connection to a program. You can do this by clicking on Allow an app or feature through Windows Firewall.

Adjust Windows 8 Firewall   Settings


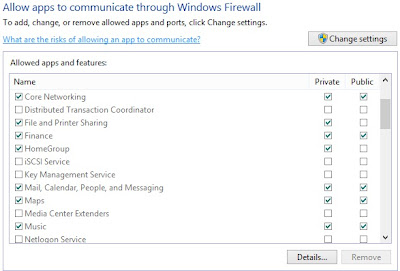
As you can see, for each program or feature of Windows you can choose to allow incoming connections on the private and public networks separately. This is handy for things like File and Printer Sharing and Home Groups since you probably would not want someone from the Internet to connect to your network share or local Home Group. 

To allow an app, simply find it in the list and then check the box for which type of network you want to allow incoming connections on.If the app is not listed, you can click on the Allow another app button and pick from a list or click the Browse button to find your program specifically.

Adjust Windows 8 Firewall   Settings


If you go back to the Firewall home dialog, there is another link on the left-hand pane called Turn Windows Firewall On or Off. If you click on that, you’ll get a set of options like shown below:


You can of course turn off the firewall in Windows 8, but you can also bloc all incoming connections to your computer, even for allowed apps. This is actually kind of handy if you are in a public setting like a hotel or airport and you want to be extra safe while connected to the network. You can still browse the Internet using a web browser, but no program will be able to get an incoming connection from another computer on the local network or from a server on the Internet.


The real fun, though, is if you want to mess around with the advanced firewall settings. This is obviously not for the faint of heart, but it’s also not a big deal because you can click the Restore Defaults link and set everything back to the way it was when you first setup Windows 8. 

To get to the advanced settings, click the Advanced settings link in the left-hand pane on the firewall main dialog. This will bring up the Windows Firewall with Advanced Security window:

 Adjust Windows 8 Firewall   Settings


On the main screen, it gives you a quick overview of your firewall settings for the domain, private networks, and public networks. If your computer is not joined to a domain, you don’t have to worry about that profile. You can quickly see how inbound and outbound connections are managed by the firewall. If you want to block an outbound connection, click on Outbound Rules in the left-hand column.

 Adjust Windows 8 Firewall   Settings


Go ahead and click on New Rule and then you’ll get a dialog asking what type of rule.

 Adjust Windows 8 Firewall   Settings

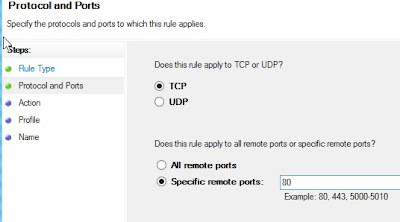
I chose port because I want to block all outgoing connections on port 80, the HTTP port used by every web browser. In theory, this should block all Internet access in IE and other browsers. Click Next and type in the port number.

Adjust Windows 8 Firewall   Settings

Click Next and choose the action you want to perform, in my case, Block the connection.

Adjust Windows 8 Firewall   Settings


Finally, choose which profiles you want the rule to apply too. It’s probably a good idea to just pick all the profiles.

 Adjust Windows 8 Firewall   Settings

Now just give it a name and that’s it! When I open IE to visit a webpage, this is what I get:

Adjust Windows 8 Firewall   Settings

Sweet! So I just created a new outbound connection rule in Windows 8 firewall that blocks port 80 and 
therefore prevents anyone from browsing the Internet! You can create your own custom firewall rules in Windows 8 following the steps I showed above. Overall, that’s pretty much all there is to the firewall. You can do more advanced stuff, but 

I wanted to give a decent overview that even non-technical people can try to follow.If you have any questions about configuring the firewall in Windows 8.


"Windows 8 Tips-- Adjust Windows 8 Firewall   Settings"


Reference : online-tech-tips.com


Windows 8 Tips-- Add Printer in Windows 8


Playing around with Windows 8 recently? If so, you might have come around to adding a printer! I recently installed Windows 8 and went ahead and installed two wireless printers that I have on my home network. Overall, the process was pretty easy and I did not run into any problems.

In this post, I’ll go through the steps to install a printer in Windows 8. To get started, you’ll need to open the Control Panel. You can read my previous post on different ways to access the 

Control Panel in Windows 8 now that the Start Button is gone.Once you are there, click on Devices and Printers.

Add Printer in Windows 8


You may have to change the view to Small icons in order to get the same view I have above. I find it much easier than the default category view, which doesn’t show you all the Control Panel applets.


 Add Printer in Windows 8


Here you’ll see a list of devices, multimedia devices and printers installed on your Windows 8 machine. To add a new printer, click on the Add a printer link at the top.

 Add Printer in Windows 8


This will bring up the Add Printer dialog, which automatically starts searching for printers on the local network. In my case, it found both of my wireless network printers. Choose the printer you want to install and click Next. Note that is feature was not available in versions of Windows prior to Windows 7.

Add Printer in Windows 8

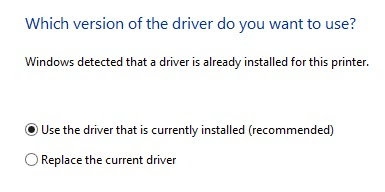
It will then ask you which version of the driver you want to install if one has already been detected on the system. Windows 8 comes with a bunch of pre-installed driver for a lot of printers, so most of the time you won’t have to pull out a driver CD or download a driver from the website as Windows will already have it on the system. Of course, it’s probably a good idea to go ahead and get the latest version directly from the 
printer manufacturer, but you don’t have to if it’s not needed.

Add Printer in Windows 8

Next give your printer a name, otherwise it will be called something crazy like mine was “Brother Laser Leg Type1 Class Driver”. On the next screen, it’ll ask you if you want to share your printer on Windows 8:


Finally, you can try to print the infamous test page!


That’s about it! You should now have a printer installed on your system ready to print from those fancy Metro apps! If you have any problem installing a printer in Windows 8, post a comment here and I’ll try to help.


"Windows 8 Tips-- Add Printer in Windows 8"


Reference : online-tech-tips.com


Windows 8 Tips-- Change Startup Programs by MSCONFIG


To change the startup programs in Windows XP and Windows 7, you had to open the System Configuration utility by clicking on Start, then typing in MSCONFIG. Clicking on the Startup tab showed you all of the startup items and you simply unchecked the ones you didn’t want to load when Windows boots.


 Change Startup Programs by MSCONFIG

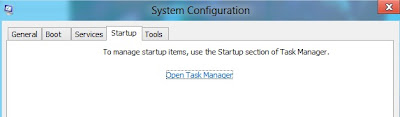
In Windows 8, if you open MSCONFIG and click on the Startup tab, you now will see a message that it has been moved.


 Change Startup Programs by MSCONFIG


Thankfully, Microsoft decided to at least keep the tab there and redirect users to the new location otherwise lots of people would suddenly be wondering how to manage startup items! In Windows 8, the startup items have moved to the Startup section of Task Manager. Click the Open Task Manager link.


 Change Startup Programs by MSCONFIG


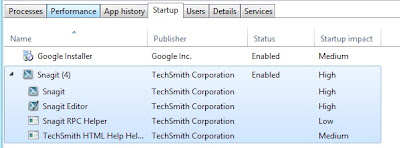
As you can see, I only have one startup item on my Windows 8 system right now. The new thing about Windows 8 is that it also tries to give you a “Startup impact” value so you can quickly see if one particular startup item is really slowing everything down. The values are High, Medium and Low. After a few restarts, you should start seeing the value instead of Not measured.


 Change Startup Programs by MSCONFIG

To disable a startup program in Windows 8, you have to right-click on the item and choose Disable. No more check boxes!


 Change Startup Programs by MSCONFIG


So that’s about it. A slightly different procedure in Windows 8, but overall not a lot of change. Another new thing you might have noticed is that it will actually group all the related processes together (Snagit screenshot above) and tell you the impact of each process. Unfortunately, you can’t disable each item individually, 
but have to disable the entire group. Maybe before the final release of Windows, they will change it so you can disable individual items in a group. Enjoy!


"Windows 8 Tips-- Change Startup Programs by MSCONFIG"


Reference : online-tech-tips.com


Windows 8 Tips-- Windows 8 Metro Apps ,Refresh Your PC


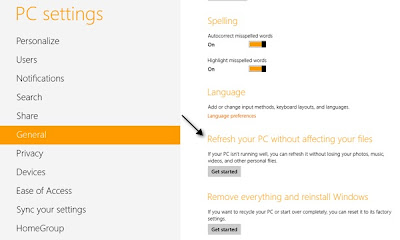
The last thing you can try is to refresh your PC. You can do this by going to the Metro settings again and then clicking on General. Here you’ll see an option to refresh your PC.


Windows 8 Metro Apps ,Refresh Your PC


Of course, the last last resort is to reinstall Windows, but that’s not a very good choice. If you’re still having issues with Metro apps not opening in Windows 8, post a comment here and we’ll help.


"Windows 8 Tips-- Windows 8 Metro Apps ,Refresh Your PC"


Reference : online-tech-tips.com


Windows 8 Tips-- Windows 8 Metro Apps,Uninstall/Reinstall Metro App


The next thing you can try is to uninstall the app and then reinstall it. You can do this by going to the Start Screen and right-clicking on the app. You’ll see a few icons pop up at the bottom Click Uninstall.

 Windows 8 Metro Apps,Uninstall Reinstall Metro App

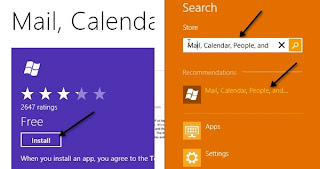
Now to reinstall, go to the Start Screen again and click on the Store tile. Once you’re in the store, you have to open the Charms bar and click on the magnifying glass to search. Type in Mail or Calendar, etc and you’ll see one item under Recommendations.

 Windows 8 Metro Apps,Uninstall Reinstall Metro App

Basically, Mail, Calendar, People and Messaging all get installed together. So if you had to uninstall one of those apps, just click Install once to get all the apps. I’m guessing if the others are still installed, it won’t reinstall those again, but not sure.


"Windows 8 Tips-- Windows 8 Metro Apps,Uninstall/Reinstall Metro App"


Reference : online-tech-tips.com


Windows 8 Tips-- Windows 8 Metro Apps,Connect to External Monitor


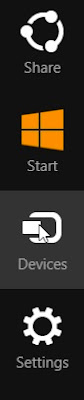
The problem I had was the fact that I installed Windows 8 on a netbook and apparently the resolution on that netbook was not high enough to support Metro apps! Go figure! Anyway, I connected it to an external LCD monitor and then opened the Charms bar and clicked on Devices and then chose Second Screen 

Only. This turned Windows 8 off on the small netbook screen, but displayed it on my 22 inch LCD monitor.


Windows 8 Metro Apps,Connect to External Monitor


After that, I changed the resolution to the highest possible and all the apps started loading fine even though they were running off the netbook! Kind of pointless to have a system setup like that, but it works!


"Windows 8 Tips-- Windows 8 Metro Apps,Connect to External Monitor"


Reference : online-tech-tips.com


Windows 8 Tips-- Windows 8 Metro Apps,Log in Using Local Account


If you notice certain apps not loading like Mail, Calendar, and Contacts, it might be because of a problem with the Windows Live login system. In Windows 8, you can log into your PC using your Windows Live ID, which they really want you to do or login using a local ID like you have in all previous versions of Windows.

Obviously, anything new is going to have bugs and this is one of those new frtures. Go to the Metro UI Settings and then click on Users. If you don’t know how to get to Metro UI settings as opposed to Windows settings, don’t worry, you’re not the only one. Read my previous post on how there are two sets of settings in Windows 8, one for Metro and one for Windows.


Windows 8 Metro Apps,Log in Using Local Account


Go ahead and click on the Switch to local account button. Now go ahead and try to open the Mail, Calendar or Contacts app and see if you can get in. If so, it’s a problem with the Live ID system and you may have to try it again later on. You’ll see the option change to Switch to Microsoft Account.


"Windows 8 Tips-- Windows 8 Metro Apps,Log in Using Local Account"


Reference : online-tech-tips.com
Windows 8 Tips-- Windows 8 Metro Apps,Remove an Update


On the other hand, if you just installed some Windows updates and now you can’t open Metro apps, you may have to uninstall those updates. You can do that by going to Control Panel and then going to Programs and Features.


Windows 8 Metro Apps,Remove an Update

Click on View installed updates and you’ll see the list of updates show up on the right hand pane.


Windows 8 Metro Apps,Remove an Update

Remove the updates and then see if you can open your Metro apps now.


"Windows 8 Tips-- Windows 8 Metro Apps,Remove an Update"


Reference : online-tech-tips.com


Windows 8 Tips-- Windows 8 Metro Apps,Run Windows Update


If the troubleshooter didn’t find any issues, then the next thing you can try is to run Windows Update and install all the updates. Microsoft is constantly releasing fixes and updates to drivers, etc, so your problem may be solved by simply performing an update.


Windows 8 Metro Apps,Run Windows Update


Make sure to go ahead and restart the computer after installing any updates. See if the problem goes away.


"Windows 8 Tips-- Windows 8 Metro Apps,Run Windows Update"


Reference : online-tech-tips.com


Windows 8 Tips-- Windows 8 Metro Apps,Run the Troubleshooter


Microsoft is aware that certain apps won’t run in Windows 8 because of an incorrect resolution, incorrect permissions, or incorrect security or account settings. You can download the troubleshooter here:


 Windows 8 Metro Apps,Run the Troubleshooter


Windows 8 Troubleshooter

The troubleshooter will automatically fix common problems that can cause apps to not load in Windows 8. This is the easiest way to fix the problem if you’re having it. If you’re still having issues even after running the troubleshooter, keep reading.


"Windows 8 Tips-- Windows 8 Metro Apps Fail-Run or Open"


Reference : online-tech-tips.com

Windows 8 Tips-- Windows 8 Metro Apps Fail-Run or Open


As you can probably see by the number of posts on Windows 8, I’ve been playing around with the it lately ahead of the final release at the end of the year. Today I ran into an interesting problem. I loaded up Windows 8 on a netbook just to see how well it would run and when I tried to launch one of the Metro apps, nothing happened. It just would not load the app.

I figured maybe Windows had crashed or something, so I restarted the computer, but I still was not able to run some of the Windows 8 apps. It was getting very annoying because there was no error message or anything, you just clicked and nothing happened.

Windows 8 Metro Apps Fail-Run or Open

In this article, I’ll walk you through a couple of troubleshooting steps you can take to fix the problem. If none of the solutions below fix your issue, go ahead and post a comment and I’ll try to help.


"Windows 8 Tips-- Windows 8 Metro Apps Fail-Run or Open"


Reference : online-tech-tips.com

iPhone Tip- Apps to Write on Pictures-TypeDrawing


TypeDrawing

TypeDrawing is $2, but it’s pretty awesome. It’s a typographic drawing app, which I didn’t even know existed until I found this little gem of an app. You can create some really artistic looking text on your photos using your finger and the various controls that are in the app.


iPhone Tip Apps to Write on Pictures TypeDrawing

They have a lot of controls and settings for managing color, outlines, shadows, symbols, text and lot of other stuff. You can really get creative with adding text to your photos using this app.


"iPhone Tip- Apps to Write on Pictures-TypeDrawing"


Reference : online-tech-tips.com


iPhone Tip- Apps to Write on Pictures-Photo Notes


Photo Notes

This is another app that I like quite a bit. They also have a free and pro version, but the free one does a pretty good job. You can add thought bubbles, speech bubbles and text shapes to pictures and also create interesting photo collages, which is one of it’s unique features. You can also add smileys and clipart to your photos.


iPhone Tip- Apps to Write on Pictures-Photo Notes


If you want to simply add plain text, you can do that too. It also has a nice interface and a lot of controls for color, rotation, effects, etc.


"iPhone Tip- Apps to Write on Pictures-Photo Notes"


Reference : online-tech-tips.com