TRICK--Create your business page on Facebook Registration – So easy a caveman could..well, you get the point.
There are two ways to create your business page on Facebook; in conjunction with your personal profile, or as a standalone page. This guide will explain how to set up both.
"I am already a Facebook user, but I want a page for my business”
To add a business page to your existing profile simply log in and look for the account tab in the upper right hand corner of the page. The drop down menu for this tab will have a link for Application Settings.
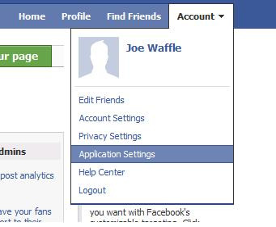
Under the application settings, look for another drop down menu on the right side and click “Authorized”. Once selected, Facebook Ads and Pages should now appear at the top of the list.

Click it and look for the “Create Page” tab. From now on, when you log into your personal account, Facebook Ads and Pages will be an easily accessible option located on the navigation column underneath your profile picture. From here, just follow the steps for first time Facebook users.

“Brand New Users – Set up a Business Page Like This”
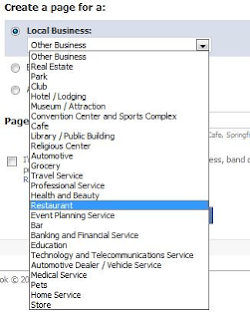
Start by visiting Facebook.com. On the right side of the page you’ll see an area where you can sign up for a personal Facebook. Underneath the text fields there is a small link that reads “Creating a page for a celebrity, band or business”. Click this link and select the tab that best describes the nature of your business.
1

2

3

Choose from a variety of options, including: Automotive, Café, Pets and Store. If none of the options are a fit, go with “Other Business”. Different settings provide unique information fields you’ll be able to fill out later which pertain to the specific nature of the business category. Make sure whatever you select is a
classification you’re happy with; at this time Facebook does not allow page owners to edit this setting.
4
In the name field type the name of your business. Wait, not so quickly! This field is pretty important. Pay special attention to wording and spelling as this will be part of how people find you and you will not be able to edit it later. If you’re the owner of “Joe’s Waffle Shack” you don’t want to go down in Facebook history as
“jois waffle shck”. This is not the same as your vanity URL, which we’ll discuss later.
Click the box underneath the field to delay having the page published right away.We’ll get to the publishing part later. This will give you a chance to look things over before making your site “live”.
Though you won’t be able to edit your selections if you find a mistake, you can always start over. Better to start over before you’re published, than after you have thousands of fans, or the profile is more developed.
Finally, finish the security prompts to prove you’re not an information seeking robot and click “Create Page”. Hold on, we’re not done yet. The next page will ask you if you already have a personal Facebook page. Click whichever applies. If you do not have a Facebook account, proceed to fill in the required information.
After a quick email confirmation, you’ll be redirected back to Facebook and see something like this.
"Behold the glory of a fresh Facebook page!Congratulations, the hardest part is over"
Okay, so maybe it isn’t so glorious yet. But you’re on the right track. Just a few more steps before you’re a (viral) marketing power house.Before we take your page to the next level, it’s important to note that you should stay away from two of the tabs in the upper right corner before you have any fans. “Create Your Profile” and “Settings” are incorporated in the interface for personal Facebook pages and will convert your business page to a personal profile
f those tabs are filled out and activated. All of the editing for your business page can be done either from the main page, or by clicking on the “Facebook” logo in the upper left corner. Clicking the Facebook logo will toggle between your page view and the administrative panel of your site.Now, let’s get to customizing!
Reference : avirtualexit.com


1 comments:
that is nice trick,
i like that.
Facebook App Developer | Facebook Game Development