Showing posts with label Windows 7 tips and tricks. Show all posts

windows tips---Your computer Hosts File in Windows and How Can You Use It.

The hosts file in Windows is like an address book for your computer. It is loaded into memory (cache) when Windows starts and associates host names, such as www.google.com with IP addresses, such as 74.125.224.72 for Google. The IP address is like the telephone number for that site. 

However, so we don’t have to remember a string of numbers for every site we want to visit, we enter easy-to-remember host names.Because the computer uses IP addresses to find sites, it needs to translate the host name for a site into an IP address. If the IP address for a site is in your hosts file associated with a host name, your computer can use that to “call” the site when you enter the host name in your browser’s address bar. If not, your computer must contact a DNS (domain name server) computer on the Internet for the IP address before it can contact the site.

Initially, there are no host name/IP address associations in the hosts file. Examples of the format and layout of the IP addresses and host names are listed in the comments in the file.


If you add host names and their associated IP addresses into the hosts file for sites you visit often, access to those sites becomes faster. Your computer doesn’t have to query DNS servers on the Internet to get the IP addresses for those sites. If there are any sites that don’t have a domain name, you can enter the site’s IP address in your hosts file with a custom domain name which can serve as a “shortcut” to the site.

So how can you use a HOSTS file in Windows? Well, websites can collect various types of information about you as you surf the web. The hosts file can help block sites from tracking you, as well as block ads, banners, third-party cookies, and other annoying parts of web pages.Each computer has a host address of its own, known as the “localhost” address. The IP address for localhost is 127.0.0.1. This can be used to block sites serving ads or objectionable content by entering a site’s host name in the hosts file and associating it with the localhost IP address. That refers the host name to your own computer, which then thinks it found the site and displayed it already, even though that site was never actually contacted.

For example, DoubleClick is an ad server that, in some cases, will quietly try to open a separate connection on the current webpage and record your activity on that page as well as follow you to other sites you visit. Adding the following entry to your hosts file, prevents DoubleClick from ever serving you any ads or tracking your activity.127.0.0.1 ad.doubleclick.net

NOTE: The entries in the hosts file allow you only to block entire sites. Therefore, if you are viewing a site, any ads that are served to you by that site, cannot be blocked with the hosts file without blocking the whole site.

Another advantage of blocking ads, banners, hit counters, and other annoying webpage elements is that it can also speed up your browsing experience. You don’t have to wait for all those webpage elements to load before viewing the page.

You can set up the hosts file yourself to block websites or you can download a hosts file that is already filled out with common sites you may want to block. The following image shows a ready-made hosts file created by the MVPS site.


NOTE: You cannot use wildcards for the host names in the hosts file. For example, *.sitehostname.com will not work.

If you decide to edit the hosts file yourself, it is located in the following directory for Windows 7, Vista, and XP. The file does not have an extension, but it is a standard text (.txt) file. An easy way to open it is to open Notepad, or other text editor, first and then open the hosts file from within the editor program.

C:\Windows\System32\drivers\etc


NOTE: If you choose to download and use a ready-made hosts file, be sure to make a backup copy of the original hosts file, in case you want to use that again. The easiest way to do that is to add an extension to the original hosts file, such as .mvp (for the site from which you downloaded the file) before copying the new hosts file to the directory listed above.

The hosts file is an easy way to restrict undesirable websites from accessing your computer and tracking your web activity without using third-party software and to speed up your browsing experience for sites you visit often.


"windows tips---Your computer Hosts File in Windows and How Can You Use It."


Reference : online-tech-tips.com


Computer,Windows 7 Tips--- Fix Back Button Not Working in Internet Explorer

I recently ran into a very odd problem on one of my Windows 7 machines where the Back button in Internet Explorer stopped working! I would press back and nothing would happen! It was the oddest thing ever and this was on a fresh install of Windows 7 with IE 9. I had never experienced this problem before and had to think for a little while before I could figure out how to fix it.

In this article, I’ll mention a couple of the methods I used to try and fix the problem. What worked for me may not work for you, so go ahead and try all the different possible solutions. If you still can’t get the back button working on IE, post a comment here and I’ll try to help.


Method 1 – Disable Add-ons

The first thing to try is to disable all add-ons and see if that solves the back button problem. The easiest way to start Internet Explorer without add-ons is to click on Start, All Programs, Accessories, System Tools and then click on Internet Explorer (No Add-ons).


If that didn’t solve your problem, keep on reading through the other solutions.

Method 2 – Reset Internet Explorer

You can also try resetting Internet Explorer by clicking on the Tools button and then Internet options.


Now click on the Advanced tab and then click on the Reset button at the very bottom.


Now you will get a pop up dialog that goes through everything the reset process will do like disabling toolbars/add-ons, resetting security, privacy, and browsing settings. You can also choose to delete personal settings like the home page, search providers, accelerators, removing temporary Internet files, cookies, browsing history, saved form data, tracking data, and passwords.


I suggest deleting the personal settings too unless you really need them. Once you reset IE, restart your computer and then try browsing again and using the back button. Hopefully it works now!

Method 3 – Install Latest Updates

Apparently, this problem has been around for a while, so go ahead and install the latest Windows updates as there could be a fix for it in one of the updates released. If your computer is up-to-date and you’re still having the Back button problem, keep reading.

Method 4 – Alt Key & Refresh Button

Some people have noted that this back button problem happens with Google AdSense ads or other types of widgets running on a webpage. When you click back, it’s actually working, but it’s going through a bunch of ads instead of the last web page you visited.

A couple of people suggested pressing the Alt key + back button or pressing the Refresh button and then pressing back. Give them a try and see if either solution works. Obviously, it’s not an ideal solution, but if you don’t have the problem all the time or have it on certain websites only, then you can use these tricks.


Method 5 – Uninstall and Reinstall IE

The last thing you can try is to uninstall IE completely and then reinstall it. You can do this by going to Control Panel, Programs and Features and clicking on Turn Windows features on or off. Go ahead and uncheck Internet Explorer 9 and then restart the computer.


If you solved the problem using a different method not listed here, post a comment and let us know. Method 2 is what worked for me. Hopefully, something here fixes your problem. Enjoy!


"Computer,Windows 7 Tips--- Fix Back Button Not Working in Internet Explorer"


Reference : online-tech-tips.com


Computer Tips: Windows 7 Start Orb Changer

For some reason, I didn’t know until this point that you can change the start orb in Windows 7 to something other than the default one! Considering I use Windows all the time and customize just about everything, it’s pretty sad I didn’t know about this!

Anyway, there are a few nice freeware programs that you can use to customize the start orb with some crazy looking graphics.

Computer Tips: Windows 7 Start Orb Changer

Nice! Of course, the only thing with these types of customizations is that it requires system files to be changed. Normally, things go fine and all is well, but sometimes things can go awry and you could end up with a corrupted Windows machine that you can’t log into anymore! So be careful when using this software and make sure you have a backup of everything before trying it.

Door2Windows Start Orb Changer


Computer Tips: Windows 7 Start Orb Changer

This free program seems to have the most options for changing the orb. You can change the default, the hover image and the pressed image. You can also choose between patching memory or editing resources to change the orb. You can download it here:

http://www.door2windows.com/windows-7-start-button-changer-change-your-windows-7-

start-button-with-one-click/Start Button Changer by The Windows Club

Computer Tips: Windows 7 Start Orb Changer


The guys over at The Windows Club always release some really useful utilities, one of those being the start button changer. It’s free and they have instructions on how to use the program properly and what to do if something goes wrong. You can download it here:

http://www.thewindowsclub.com/windows-7-start-button-changer-released

So those are pretty much the only two programs out there that let you change the start orb and I think they are both written by the same person! Anyway, you will also need to find a good start orb image unless you are a pro at Photoshop. Here are some links to free start orb images:

http://browse.deviantart.com/customization/skins/windows7/startorbs/

http://browse.deviantart.com/customization/skins/windows7/startorbs/?q=Bar

http://www.vikitech.com/3193/50-start-orbs-for-windows-7

http://www.sevenforums.com/themes-styles/34951-custom-start-menu-button-collection.html

If you go to DevianArt and just search start orb, you’ll also find a lot of individual artists who have created start orbs that you can download for free. And that’s pretty much it! If you like to customize your Windows 7 desktop, this is probably one of the better customizations since you see that start button all the time! Enjoy!


"Computer Tips: Windows 7 Start Orb Changer"


Reference : online-tech-tips.com


Windows 8 Tips-- Mac OS X Mountain Lion Requirements and Windows 8


Being mid June, we’re already half way through the year. For many tech gurus and everyday consumers alike, the next half of the year will be a time of operating system updates. With Mac OS X Mountain Lion due in July and Windows 8 due by Q4 of this year, PC and Mac users have some exciting things to look forward to. However, will your current computer meet the requirements to run the next gen operating systems from Microsoft and Apple.

Windows 8 Tips-- Mac OS X Mountain Lion Requirements and Windows 8

Normally when a new operating system is released, it offers a significant redesign and several new features. This is definitely the case with Windows 8, but Apple’s OS X Mountain Lion won’t feature as many drastic changes.Windows 8 Requirements Microsoft, being mainly a software company (as far as Windows is concerned), has made significant efforts to keep the requirements for running Windows 8 low. This way, the company will simply be able to sell more copies of Windows 8 to more customers, without customers having to purchase new computers in order to run the operating system.

 The Windows team’s optimization efforts have been able to keep Windows 8 system requirements to a quite similar recommendation of Windows 7.Microsoft recommended system requirements for running Windows 8 are as follows:

Processor (CPU) – 1GHz processor or faster
Graphics (Video) – DirectX 9 graphics device with WDDM 1.0 drive or greater
RAM memory – 1GB (32-bit), 2GB (64-bit)
Hard drive – 16GB (32-bit), 20GB (64-bit)

Keep under consideration that those are the minimum requirements that are recommended for a Windows 8 based computer. A machine with the above specs is capable of using Windows 8 as an operating system, but it may not be the smoothest experience.

I tried running Windows 7 on a computer with a > 1GHz processor (Pentium 4), a decent graphics card, 1GB of RAM and a hard drive beyond 20GB. It worked, but it was incredibly slow.As mentioned above, Microsoft’s requirements seem a bit low, but if they market Windows 8 with those requirements, it will help sales.

 For a more optimal Windows 8 environment, you may want to consider…Recommended specs:

Processor (CPU) – Core Duo, Core 2 Duo, Core 2 Quad, i3, i5, i7
Graphics (Video) – Dedicated Graphics or newer model Integrated graphics. 128 MB of video RAM and up.

RAM memory – 2GB (32-bit), 4GB (64-bit)
Hard drive – 64GB or higher (32-bit), 64GB or higher (64-bit)
Mac OS X Mountain Lion

Mac OS X operating system releases can be a bit different than Windows, as far as system requirements. For Mac OS X Mountain Lion, Apple recommends the following system requirements:
OS X 10.6.8 (Snow Leopard) or later (upgrade from…)
2GB of RAM memory
8GB of available hard drive space
Some features require an Apple ID

Some features require an internet connection Apple specifically lists compatible Mac computers that can run Mountain Lion. Because OS X is made specifically for Mac computers only, Apple has provided the following…

Mac OS X Mountain Lion is compatible with the following Mac products:

iMac – mid 2007 models and newer.
MacBook – late 2008 aluminum, early 2009 and newer.
MacBook Pro – mid/late 2007 and newer.
MacBook Air – late 2008 or newer.
Mac mini – early 2009 or newer.
Mac pro – early 2008 or newer.
Xserve – early 2009.

These supported Mac OS X Mountain Lion compatible models are likely specified due to tech specs; and as you can tell from the above list, each particular Mac has different compatibilities with Apple’s next gen OS.
Additionally, specific features that will be offered by Mountain Lion will only be supported by newer Mac computers also:

Windows 8 Tips-- Mac OS X Mountain Lion Requirements and Windows 8

Thank you for stopping by the site for today’s post. If you plan on installing Windows 8 on your PC, you very likely won’t have to purchase a new PC; and if you want to install Mac OS X Mountain Lion on your Mac, it will have to be a 2007 or newer model (depending on specific Mac).


"Windows 8 Tips-- Mac OS X Mountain Lion Requirements and Windows 8"


Reference : online-tech-tips.com


Windows 8 Tips-- Assign Static IP Address Windows 8


So what is a fairly simple task in Windows 7 turns out to take a bit of time in Windows 8. What task might that be? Hmm, maybe changing the IP to a static IP address! Granted, 80% of the extra time it takes to do it in Windows 8 is because of the new Metro UI, which makes it difficult to even get to the Control Panel easily.

In this article, I’ll walk you through the steps necessary to configure a static IP address in Windows 8. Along the way, I’ll mention a few things about Windows 8 and how you can make it a little less frustrating. For example, it’s nice to just add the Control Panel to your desktop rather than going through the whole Metro UI.

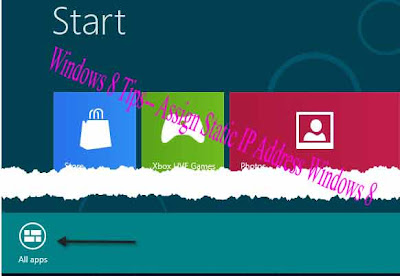
To get started, let’s go to the Start Screen. You can do that by moving your mouse to the lower left part of the screen (where the start button used to be), opening the charms bar by moving your mouse to the upper right corner of the screen and clicking on Start, or by simply clicking on the Windows key on your keyboard.Once on the Start Screen, right-click on a blank space and you’ll see the All Apps icon appear at the bottom.

Windows 8 Tips-- Assign Static IP Address Windows 8

Now you will see Control Panel if you scroll to the right side.

Windows 8 Tips-- Assign Static IP Address Windows 8

Go ahead and right-click on Control Panel and you’ll see it gets checked and a few options appear at the bottom of the screen. Go ahead and click Pin to Start and Pin to Taskbar. You may have to right-click on it again to do both.

Windows 8 Tips-- Assign Static IP Address Windows 8

Now you can open the Control Panel from the Windows 8 desktop or from the Start screen. Open the Control Panel and click on Network and Sharing Center.

Windows 8 Tips-- Assign Static IP Address Windows 8

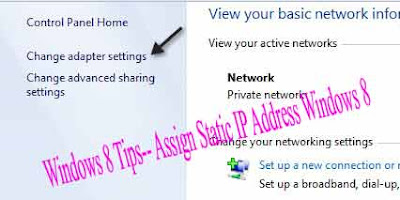
Now click on Change Adapter Settings in the left-hand pane.

Windows 8 Tips-- Assign Static IP Address Windows 8

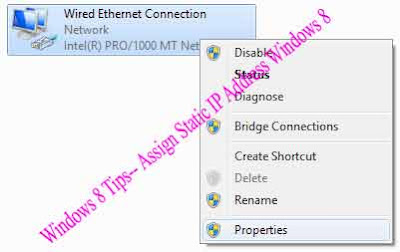
Right-click on the network adapter you want to make static and click on Properties.

Windows 8 Tips-- Assign Static IP Address Windows 8

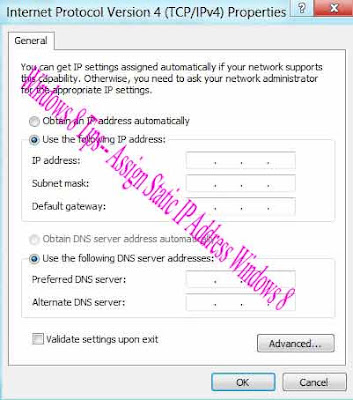
Now click on Internet Protocol Version 4 (TCP/IPv4) and then click on the Properties button.

Windows 8 Tips-- Assign Static IP Address Windows 8

Finally, click on Use the following IP address and type in your static IP address. Whew!! That’s a long process for something so simple.

Windows 8 Tips-- Assign Static IP Address Windows 8

And that’s it! Yes a little long and drawn out, but it’s the same process once you get into the Control Panel. If you have any issues or problems, post a comment and we’ll try to help.


"Windows 8 Tips-- Assign Static IP Address Windows 8"


Reference : online-tech-tips.com


Windows 8 TIPS: Troubleshoot Adobe Flash Player Has been crashing Stopped Working


Upon upgrading to the latest version of Adobe Flash Player on my windows computer, Flash Player has been crashing randomly, but more so when I use a web browser. Each time it crashes, it prompts an error message similar to Adobe Flash Player has stopped working. This is quite annoying, but it’s not too difficult to troubleshoot.

Windows 8 TIPS: Troubleshoot Adobe Flash Player Has   been crashing Stopped Working


Clicking the Check online for a solution and close the program button wasn’t able to fix the Adobe Flash Player 11.3 r300 code.

To get the Adobe Flash Player has stopped working error problem solved, there are a few basic steps that you can take that should fix the problem the majority of the time.

1. Restart Windows

Simply restarting Windows seems to fix basic error messages a lot of the time. By performing a Windows reset, you are clearing your computer’s RAM memory and also restarting many core services, programs and applications. 

Whenever some stupid error message pops up on the screen, for any program, one of the first things that you can do to troubleshoot the problem is to restart your PC.

Windows 8 TIPS: Troubleshoot Adobe Flash Player Has   been crashing Stopped Working

2. Edit Flash Player Settings and Permissions.In Windows, you can edit Adobe Flash Player settings from a web browser using the Flash Player Help website.Using the Settings Manager, located towards the left of the screen, begin checking Flash Player settings for Global, Website, Protected etc.

Windows 8 TIPS: Troubleshoot Adobe Flash Player Has   been crashing Stopped Working


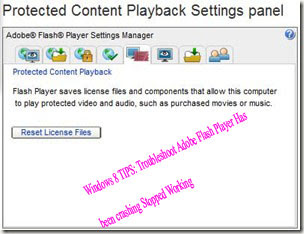
Try toggling on/off some of the settings. Under the Protected Content Playback Settings panel, try Resetting License Files. You may also want to try Deleting all sites under the Website Storage Settings panel.

Windows 8 TIPS: Troubleshoot Adobe Flash Player Has   been crashing Stopped Working


3. Reinstall Adobe Flash Player

Reinstalling Flash Player is usually effective in fixing random error messages. This worked for the Adobe Flash Player error that kept popping up on my PC. You can uninstall Flash Player from the Windows Uninstaller pane, located at Start > Control Panel > Uninstall a Program.However, Adobe recommends that you uninstall Flash Player using a specific uninstaller which you can download

The Uninstall Flash Player for Windows website provides a link for the uninstaller and some additional steps for completely uninstalling the software in Windows.

Windows 8 TIPS: Troubleshoot Adobe Flash Player Has   been crashing Stopped Working

Once you have completely uninstalled Adobe Flash Player, the next step is to check for any new available Windows Updates. If Windows does find updates, install them prior to reinstalling Flash Player.

To reinstall the software, jump to the Adobe Downloads page and download the latest version. Proceed to reinstall Flash Player on your PC.The above Adobe Flash Player has stopped working troubleshooting steps should hopefully help you to get Flash Player up and running without crashing on your Windows PC. If Flash Player is still not operating correctly, you may also want to try running a full virus scan on your computer. If 
you have a malware or virus program on your PC, it can stop programs like Flash Player from operating correctly.

Thank you for stopping by the site for today’s post. The above steps should fix Adobe Flash Player errors the majority of the time, but if Flash Player on your PC is still getting errors, you can leave a comment .


"Windows 8 TIPS: Troubleshoot Adobe Flash Player Has been crashing Stopped Working"


Reference : online-tech-tips.com


Windows 8 TIPS: Identify Your Intel Processor-CPU in Windows


So you’re running Windows on some machine you got 3 years ago and you want to know a little bit about the processor installed, right, Well, you can always go to the system information screen in Windows by clicking on Start and typing in msinfo32. This is what you will get.

Windows 8 TIPS: Identify Your Intel Processor-CPU in  Windows


It gives you some very basic info about your CPU, but nothing very special or detailed. If you want to get extensive information about your CPU, which can come in handy in making sure your PC doesn’t get an incompatible CPU error when you install Windows 8 on it in the future! So instead, you can download the Intel Processor Identification Utility.

The utility supports everything from Windows 2000 onward. Once you install it, go ahead and run it and you’ll get a window with three dialogs. The first one is the Frequency Test. It tells you the expected and reported speed, system bus speed, and the L2 Cache Memory.

Windows 8 TIPS: Identify Your Intel Processor-CPU in  Windows


If you are over clocking your PC, then you might be different values for expected and reported speeds. The system bus is the same as the front side bus.Next, if you click on CPU Technologies, you’ll get detailed information about what your CPU supports.


Windows 8 TIPS: Identify Your Intel Processor-CPU in  Windows

Here you can see if your processor supports Intel Virtualization Technology, Intel Hyper-Threading Technology and the Intel 64-Architecture. Also, worth nothing is whether your Intel processor supports SpeedStep and SSE2. SSE2 is important because this has to be supported by the processor in order to run Windows 8. The last tab is the CPUID Data tab, which has more details about your CPU.

Windows 8 TIPS: Identify Your Intel Processor-CPU in  Windows

Here you can see the CPU Type, CPU Family, CPU ModelCPU Stepping, CPU Revision, the Level 1 and 2 caches and whether your processor supports Execute Disable Bit and Enhanced Halt State. Again, the CPU needs to support Execute Disable Bit in order to run Windows 8.Overall, the tool is very accurate and does a very good job of identifying your processor and giving you a lot of useful information. Note that trying to run this utility in a virtual machine does not seem to work so well. I tried it in a Windows 7 VM in VMWare Fusion and it returned some sort of error. If you have any questions about your processor, post a comment.


"Windows 8 TIPS: Identify Your Intel Processor-CPU in Windows"


Reference : online-tech-tips.com


Windows 7 Tips: Windows Media Player 12 Jumplist feature


twitter tips,twitter tricks,twitter tips and tricks,twitter latest updates,facebook tips and tricks,facebook tricks,facebook tips,Windows 7 Tips,Windows 7 tips and tricks,Windows 7 tips with staps


Jumplist is a great new feature in Windows 7. It can queue up recently used files of that particular application in the list which pops up on application icon in the taskbar aka Super Taskbar. It has specific Jumplist options for few applications like Outlook 2010 and Windows Media Player 12.

WMP12 makes full use of this feature provided by Windows 7, as seen in above screenshot, Jumplist for WMP12 provides:

A: Frequently Played Files in WMP12

B:  Task to Resume previous playlist

C:  Task to Play all the Music

This comes out handy most of the time and would save a lot of clicks as well.

twitter tips,twitter tricks,twitter tips and tricks,twitter latest updates,facebook tips and tricks,facebook tricks,facebook tips,Windows 7 Tips,Windows 7 tips and tricks,Windows 7 tips with staps

Further playback options can be configured from the Live preview Windows of WMP12 which gives option to Play/Pause, Next Track, and Previous Track.


"Windows 7  Tips:  Windows Media Player 12 Jumplist feature"


Reference : www.WindowsVJ.com


Windows 7 Tips: Windows Media Player 12: Preview song before adding to playlist

twitter tips,twitter tricks,twitter tips and tricks,twitter latest updates,facebook tips and tricks,facebook tricks,facebook tips,Windows 7 Tips,Windows 7 tips and tricks,Windows 7 tips with staps

Windows Media Player 12 plays more music and video than ever. Also there is a nice feature in Windows Media Player 12 which shows the preview of song before adding it to a playlist. 
Suppose you are creating a playlist “MyPlayList”. 

While selecting any song from any album the whole album replaces the current playlist and you cannot drag and drop from Album to the playlist until you have navigated to previous after previewing the song. Also when you try to play any song from the album it also prompts you for saving the unsaved “MyPlayList”. 

You can simply skip this hassle by using the preview feature provided in Windows 7.While you are selecting any song to be added in the playlist just keep the mouse over the song which you want to preview and it would show a nice tiny window where you can live preview the song skipping the procedure i mentioned earlier,like the way it was in WMP 11.Windows 7 has reduced the number of clicks and yes it is with 

Windows Media Player 12.


"Windows 7  Tips:  Windows Media Player 12: Preview  song before   adding to playlist "


Reference : www.WindowsVJ.com


Windows 7 Tips: Windows Media Player 12 Customize Playlist

twitter tips,twitter tricks,twitter tips and tricks,twitter latest updates,facebook tips and tricks,facebook tricks,facebook tips,Windows 7 Tips,Windows 7 tips and tricks,Windows 7 tips with staps

Windows media Player Navigation pane by default shows only 5 recent playlists. This can be changed to show all playlists you have. To do so switch to WMP library and right click on Playlists in navigation pane. Here click on customize navigation pane which opens a popup where you can select to display “Recent 5“or “All” playlists.

twitter tips,twitter tricks,twitter tips and tricks,twitter latest updates,facebook tips and tricks,facebook tricks,facebook tips,Windows 7 Tips,Windows 7 tips and tricks,Windows 7 tips with staps

Further Video, Music, Synch options are available there.


"Windows 7  Tips:  Windows Media Player 12 Customize Playlist"


Reference : www.WindowsVJ.com


Windows 7 Tips: Windows Application Compatibility Mode


Windows Vista onwards Compatibility mode is provided in applications. Compatibility mode allows an older application compatible for earlier versions of Windows to possibly run in Windows 7. It runs the program using settings from a previous version of Windows.
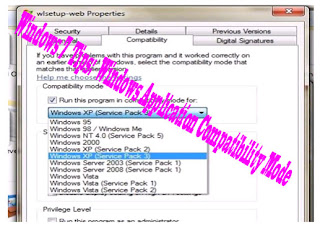
Changing the compatibility mode solves the problem most of the time which is generally crashing of an application while executing it on a newer Windows. Even If changing the Compatibility settings does not fix the problem, you need to check for an update for that application at the manufacturer's website.

1. Right click on the program's shortcut, Application file, or installation program.


2. Click on Properties. It will show properties of that application with few tabs.

twitter tips,twitter tricks,twitter tips and tricks,twitter latest updates,facebook tips and tricks,facebook tricks,facebook tips,Windows 7 Tips,Windows 7 tips and tricks,Windows 7 tips with staps


3. Click on the Compatibility tab.

4. To Run a Program in Compatibility Mode you can select compatibility mode for a previous version of Windows. Choose the one this program works well on or the one you believe this program runs well on.

5. Check the Run this program in compatibility mode Check box.

6. Now click on the drop down menu and select which version of Windows the program was made for.

twitter tips,twitter tricks,twitter tips and tricks,twitter latest updates,facebook tips and tricks,facebook tricks,facebook tips,Windows 7 Tips,Windows 7 tips and tricks,Windows 7 tips with staps

7. Few more settings can be changed to make the application more compatible. Checking the checkbox enables that particular setting. These settings are:  

Run in 256 colors  

Run in 640 × 480 screen resolution  

Disable visual themes  

Disable desktop composition 

Disable display scaling on high DPI settings  

8. Click OK to apply the changes.

twitter tips,twitter tricks,twitter tips and tricks,twitter latest updates,facebook tips and tricks,facebook tricks,facebook tips,Windows 7 Tips,Windows 7 tips and tricks,Windows 7 tips with staps


It is recommended that Compatibility mode must not be used with system applications like system drivers or antivirus as that may cause losses & risks to your data.


"Windows 7  Tips:  Windows Application Compatibility Mode"


Reference : www.WindowsVJ.com


Windows 7 Tips: User Account pictures in Windows 7


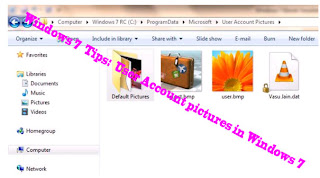
You can find the default pictures of Windows 7 user Account in a hidden folder, path given below. Also you can find Admin & guest account picture here.

A: The default Pictures are located in the hidden  C:\ProgramData\Microsoft\User Account Pictures\Default
     Pictures folder.

B: The default Standard and administrator account picture is the hidden C:\ProgramData\Microsoft\User Account Pictures\user.bmp file.

C: The default Guest account picture is the hidden C:\ProgramData\Microsoft\User Account Pictures\guest.bmp file.

twitter tips,twitter tricks,twitter tips and tricks,twitter latest updates,facebook tips and tricks,facebook tricks,facebook tips,Windows 7 Tips,Windows 7 tips and tricks,Windows 7 tips with staps


If you wish to change these simply replace them with another file up to 128 x 128 pixels in size to prevent it from being automatically cropped to fit the user picture display box.


"Windows 7  Tips:  User Account pictures in Windows 7"


Reference : www.WindowsVJ.com


Windows 7 Tips: Upgrading From Windows 7 RC to Final


The steps that were outlined for upgrading the Windows 7 beta release to release candidate were the following:

A: Download the ISO as you did previously and burn the ISO to a DVD.

B:  Copy the whole image to a storage location you wish to run the upgrade from.

C:  Browse to the sources directory.

D:  Open the file cversion.ini in a text editor like Notepad.

twitter tips,twitter tricks,twitter tips and tricks,twitter latest updates,facebook tips and tricks,facebook tricks,facebook tips,Windows 7 Tips,Windows 7 tips and tricks,Windows 7 tips with staps


Modify the MinClient build number to a value lower than the down-level build. For example, change 7100 to 7000.

E: Save the file in place with the same name. 

F:  Run setup like you would normally from this modify copy of the image and the version check will be bypassed.

twitter tips,twitter tricks,twitter tips and tricks,twitter latest updates,facebook tips and tricks,facebook tricks,facebook tips,Windows 7 Tips,Windows 7 tips and tricks,Windows 7 tips with staps

The RTM build of Windows 7 is distributed with the build number 7600. An upgrade from release candidate to RTM build would therefor require the modification of the MinClient build number from 7600 to 7100 or lower.

"Windows 7  Tips: Upgrading From Windows 7 RC to Final "


Reference : www.WindowsVJ.com


Windows 7 Tips: Twenty Windows 7 Keyboard Shortcuts


From Desktop

A:  Windows Key + Tab = Aero [press Tab to cycle between Windows]

B:  Windows Key + E = Windows Explorer is launched.

C:  Windows Key + R = Run Command is launched.

D:  Windows Key + F = Search (which is there in previous Windows versions too)

E:  Windows Key + X = Mobility Center

F:  Windows Key + L = Lock Computer (It is there from the earlier versions as well)

twitter tips,twitter tricks,twitter tips and tricks,twitter latest updates,facebook tips and tricks,facebook tricks,facebook tips,Windows 7 Tips,Windows 7 tips and tricks,Windows 7 tips with staps


G:  Windows Key + U = Ease of Access

H:  Windows Key + P = Projector

I:  Windows Key + T = Cycle Super Taskbar Items

J:  Windows Key + S = OneNote Screen Clipping Tool [requires OneNote]

K:  Windows Key + M = Minimize All Windows

L:  Windows Key + D = Show/Hide Desktop

M:  Windows Key + Up = Maximize Current Window

N:  Windows Key + Down = Restore Down / Minimize Current Windows

O:  Windows Key + Left = Tile Current Window to the Left

P:  Windows Key + Right = Tile Current Windows to the Right [Continue pressing the Left and Right keys to rotate the window as well]

Q:  Windows Key + # = Quicklaunch

R:  Windows Key + = = Magnifier

From Windows Explorer

S:  Alt + Up = Go up one level

T:  Alt + Left/ Right = Back/ Forward


"Windows 7  Tips:  Twenty Windows 7 Keyboard Shortcuts"


Reference : www.WindowsVJ.com

Windows 7 Tips: Turn off all balloon notifications


Balloon notifications can be annoying many a times. Good thing is they can be disabled easily in Windows 7. To disable balloon tips in the notification area, follow these Methods:  

1. Using GPEdit (Group Policy Editor) This setting turns off the Balloon notification in the notification area using 
Group Policy editor.

twitter tips,twitter tricks,twitter tips and tricks,twitter latest updates,facebook tips and tricks,facebook tricks,facebook tips,Windows 7 Tips,Windows 7 tips and tricks,Windows 7 tips with staps

Open Run Dialogue Box (Win + R) and type gpedit.msc Navigate to Local Computer policy > User Configuration > Administrative Templates > Start Menu & Taskbar in left hand side pane.

twitter tips,twitter tricks,twitter tips and tricks,twitter latest updates,facebook tips and tricks,facebook tricks,facebook tips,Windows 7 Tips,Windows 7 tips and tricks,Windows 7 tips with staps

Select Turn off all Balloon notifications setting from right side pane. Open it and enable it so that no notification balloons will be shown to the user. 

Press OK 

2. Using RegEdit (Registry Editor) Click Start, click Run, type regedit, and then press ENTER.Navigate to  the following  subkey:

HKEY_CURRENT_USER\Software\Microsoft\Windows\CurrentVersion\Explorer\Advanced

twitter tips,twitter tricks,twitter tips and tricks,twitter latest updates,facebook tips and tricks,facebook tricks,facebook tips,Windows 7 Tips,Windows 7 tips and tricks,Windows 7 tips with staps

Right-click the right side pane, create a new DWORD value, and then name it EnableBalloonTips.  
Double-click EnableBalloonTips, and then give it a value of 0.  Close Registry Editor.   
  
Note: To make changes to this setting effective, you must log off and then log back on.


"Windows 7  Tips:  Turn off all balloon notifications"


Reference : www.WindowsVJ.com


Windows 7 Tips: Super Taskbar


In Windows 7, the taskbar has become a super Taskbar. All things are @ tips and fewer clicks are required for access to anything. Features of Windows 7 Taskbar.  

1. You can pin frequently used programs to the taskbar

twitter tips,twitter tricks,twitter tips and tricks,twitter latest updates,facebook tips and tricks,facebook tricks,facebook tips,Windows 7 Tips,Windows 7 tips and tricks,Windows 7 tips with staps

2. You can even pin a specific document to a program using Jumplist feature. Any frequently used document can be pinned to an application. Right click application icon in taskbar to access it. 

twitter tips,twitter tricks,twitter tips and tricks,twitter latest updates,facebook tips and tricks,facebook tricks,facebook tips,Windows 7 Tips,Windows 7 tips and tricks,Windows 7 tips with staps

3.You'll see live taskbar thumbnails of each open window so you can keep track of the files and programs you're using and select them more easily. Rest your cursor on the thumbnail, and Aero Peek brings the full size window into focus.

twitter tips,twitter tricks,twitter tips and tricks,twitter latest updates,facebook tips and tricks,facebook tricks,facebook tips,Windows 7 Tips,Windows 7 tips and tricks,Windows 7 tips with staps

4. You can also close a window directly from the thumbnail preview window.

twitter tips,twitter tricks,twitter tips and tricks,twitter latest updates,facebook tips and tricks,facebook tricks,facebook tips,Windows 7 Tips,Windows 7 tips and tricks,Windows 7 tips with staps


"Windows 7  Tips:  Super Taskbar"


Reference : www.WindowsVJ.com