Computer tips: Share a Google Calendar and Tips different methods

Google Calendar is great. I can access it from any computer, sync it to my smartphone, and sync it to my desktop email app and lots more. It’s simple to use and has a ton of features. One of the nice features that I’ve only started using recently is sharing a Google calendar.

When you share a Google calendar, you can quickly give controlled access to your events to a coworker, family member or friend. In this article, I’ll show you the different methods to share a calendar and give some tips along the way.

Computer tips: Share a Google Calendar and Tips different methods

Public vs Private Calendar

The first thing you want to consider when sharing a calendar is whether the calendar is private or public. If you have a public calendar, then sharing it is super easy. Let’s start with that scenario first. In this case, all you have to do is send someone the public address for your calendar. You can do this by going to Google Calendar and clicking on the small triangle next to the calendar name.

Computer tips: Share a Google Calendar and Tips different methods

Click on Calendar Settings and then click on the calendar name in the settings page.

Computer tips: Share a Google Calendar and Tips different methods

At the bottom, you’ll see Calendar Address. Click on HTML and that is the link you would send to whoever you want to share the calendar with.

Computer tips: Share a Google Calendar and Tips different methods

Now with a public calendar, anyone can see your events. If you don’t want to do that, the other thing you can do is share your entire calendar with just certain people.

Share Google Calendar with Select People

If you have a private calendar and want only certain people to see the events on the calendar, then you have to go to sharing settings by clicking on the triangle and choosing Share this Calendar.

Computer tips: Share a Google Calendar and Tips different methods

This will take you to the sharing settings page. Here you can now type in individual email address and assign the permissions.

Computer tips: Share a Google Calendar and Tips different methods

Just type in the email address and choose from See only free/busy (hide details), See all event details, Make changes to events, Make changes and manage sharing. By default, it’s set to just viewing event details.


Computer tips: Share a Google Calendar and Tips different methods


As long as the other person is using Google Calendar, you can now share the HTML calendar address that I mentioned above with the people you gave access to. If someone else tries to go to that URL, the calendar will be empty. This is the best method if you want to share an entire calendar with just certain trusted people. But what if you want to just share one event or just a few events on your calendar and not the whole thing?

Share Individual Calendar Events

The last thing you can do is share individual events with select people. In order to do this, you have to do two things. First, click on an event on your calendar and Edit the event.

Computer tips: Share a Google Calendar and Tips different methods


Now go to the bottom and make it Public.


Computer tips: Share a Google Calendar and Tips different methods

At this point, if you were to go to the HTML address for your calendar, it would not display the event. Only people with access to your Free/Busy schedule can see these public events. You have to go to sharing settings like shown above, add the email address and then choose See only free/busy (hide details).

So those are the three ways you can share your calendar and events on your calendar with others.


"Computer tips: Share a Google Calendar and Tips different methods"


Reference : online-tech-tips.com


iPhone and iPad tips: Get Most Out of Your iPad,apps and setting

When the iPad first came out, I waited a year until they released the second version. I figured the 1st generation model would have issues that would mostly be fixed by the next iteration. So far, the iPad has been an awesome tool that I use pretty much everyday. However, it has not always been that way.

Like most people, I got the iPad and the first thing I started doing was installing apps and setting up my email, etc, etc. I used it heavily for the first few months, but then things slowly started to decline. I wasn’t sure why, but I was using my iPad a lot less! I decided to sit down and really take a look at what I needed the iPad for and what was useless.

I spent about 2 days on this project and after that I found myself using the iPad a lot more again. It was quite surprising and something I hadn’t expected. So in this article, I’ll give you some tips and pointers to maximize the potential of your awesome iPad!

iPhone and iPad tips: Get Most Out of Your iPad,apps and setting


Step 1 – App Cleanup

The first thing I did was go through a 7 pages of apps I had downloaded over the last year and removed all the useless ones and I mean really get rid of the apps I opened maybe once or twice. Don’t worry because even if you paid for an app, you can re-download any app again from iCloud later on.

On my iPad, I went from about 150 apps to about 55! That’s a lot of apps. So what’s the point of doing this? Well, I noticed that sometimes I would pick up my iPad and flip through the pages to find something to do. 80% of the time, I browsed and then just put it back down. The reason? Too many apps I really didn’t care about kept distracting me from the apps I actually use.

Also, just having that many options made my decision to pick something harder. With a lot fewer choices, I now pick something much faster and actually use the app rather than it just sitting there for months and months.

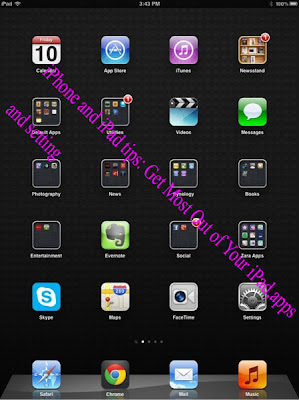
The second thing with app cleanup is organizing your apps into folders and putting those folders on the 1st page. Here’s what my home screen looks like:

iPhone and iPad tips: Get Most Out of Your iPad,apps and setting

I use the calendar, so it’s there. iTunes and App Store come in handy for buying and updating apps. Newsstand has all my magazines like Time, Reader’s Digest, etc. Default apps are all in one folder since I don’t use those that often. Then I have other stuff that I use routinely like Evernote, Skype, FaceTime, Maps, Videos, etc. Basically, 80% of the stuff that I actually use on the iPad is on the home screen now. Before the apps were all over the place and I had so many pages because I didn’t use folders to organize them properly. It’s just like keeping your computer organized, makes you want to use it more.


Step 2 – Find the Right Apps

Another thing I realized is that a lot of people could use their iPads to do things that they currently do on their computer, but they just have no clue. For example, my father checks his stocks and retirement accounts regularly, but didn’t realize that all the financial companies have iPad apps that he could use to view, manage, and even trade!

Another great example is my NAS (Network Attached Storage) device that I have at home. It’s a Synology NAS those guys are awesome because they have a couple of iPhone and iPad apps that let me stream music from my NAS to my device, play videos, download torrents, and all kinds of other cool stuff. If you didn’t know that app existed, you would be missing out on a lot of neat uses for you iPad.

Another example is if you are a paying cable customer. Using your login credentials as proof, you can watch live TV or stream movies, TV shows and lots more from apps like CNN, NBC, TNT, TBS, etc. The point is do your research on apps and you could find yourself doing everything on the iPad!


Step 3 – Get a Stand

The title may sound silly, but I have seriously started using my iPad a ton more once I got a stand for it. I’m not talking about a case that protects it, but a stand. The stands basically keep my iPad vertical rather than flat on a table all the time.

Secondly, having a stand saves my arms and actually keeps me using the iPad longer. Before, I used to just hold it in my hand, but after a while, I would get tired and just put it down. After a point, if someone called on FaceTime, I purposely would not pick up because it was such a paint to hold it for half an hour!

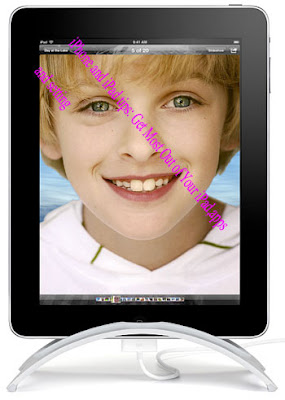
I solved these problems with two stands. These may or may not work for you, but they get the job done for me while laying in bed, while at my desk, while traveling, etc. The first is the Book Arc. It’s perfect for FaceTime because you can’t tilt it slightly upwards and downwards.

http://twelvesouth.com/products/bookarc_ipad/

iPhone and iPad tips: Get Most Out of Your iPad,apps and setting

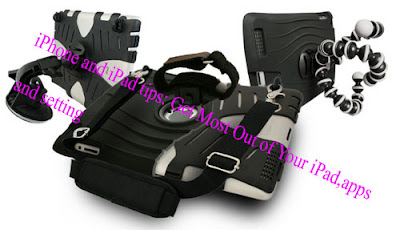
I use this thing all the time. And it’s great to watch a movie when sitting on my desk or anywhere in the house using the stand. The second stand that I use is the Flex Versatility Fit.

http://www.amazon.com/gp/product/B008GZ8KMG

iPhone and iPad tips: Get Most Out of Your iPad,apps and setting

I basically use the tripod and not the rest of the stuff. That tripod is simply awesome and you can use it anywhere. It’s especially useful when you are laying in bed and need something to hold the iPad while it sits on top of covers and blankets. This thing works amazing well. You’ll see a world of difference once you get a proper stand for you iPad.


Step 4 – Get More Apple Products

The other thing that really started getting me to use the iPad more was having other Apple products. During my time with the iPad, I bought a MacBook Pro, an iPhone and and Apple TV. My wife also got an iPhone, my brother an iPhone, my sister an iPhone and an iPad and my parents an iPad.

Now things started getting interesting. Between my own devices, it was nice to be able to take a picture on the iPhone and have it automatically appear on my iPad and MacBook Pro. It was also nice cool that I could setup the same iCloud account on my wife’s phone and anything she took also showed up automatically using Photostream. We then enabled it for my sister and parents. Now everyone could see the pictures taken by everyone else.

Not something everyone would probably want to do, but it works well for us. Secondly, it’s a lot of fun to Air Play anything on my iPhone or iPad to my HDTV at home. And with Mountain Lion, I could even Air Play anything on my MacBook Pro to the TV too.

But there are other things that make having more Apple products useful. For example, I use the Chrome browser on my Windows machine and I also have it installed on my iPhone, iPad and MacBook. Now when I open a tab on any device, it automatically shows up in Chrome on all the other devices. It’s just convenient, especially if I have to leave home and happen to be browsing a web page.

There are also lots of other benefits to having more than one Apple device and it becomes readily apparent once you start using them. If you are into games, there are a ton of multiplayer games you can play over Wifi. I’ve been whipped many times in Scrabble playing against my wife over Wifi on our iPhones.


Step 5 – Accessories

The last thing that really got me using the iPad a lot was the accessories! I quickly realized that I used the iPad a lot to read emails, but never really responded because it took too long to type. Instead, I would go to the computer and do the writing there.

But then, the Logitech Ultrathin Bluetooth Keyboard Cover came along and I snapped one of those bad boys up in a second!

iPhone and iPad tips: Get Most Out of Your iPad,apps and setting

http://www.logitech.com/en-us/tablet-accessories/ipad/ultrathin-keyboard-cover

It’s super sleek like the iPad and it works wonderfully. I understand some people say to just buy a computer or ultrabook instead of trying to turn your iPad into a computer, but it’s really not that. The keyboard just lets me type faster, it’s not about getting all the functionality of a computer. It’s way more convenient to use the iPad than it is for me to go use my 4 lb laptop. Plus, I enjoy the touch interface and how much better the apps look on the iPad than on a webpage.

The second useful accessory I bought was a stylus. It’s not something everyone needs, but it’s useful if you like to draw or write by hand. There are quite a few apps out there that work very well with a stylus and make the experience a lot more immersive.

Hopefully, these tips will help you get the most out of your iPad and make it worth all that cash you used to buy it! What are your tips? Post a comment here and let us know. 


"iPhone and iPad tips: Get Most Out of YouriPad,apps and setting"


Reference : online-tech-tips.com


Computer Tips: Setup Guide for Gmail,Outlook 2010,Ultimate Setup Guide

Up until a few days ago, I was using my MacBook Pro with the Mail app to manage all my email accounts. Unfortunately, my Mac hard drive crashed and I was left with nothing but a Windows 7 PC I had just setup a few days earlier.

Since I like using a desktop app, I ended up using Outlook 2010 for my email rather than Thunderbird or other choices. Outlook is familiar and I just like it’s interface more.However, configuring Outlook 2010 with Gmail for optimal settings is not that straight-forward. It took me a while to figure out how to get everything setup properly so that my labels showed up as folders, sent emails showed up in Gmail Sent folder, Google Calendar synced with Outlook calendar, etc.

The only thing you can’t get to work is the Drafts folder. For whatever reason, there is no way to map the Outlook 2010 drafts folder to the Gmail IMAP Drafts folder. Minor annoyance, but just so you know.Otherwise, you can get everything else working just fine. In this article, I’ll walk you through the steps to properly configure Gmail with Outlook 2010.To get started, open Outlook 2010 and click on File and then Add Account.

Computer Tips: Setup Guide for Gmail,Outlook 2010,Ultimate Setup Guide


Go ahead and choose E-Mail Account and then type in your name, email address and Gmail password. Note that if you are using Google with 2-factor authentication, you’ll need to use an application-specific 
password instead of your normal Gmail password.

Now Outlook should be able to detect all the proper settings for you and configure Gmail with the correct incoming and outgoing settings. You should get a Microsoft Outlook test message in your Gmail account 
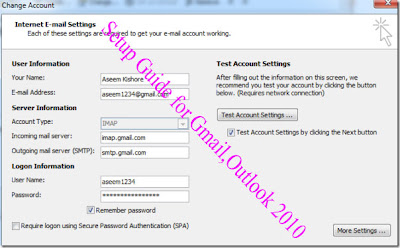
once it has finished. If, for any reason, you have to manually enter the settings for the server, here is what it should look like:

Computer Tips: Setup Guide for Gmail,Outlook 2010,Ultimate Setup Guide

Then click on More Settings to configure the rest of the settings. Click on Sent Items first and make sure you choose Do not save copies of Sent Items. If you try to save them to the Sent IMAP folder on the server, every time you send a message, you’ll see a duplicate in the Sent mail folder. Anything sent through IMAP automatically gets put into the Sent mail folder on the server, so you don’t have to save copies of sent items.

Computer Tips: Setup Guide for Gmail,Outlook 2010,Ultimate Setup Guide


Next click on Deleted Items. Here is where things get a little tricky.

Computer Tips: Setup Guide for Gmail,Outlook 2010,Ultimate Setup Guide

So there are a couple of things you can do for deleted items. The first option “Move deleted items to the following folder on the server” can be set to the Gmail Trash folder as seen above.

However, this is different than the way Gmail deletes emails. For example, if you go to the web interface and delete an email in Gmail, it will simply remove all the labels, including Inbox, and will move the email to the All Mail folder. This is kind of a catch all folder. 

So in theory, nothing actually ever gets deleted from your Gmail account.

If you choose the setting mentioned above, the email will go to the Trash, meaning it won’t show up in the All Mail folder either. Basically, it’s really gone. So make sure that’s what you really want to do.

Secondly, ONLY choose the Trash folder when choosing this option. Do not try to move deleted items to the All Mail folder or any other label. Just move it to Trash or you’ll see some funky behavior.If you want the normal behavior of Gmail, you need to select Mark items for deletion but do not move them automatically. Make sure you check Purge items when switching folders while online.

Then you need to go to Gmail, Settings and click on Forwarding and POP/IMAP. If you leave the IMAP access settings as is, then when you delete a message in Outlook and then do a purge, it will auto-expunge 
(remove the label) and move the item to the All Mail folder.

Computer Tips: Setup Guide for Gmail,Outlook 2010,Ultimate Setup Guide

You can also turn that off and then choose what you want to do when you do a purge in Outlook. You can archive (which is the default) or move it to the Trash or delete it forever. I suggest leaving Auto-Expunge on 
and having the message archived. If you really want items deleted, then choose to move deleted items to the Trash Gmail folder like shown above.

Next click on Advanced tab and these settings should be set already. Incoming server uses port 993 and SSL and outgoing server uses port 587 and TLS.

Computer Tips: Setup Guide for Gmail,Outlook 2010,Ultimate Setup Guide

The one thing you’ll want to add is [Gmail] as the root folder path. This basically removes the extra folders and makes Gmail work more seamlessly with Outlook. The only thing is that all your labels will disappear when you do this! Whoops. Not to worry.

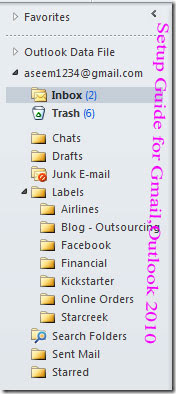
All you have to do is go to Settings in Gmail, click on Labels and create a new label called [Gmail]/Labels. You can choose anything for the word “labels”. Then, you have to move all the labels you want to see in Outlook under [Gmail]/Label. You basically have to nest those labels under the newly created label.

Computer Tips: Setup Guide for Gmail,Outlook 2010,Ultimate Setup Guide

Now your Outlook should look something like this:

Computer Tips: Setup Guide for Gmail,Outlook 2010,Ultimate Setup Guide

Pretty sweet! Now people have complained that there are times when they don’t see an updated new message count under some of their Gmail labels. The way to fix this is by scheduling a Send and Receive All every so often. You can do this by going to the Send /Receive tab and then clicking on Send/Receive Groups and clicking on Define Send/Receive Groups.

Computer Tips: Setup Guide for Gmail,Outlook 2010,Ultimate Setup Guide

Make sure that the group name All Accounts has the check box Schedule and automatic send/receive every x minutes enabled. Note that your labels will not have their new message counts updated the second you get a new email under those labels. For whatever reason, a Send/Receive has to be done and then the counts get updated. Also, click on Edit and make sure your settings match:

Computer Tips: Setup Guide for Gmail,Outlook 2010,Ultimate Setup Guide


You want to make sure that Get folder unread count for subscribed folders is checked. It would be nice if the counts were updated immediately, but they don’t. However, you can do a Send/Receive more often if you need the count updated quickly.

Now in order to get your Google Calendar synced with your Outlook calendar, just download Google Calendar Sync.

http://support.google.com/calendar/bin/answer.py?hl=en&answer=89955

Install it, type in your Google account info and choose how you want to sync:

Computer Tips: Setup Guide for Gmail,Outlook 2010,Ultimate Setup Guide

I would recommend 2-way since it allows you to add events to either Outlook or Google Calendar and they will sync automatically. After the sync is finished, you’ll see events appear in your Outlook calendar:

Computer Tips: Setup Guide for Gmail,Outlook 2010,Ultimate Setup Guide

Now for the final part, which is the most fun! Basically, starting fresh in Outlook, you will have nothing in your auto-complete list. When you go to type an email address, you’ll get no auto-complete suggestions. This kind of sucks. So how can you import your Gmail contacts into Outlook and have them show up in the auto-complete list?

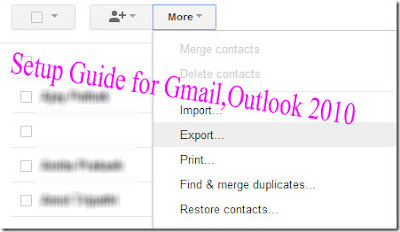
Here’s how. First, you need to go to Google Contacts and export your contacts.

https://www.google.com/contacts/u/0/#contacts

Computer Tips: Setup Guide for Gmail,Outlook 2010,Ultimate Setup Guide

Choose Outlook CSV format and choose which contacts you want to export. You can either export all (which may be a ton) or you can choose from a group. You can also create a group, add the emails to that group and then export. That way you won’t have a ton of useless contacts in Outlook after the import.

Next, go to Outlook and click on File, Open and then Import.

Computer Tips: Setup Guide for Gmail,Outlook 2010,Ultimate Setup Guide

Choose Import from another program or file and click Next.

Computer Tips: Setup Guide for Gmail,Outlook 2010,Ultimate Setup Guide

Then choose Comma Separated Values (Windows) and click Next.

Computer Tips: Setup Guide for Gmail,Outlook 2010,Ultimate Setup Guide

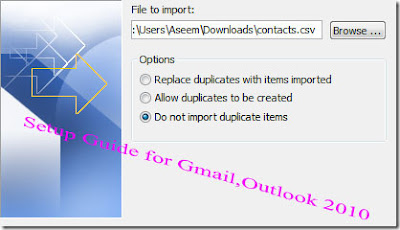
Go ahead and browse to the location of the CSV file and choose Do not import duplicate items.

Computer Tips: Setup Guide for Gmail,Outlook 2010,Ultimate Setup Guide

Choose Contacts for the destination and click Next.

Computer Tips: Setup Guide for Gmail,Outlook 2010,Ultimate Setup Guide

Click Finish and everything will be imported. Now that is step one. You’ll notice all your contacts are in the address book, but when you go to type an email, it still won’t auto-complete anything. That’s where you have to download a third-party tool called NK2View. Don’t worry about how it works, just follow the instructions below. First, shut down Outlook.

http://www.nirsoft.net/utils/outlook_nk2_autocomplete.html

Then, scroll down to the bottom of the web page and download NK2View. Then unzip it and run the EXE file. It will look something like this:

Computer Tips: Setup Guide for Gmail,Outlook 2010,Ultimate Setup Guide

Basically, whatever shows up in that list is what is currently saved in the auto-complete list. This tool lets you import anything you want! So now you can simply import the entire address book, which we just populated with all the Gmail contacts. So click on File and then click on Add Items From Address Book.

Computer Tips: Setup Guide for Gmail,Outlook 2010,Ultimate Setup Guide

Go ahead and press SHIFT + click to select all the items. Then click the To-> button at the bottom. Then click OK.

Computer Tips: Setup Guide for Gmail,Outlook 2010,Ultimate Setup Guide

That’s it! Now exit the program and open Outlook. Go to type an email and voila! Your auto-complete list will have all the emails from Gmail:

Computer Tips: Setup Guide for Gmail,Outlook 2010,Ultimate Setup Guide

Now you can enjoy Outlook 2010 nicely connected and working with your Gmail account! Hopefully, this intensive guide helps someone out there! Feel free to post a comment if you have opinions, comments, questions, etc. 


"Computer Tips: Setup Guide for Gmail,Outlook 2010,Ultimate Setup Guide "


Reference : online-tech-tips.com


Computer Tips: Clean Install Windows 8

In Windows 8, performing a clean install is a very simple and easy process, unlike previous versions of Windows. In Windows 7, you had to go through about 10 steps in order to do a clean install. In Windows 8, the process has been simplified and can be done from within Windows 8 itself!

In this article, I’ll walk you through the steps to perform a clean install of Windows 8. Remember that you will lose all of your data, so make sure to backup anything that you might need.

Clean Install Windows 8

To get started, you need to open the Charms bar in Windows 8. You can access it by moving your mouse over to the top right side of the screen or by pressing Windows Key + C. Then click on Settings.

Computer Tips: Clean Install Windows 8


Next, click on Change PC Settings at the very bottom.


Computer Tips: Clean Install Windows 8


Next, under PC Settings, click on General.


Computer Tips: Clean Install Windows 8

On the right hand side, you’ll see a option if you scroll down that says “Remove everything and reinstall Windows“. Go ahead and click on that.

Computer Tips: Clean Install Windows 8


You’ll get a message about what a reset of your PC will do:


Computer Tips: Clean Install Windows 8


At this point, you might need to pop in your Windows 8 disc if you have one, otherwise it will start the reinstall process and you’re good to go. It will take some time to reinstall and after that you’ll have to go through the setup steps to get started with Windows 8 such as choosing a username, login, etc. If you have any problems performing a clean install of Windows 8, post a comment here and I’ll try to help. 


"Computer Tips: Clean Install Windows 8"


Reference : online-tech-tips.com


Computer Tips: Windows 8 Tile Size Change,Rearrange and Move


Getting used to the new Start Screen in Windows 8? It’s basically composed of a bunch of tiles that are either static or “live” tiles, which means they are updated in real-time with various types of data. I kind of like the new tile interface, but I hope Microsoft allows more customization of the Start Screen by the time Windows 8 is released.

There are a couple of things you can do to customize the look and feel of the Start Screen such as moving tiles, rearranging tiles and changing the size of the tiles. In this article, I’ll show you what you can adjust and how to do it.

Move & Rearrange Tiles in Windows 8

Moving tiles in Windows 8 is pretty straight-forward. Just click or hold your finger over the tile and drag it to a new position. Note that there are tile groups and you can drag and drop tiles between different groups.

Computer Tips:  Windows 8 Tile Size Change,Rearrange and Move

If you drag the tile within the same group, it will just just rearrange the other tiles by pushing them down. You can create as many groups as you like by just dragging a tile to the far right where there are currently no tiles.


"Computer Tips:  Windows 8 Tile Size Change,Rearrange and Move"


Reference : online-tech-tips.com


Computer Tips: Rearranging Tile Groups in Windows 8


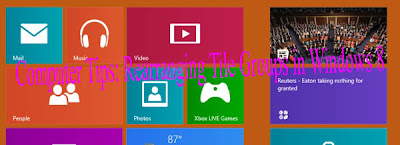
Now that you have tile groups, it would be nice if you could move them around. For example, my setup currently looks like this:

Computer Tips: Rearranging Tile Groups in Windows 8

However, if I just press the CTRL key and then swipe up on the trackpad/screen or zoom out with my mouse wheel, everything will shrink and then you can drag and move the entire group of tiles.

Computer Tips: Rearranging Tile Groups in Windows 8

Now the start screen looks like this with the two column tile group moved over to the right:

Computer Tips: Rearranging Tile Groups in Windows 8


"Computer Tips: Rearranging Tile Groups in Windows 8"


Reference : online-tech-tips.com


Computer Tips: Change Tile Size in Windows 8

Lastly, you can change the size of some tiles, not all. If a tile is big, which usually means it’s width is double that of a small tile, then you can right-click on it and choose Smaller in the options that pop up in the bar at the bottom of the screen.

Computer Tips: Change Tile Size in Windows 8


And, of course, vice versa will also be there, so if you right-click on certain small tiles, you’ll see an option to make it larger. Not all small tiles can be made larger though. Also, the sizes are fixed, you can drag the corners of a tile and adjust it’s size manually. This may change in the future, but that’s the way it is now.

Also, you currently can’t change the color of individual tiles on the start screen. Changing the tile color in Windows 8 is a feature that I’m really hoping comes out with the final release. Everyone loves to customize their PCs and this will be no different. 


"Computer Tips: Change Tile Size in Windows 8"


Reference : online-tech-tips.com


iPad-iPhone and computer Tips: Control iTunes,Spotify,Windows Media Center using Gestures

If you have a tablet such as a Google Nexus or Apple iPad, you of course use gestures to control the music player apps for those particular devices via touchscreen. However, if you use a standard notebook or desktop computer to listen to music and watch videos, then you likely do not have any gesture support, with the exception of MacBooks and some PC notebooks that have gesture based trackpads.

iPad-iPhone and computer Tips: Control iTunes,Spotify,Windows Media Center using Gestures

For any computer that has a webcam, you can now control the popular music apps listed above, as well as your digitally stored movies, using a free app.

The app that enables gesture based media control is called Flutter. Before you get started downloading the software, let’s quickly review how it works and how you can use it.

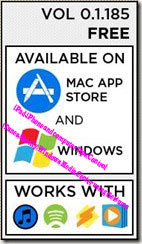
The app is available for both Mac and PC and is compatible with popular media playback software iTunes, Spotify, WinAmp and Windows Media Player.

iPad-iPhone and computer Tips: Control iTunes,Spotify,Windows Media Center using Gestures

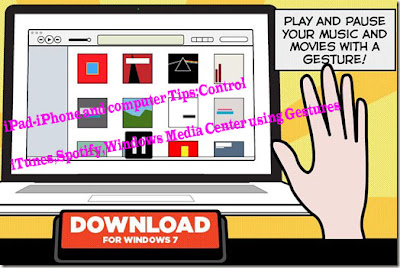
Additionally, the app does not require a touch screen computer (as noted above), because it uses webcam technology to track hand movements. Here’s an example:

iPad-iPhone and computer Tips: Control iTunes,Spotify,Windows Media Center using Gestures

To get started, jump to the Flutter homepage and download the according version for your operating system. Also, make sure that your webcam is connected (if not built-in) and that it is enabled.

Once the download is complete, double-click the Flutter installer to begin installing the app.

iPad-iPhone and computer Tips: Control iTunes,Spotify,Windows Media Center using Gestures

Once installation is complete, you will be presented with the Flutter icon on your computer’s desktop. Double click the icon to start using Flutter immediately. The application will initially detect your computer’s webcam and provide you with some simple steps on how to use the program.

Finally, you can simply launch any of the supported media playback apps, such as iTunes, and try out the play and pause gestures for yourself.

Overall, the software is very basic as it only currently supports a limited amount of gestures. However, the Flutter app is a newer, recently released app so in time, it will very likely have more gestures added to it via updates. Thank you for stopping by the site for today’s post. If any of our site visitors know of any similar apps that add gestures via webcam support, feel free to link to them in the comments section. 


"iPad-iPhone and computer Tips: Control iTunes,Spotify,Windows Media Center using Gestures"


Reference : online-tech-tips.com