Computer Tips: Email Contents and Encrypt Text to Secure Data

Previously, I wrote about a service called LockBin that lets you quickly send short encrypted emails to whoever you want. They have a free service plus some additional premium services and overall it works fairly well. The recipient has to know the secret password you create (and tell them via phone or something other than email) and then they type that into the site and can view the message.

This is definitely convenient because you don’t have to install any desktop software or import public keys etc to send a simple encrypted message. However, if you find yourself sending and receiving encrypted messages a lot from a few people, it might be a good idea to try something more robust like BCTextEncoder Utility.

It’s free and has a lot of good features. Of course, as with all types of encryption in which you want to send the encrypted text to someone else, they will also need to have the program installed. If you’re using a web client like Gmail, it’s always running over SSL, which means everything that is sent to Google from your computer is encrypted already. But that is just during transit.

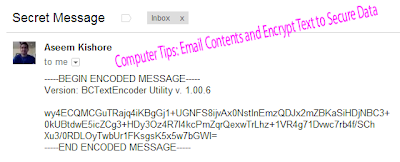
If you need extra security and want someone to receive an email that looks like the one below, them you’ll need to use a program like BCTextEncoder.

Computer Tips: Email Contents and Encrypt Text to Secure Data

Sweet eh!? So even if someone see that email, they will have no idea what to do with it. You can encrypt a message using this utility with a password or with a certificate. The program can even create public/private keys for you, which you can then send (the public key), so people can send you back encrypted messages.

To get started with keys, download the program and run it. There is no need to install it, which is nice! This means you can easily copy it to your USB drive and use it on any computer. Here’s the main interface:

Computer Tips: Email Contents and Encrypt Text to Secure Data

The simplest way to use the program is to type in your secret message in the top box (Decoded plain text) and then click the Encode button at the top right. By default, it is set to password, so it will use a password to generate the encrypted text.

Computer Tips: Email Contents and Encrypt Text to Secure Data

You will see the encrypted message in the bottom window.

Computer Tips: Email Contents and Encrypt Text to Secure Data


You can now copy and paste this text into an email or you can click on the buttons at the top to copy to clipboard or save it to a text file.

Computer Tips: Email Contents and Encrypt Text to Secure Data

There is also a button that will automatically email the recipient using your default desktop email client. Now the recipient just needs to download the program, run it, paste the encrypted text into the bottom window and click Decode. They will be asked to type in the password and then the message will appear.

Like I mentioned earlier, you can also use public and private keys and people can use your public key to encrypt data and then send it to you. You’ll be the only person to be able to decrypt it since you’ll have the private key, which is stored in the BCTextEncoder database.So, just to summarize, if you want to send encrypted messages and you do not have someone else’s public key, choose the password method. 

If you want someone else to send you encrypted messages, you can have them use the password method or you can create a public/private key and just send them the public key, which they can then import into the program and choose in the Encode by drop down.

To do this, just click on Key and then Generate New Public/Secret Pair.

Computer Tips: Email Contents and Encrypt Text to Secure Data

The wizard will pop up and you can choose Generate new private key and check the box that says “Create public key file“.

Computer Tips: Email Contents and Encrypt Text to Secure Data

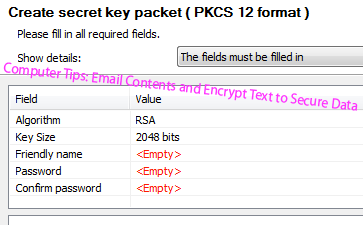
Click Next and you’ll need to type in a name and then a password.

Computer Tips: Email Contents and Encrypt Text to Secure Data

Click next and then next again and you’ll have to randomly press keys on your keyboard to generate a random seed buffer that is used to create the keys.

Computer Tips: Email Contents and Encrypt Text to Secure Data

Now if you go to Key and choose Manage Key Database, you can copy the public key for sending to someone else.

Computer Tips: Email Contents and Encrypt Text to Secure Data

That’s about it! It’s definitely not as convenient as just typing an email in Gmail and sending it, but if you really need to send some very confidential information to someone else and electronically is the only option, you should probably encrypt it using a program like this. If you have any questions about encrypting text or data or email, etc, post a comment and I’ll try to help. Enjoy!


"Computer Tips: Email Contents and Encrypt Text to Secure Data"


Reference : online-tech-tips.com


Facebook Tips: Remove the News Ticker and Sidebar in Facebook

Along with the forced migration to the new Timeline feature of Facebook, you also have to deal with that annoying sidebar that is split into two sections: one is a streaming news ticker and the other is a chat window. I use a desktop app to chat with Facebook friends and I never use the news ticker that shows all kinds of useless info about what my friends are doing every second.

If you want to remove that sidebar or modify it, there are a couple of things you can do. In this article, I’ll walk you through the various options that you have in Internet Explorer, Google Chrome and Firefox. If you employ a different method to customize Facebook in your browser, feel free to a post a comment here and let us know what you use.

First off, there are no add-ons for Internet Explorer currently that support removal of the News Ticker in Facebook completely. Instead, for IE, you only have one option and that is to hide the sidebar, which thankfully Facebook gives you the option to do!

Facebook Tips: Remove the News Ticker and Sidebar in Facebook

You can also just press that button on Chrome or Firefox also. It’s a feature of Facebook, so it’s available on all browsers. Now that’s easy enough if you just want to hide the sidebar, but if you want to remove the News Ticker and just be left with the chat window, you have to install some extensions. Again, this will only work for Chrome and Firefox as there are no add-ons for IE yet to do this.

Remove News Ticker in Google Chrome
For Chrome, there are two extensions that I tried and that work really well. The first one is Facebook News Ticker Remover.

Facebook Tips: Remove the News Ticker and Sidebar in Facebook

Once you install it, reload the Facebook tab and you’ll see that the sidebar now just has the chat option and the news ticker is gone.

Facebook Tips: Remove the News Ticker and Sidebar in Facebook

You don’t have to do anything else, it just hides the news ticker automatically! The other extension that works fine is Hide Facebook Ticker (by SachinKRaj). Once installed, you’ll see a new icon in your toolbar and a message saying the extension is disabled.

Facebook Tips: Remove the News Ticker and Sidebar in Facebook

Just click on the icon and it will be enabled. Then reload the Facebook tab and you should be good to go, again with just the chat part of the sidebar and the news ticker gone. For Firefox, you can download a plugin called Hide FB Ticker.

Facebook Tips: Remove the News Ticker and Sidebar in Facebook

I like this one because you don’t have to install Greasemonkey or any userscripts. Just install this add-on and you’re good to go. It works just like the extensions in Chrome. That’s about it. Enjoy!


"Remove the News Ticker and Sidebar in Facebook"


Reference : online-tech-tips.com


Computer Tips: Volume Too Loud while Playing Videos on computer

I’ve always found it really annoying when watching movies on my PC that some scenes are super loud and some scenes I can barely hear what is going on. I understand they are trying to make it as realistic as possible, but it’s really annoying if you can’t crank up the speakers all the way or if you’re not able to use headphones.

This is especially true at night or in a public place where I’m listening to something on my laptop and suddenly there is really loud dance music or loud action scenes. What do I normally do? Well, I manually turn down the volume until the loud scenes are over and then I turn the volume back up later on.

I’ve been super frustrated with this for a long time until I found a cool program called Sound Lock that works for Windows which will limit the sound output level on your computer! Basically, it’s really a simple piece of software. You just tell it the max sound level you want and it will make sure that the volume never goes above that.

But you’re probably like “Well, can’t I just reduce the volume on my computer to 50% and it would be the same thing?”. Nope! So the program doesn’t just turn down your volume. It plays back quieter scenes at a normal volume and then turns the volume down if something becomes really loud.

This is exactly what I wanted because I could listen to the dialogues clearly, but whenever a loud scene started playing, it would keep the volume  at the lower level that I set it too.

Once you install the software, it’ll pop up in your system tray and if you click on it, you’ll see the following sound adjuster:

Computer Tips: Volume Too Loud while Playing Videos on computer

You need to click the On button and then simply adjust the slider to the desired max sound output level you want. By default, it’s set at the max level. My suggestion would be to play a movie or video, go to a loud scene and then reduce the volume to what sounds best. Then just leave it there and watch the rest of the video.

Computer Tips: Volume Too Loud while Playing Videos on computer

You’ll notice that as long as you don’t drag the slider below the yellow bars, the volume doesn’t actually decrease! That’s what is so cool about this program. The other way you can do it is to play a normal scene with dialogue, for example, and then just drag the slider to a little bit above the bars.

The program works like magic! You can still hear everything in the loud scenes just fine, but instead of it blowing up your ears, you just hear it at the same level as everything else. It does a great job of making the whole audio sound very smooth. There are no big dips or jumps in the sound or anything like that.

Another cool thing is that you can adjust the volume per channel, up to 14 different channels. If you click on the settings button at the top right, you can see all the channels and pic the sound device.

Computer Tips: Volume Too Loud while Playing Videos on computer

Just as a note, if you download this in IE, you might get a message saying this program is not commonly downloaded, it may harm your computer, etc, etc. I checked the software on VirusTotal and it gave a 100% negative result for viruses, malware or spyware, so you don’t have to worry about that. It’s just not a well-known program and that’s why you get the message in IE.

Computer Tips: Volume Too Loud while Playing Videos on computer

I pretty much use this program all the time now even while watching YouTube videos, home videossongs from my music library or anything else. It just does such a good job with the audio and keeps everything a lot quieter! If you’ve been having the same problem with loud scenes in movies or loud sections in a song or video, this program will work wonders.


"Computer Tips: Volume Too Loud while Playing Videos on computer"


Reference : online-tech-tips.com


Computer Tips: Open a File with No Extension

Have you ever run into the scenario where you end up with a file that has no extension? How do you go about opening it? One way it so simply guess and try to change the file extension to different file types and try to open the file. That sometimes works if someone says they are emailing you a Word document, but for some reason the file has no extension. Obviously, you could just try a .doc or .docx extension and it’ll probably open.

But if you have no idea what type of file it is, trying a bunch of different extensions is a waste of time. Additionally, you may not have the program installed that the file type is associated with, so even if you changed it to the right one, it still may not open. For example, if the file actually has a PSD file extension and you try to open it without having Photoshop installed, you may incorrectly deduce that it’s not the correct file extension.

Computer Tips:  Open a File with No Extension

In this article, I’ll show you a quick and more accurate way to determine the type of file you may have. In order to do this, I created a couple of test files and then removed the file extensions. I created a Word document, a PDF file and an image file for demonstration purposes. Obviously, your file could be of a different type, but the procedure will be the same for any type of file.

Install a HEX Editor
Yes, a HEX editor may sound insanely geeky and technical, but it’s really not that bad. There is a freeware program called XVI32, which you don’t even have to install to use. You can just download it and run the EXE file! Here’s what the main interface looks like once you open it.

Computer Tips:  Open a File with No Extension

On the left side is the hex viewer and the right side is the data inspector, which basically converts the hex values into actual data values. It’s pretty much impossible to understand anything on the hex side, so don’t even worry about it. Most of the data on the data side will also not make sense, but there will usually be a few key pieces of text that will tell you what kind of file you are working with. In my first example, I opened a Word document in which I have removed the .docx extension. Here’s what it looked like in XVI32:

Computer Tips:  Open a File with No Extension

The first place to look is at the very top of the data inspector. As you can see, we can see .XML, which means this is a XML file. But wait, you’re saying, isn’t this a Word document? Technically, all word documents are XML files in Office 2010. All of the content of a Word document is actually stored inside of an underlying XML file, which is why you see that there.

However, if you scroll down a little in the data inspector, you’ll see the following at the end of one of the paragraph sections:

Computer Tips:  Open a File with No Extension

There you finally see “word” and “document”, which tells you it’s a Word document. Some filet types like Word documents are a little harder to figure out because of the underlying XML structure, but you just have to keep scrolling and looking and you’ll figure it out. The other files types are really easy. For example, this is what I get when I open a PDF file in XVI32:

Computer Tips:  Open a File with No Extension

Right at the top on the first line is PDF, so you know you’re working with a PDF file. Super easy! And here is what it looks like when opening a PNG image file:

Computer Tips:  Open a File with No Extension

Again, very easy to figure out since PNG is written right at the very top of the file. As a last example, I also decided to try out an MP3 file to see what it looked like. This one was a little harder, but if you look at the very top and Google any three or four letter combos that happen to be in all caps, you’ll figure it out.

Computer Tips:  Open a File with No Extension

As you can see, ID3 pops up at the very first line. Even though it doesn’t say MP3, ID3 gives you a huge hint because ID3 is the metadata that stores all the information about a music file like the artist, title, album, year, etc. So by seeing ID3, you can guess it’s an MP3 file. Also, you see other hints like “Ninja Tune Records”, which means it’s probably some audio file.

Overall, I find this to be a much better way to figure out how to open a file with no file extension rather than randomly trying out various file extensions without any idea. If you still can’t figure out what kind of file you have, post a comment and I’ll try to help. Enjoy!


"Open a File with No Extension"


Reference : online-tech-tips.com


Computer Tips: Connect to Shared Folder in Windows 8 from OS X Mountain Lion

I recently upgraded one of my computers to Windows 8 and setup a shared folder so that I could easily transfer files from my MacBook Pro and Windows 7 machines to Windows 8 over the home network. I did a clean install of

Windows 8, created a shared folder and attempted to connect to my shared folder from OS X Mountain Lion.Unfortunately, I was not able to connect and it took me a little time to figure it out. In this article, I’ll walk you through the steps to connect to a shared folder on Windows 8 from OS X.

Step 1 – Configure Windows 8 for Sharing

Obviously, the first thing you’ll need to do is create a shared folder on Windows 8. Right-click, go to Properties and click on the Sharing tab. Go ahead and share the folder and set the permissions to whatever you desire in terms of access.

Computer Tips: Connect to Shared Folder in Windows 8 from OS X Mountain Lion

The next thing you need to do is make sure that File and Printer Sharing is turned on and allowed through the Windows Firewall in Windows 8. Go to Control Panel and click on Windows Firewall. Then click on Allow an app or feature through Windows Firewall.

Computer Tips: Connect to Shared Folder in Windows 8 from OS X Mountain Lion

Scroll down until you see File and Printer Sharing and make sure that it is checked.

Computer Tips: Connect to Shared Folder in Windows 8 from OS X Mountain Lion

Lastly, you can decide how you want users to access the folder on Windows 8. By default, when connecting from another machine, you have to enter the username and password of an account that has access to that shared folder on 

Windows 8. If you setup a Windows 8 user account without adding a password, you won’t be able to connect to the shared folder. You’ll first have to add a password and then you could connect. However, if you feel your home network is super secure, you can always turn off password protected sharing, which means anyone can connect to the shared folder without having to type in a username or password.

Computer Tips: Connect to Shared Folder in Windows 8 from OS X Mountain Lion

You can do that by going to Control Panel, Network and Sharing Center, Advanced sharing settings and then expanding All Networks. Here you will see an option called Password protected sharing, which you can turn off. I personally keep it turned on, but if you really hate having to type in a username and password to connect, this is an option. Also, if you use Windows 8 without a password, this would save you from having to setup a password on your account. Note that even if you have a Windows account with a password, if you turn off password protected sharing, then people can still connect without typing any credentials.

Finally, on the Mac, open Finder and look under the Shared section for the Windows 8 PC.

Computer Tips: Connect to Shared Folder in Windows 8 from OS X Mountain Lion

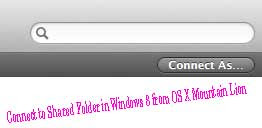
When you click on it, it will try to connect and you may get a message saying Connection Failed.

Computer Tips: Connect to Shared Folder in Windows 8 from OS X Mountain Lion

That’s ok! That’s where that password protected folder setting in Windows 8 comes into play. If it’s turned on, you need to connect using the Windows 8 account credentials. You can do that by clicking the Connect As button at the top right.

Computer Tips: Connect to Shared Folder in Windows 8 from OS X Mountain Lion

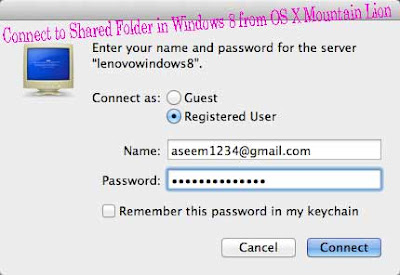
Go ahead and type in your credentials and then click OK. Note that if it’s a Microsoft account you have setup on Windows 8, you’ll need to type in the full email address and the same password as your actual Microsoft account.

Computer Tips: Connect to Shared Folder in Windows 8 from OS X Mountain Lion

That’s about it! Now you should see the Windows 8 shared folders in Finder on your Mac.

Computer Tips: Connect to Shared Folder in Windows 8 from OS X Mountain Lion

If you have any problems connecting to Windows 8 from a Mac, post a comment here and I’ll try to help out. Enjoy!


"Connect to Shared Folder in Windows 8 from OS X Mountain Lion"


Reference : online-tech-tips.com


Computer Tips: In Windows 8 Check Disk and Run System Files

If you’re having problems with your Windows 8 install, there are a couple of tools you can use to try and fix the problems. For hard disk errors, you can run check disk (chkdsk) and for corrupt or damaged system files, you can run system file checker (sfc). You can run both from within Windows 8 itself, which saves you from having to boot to the advanced startup screen.

Run Chkdsk in Windows 8

To run chkdsk, go to Computer and click right-click on the disk you want to check and click on Properties.

Computer Tips: In Windows 8 Check Disk and Run System Files


Click on the Tools tab and then click on the Check button under Error Checking.

Computer Tips: In Windows 8 Check Disk and Run System Files

Windows 8 will begin scanning your drive for any errors. This could take a few minutes.

Computer Tips: In Windows 8 Check Disk and Run System Files

Once it has completed, you’ll see a message on whether there were any errors found on the hard drive or not.

Computer Tips: In Windows 8 Check Disk and Run System Files

Finally, you can click on Show Details, which will load up the Event Viewer and show you that it actually ran chkdsk on the system.

Computer Tips: In Windows 8 Check Disk and Run System Files

Run System File Checker in Windows 8

System File Checker is a great tool that will verify all of the original files installed with Windows 8 and make sure none of them have been deleted, replaced or otherwise damaged in some way. It it does find a problem, it basically loads the original system file to replace the deleted or damaged one.

If Windows 8 is freezing a lot or crashing a lot, you might want to try and run system file checker as it could be a a problem with corrupt or missing system files. Also, it you see other strange issues in Windows 8 like missing apps or apps not opening, etc, then there is no harm in running SFC.

You can run SFC by going to the Start Screen, right-clicking on an empty spot and choosing All apps. Scroll to the right and then right-click on Command Prompt.

Computer Tips: In Windows 8 Check Disk and Run System Files

Choose Run as Administrator from the bar that pops up at the bottom of the screen. Now at the command prompt, type the following command:sfc /scannow

This will start the verification process for all system files in Windows 8.

Computer Tips: In Windows 8 Check Disk and Run System Files

Once it finishes, it will display either a message saying everything fine or it will tell you which files had problems and were replaced by the system. These are two easy to use tools in Windows 8 to help troubleshoot many different types of problems. 


"Computer Tips: In Windows 8 Check Disk and Run System Files "


Reference : online-tech-tips.com


Computer Tips: Complete Hybrid Shutdown in Windows 8

In Windows 8, when you shutdown your computer, you actually are performing a hybrid shutdown by default. What’s a hybrid shutdown? As you probably have heard, Windows 8 boots up a lot faster than Windows 7 and previous versions of Windows.

This is because of the way it shuts down. Instead of performing a cold boot in which everything has to be loaded, i.e. the OS kernel, the apps, etc, Windows 8 performs a partial hibernation in which the Kernel session and device drivers are saved to disk. When you startup Windows 8, it loads up from that hibernation file, which makes boot time much faster.

Computer Tips: Complete Hybrid Shutdown in Windows 8

In previous versions of Windows, the hibernation file was much larger because in addition to the kernel and device drivers, all application data was also stored in the file. Now that the file is smaller, the load times are better.

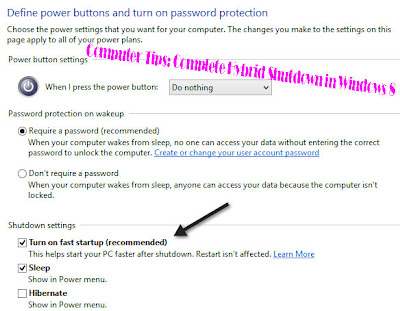
This featured is called Fast Startup in Windows 8 and it is enabled by default. You can check this by going to Power Options in Control Panel and clicking on Choose what the power button does in the left pane.

Computer Tips: Complete Hybrid Shutdown in Windows 8

Computer Tips: Complete Hybrid Shutdown in Windows 8

Scroll down and you should see a box checked that says Turn on fast startup (recommended). Note that if you do not have the Turn on fast startup checkbox listed at all, it is because hibernation is not enabled. To enable hibernation in Windows 8, open an elevated command prompt and type in the following line:

powercfg /hibernate on

Computer Tips: Complete Hybrid Shutdown in Windows 8

Now when you go to Power Options, you should see the box is visible and checked. So how to perform a full complete shutdown in Windows 8? There are three ways.

1. You can either disable fast startup from Power Options or

2. You can simply perform a restart instead of a shutdown.

3. You can use the following command at the command prompt:

shutdown /s /full / t 0
As odd as it may seem, restarting Windows 8 will first perform a complete shutdown followed by a cold boot. So those are the different ways you can perform a full shutdown of Windows 8, which comes in handy if you recently installed a new piece of hardware, etc. 


"Computer Tips: Complete Hybrid Shutdown in Windows 8"


Reference : online-tech-tips.com


Computer Tips: Use Windows 8 Metro-style app called Camera

Windows 8 has a Metro-style app called Camera that lets you use your webcam to record videos and take photos. It’s definitely better than having to download spyware/ m a l ware-ridden third-party webcam recording software. In this article, I’ll walk you through the process of using the app and adjusting the various settings.

One of the problems with the new Metro-style interface in Windows 8 is that sometimes it’s too simplistic and clean. Literally, they have removed buttons and other visual elements that you otherwise expect. For example, in the camera app, I could not even figure out how to take a picture or video! There was no camera button or anything else.

Before we get to that, lets go through the basics. Firstly, open the app and if you don’t already have a webcam built-in or connected to the PC, you’ll see a simple black screen that says Connect a camera.

Computer Tips: Use Windows 8 Metro-style app called Camera

Once you do connect the camera, it will ask you for permission to use the webcam inside the Camera app.


Computer Tips: Use Windows 8 Metro-style app called Camera

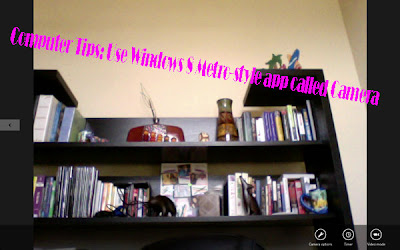
Once you do this, you should be able to see your webcam in a full screen window with a navigation bar at the very bottom:

Computer Tips: Use Windows 8 Metro-style app called Camera

Note that if your webcam is not working with the Windows 8 camera app, it probably means Windows 8 does not recognize the webcam. This is probably due to the driver not being compatible with Windows 8. You’ll have to go to the manufacturer’s website and see if they have a version of the driver for Windows 8. If not, you’ll just have to wait until one is released.

Now here’s the fun part! How do you take a picture or video using the Camera app in Widows 8? Well since it’s designed for touch screens, you have to tap or click on the screen! I was not able to figure this out on my own! By default, if you click, it will take a picture and then store it in the Camera Roll folder in the Pictures folder. When you click, it will make a picture snapping sound and then the image will slide off the screen.

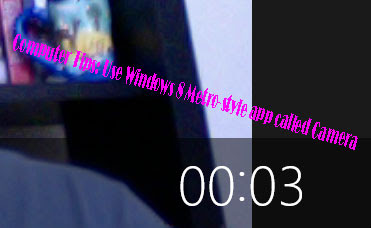
To take a video, you have to click on the Video mode button so that it turns white and then click on the screen.

Computer Tips: Use Windows 8 Metro-style app called Camera

The timer will start and all you have to do is click again on the screen to stop the recording.

Computer Tips: Use Windows 8 Metro-style app called Camera

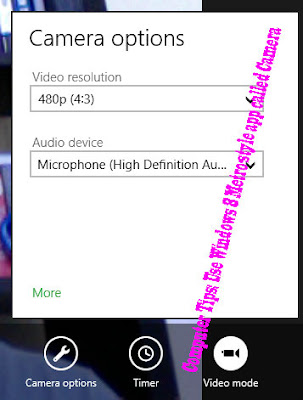
If you click on Camera Options, you can adjust the resolution of the camera and change the audio input device if you have more than one.

Computer Tips: Use Windows 8 Metro-style app called Camera

If you click the More link, you can also adjust the brightness, contrast and exposure of the camera.

Computer Tips: Use Windows 8 Metro-style app called Camera

If you want to view the photos or videos, you can either go to the Photos and Videos app respectively or you can simply go to the Camera Roll folder in Pictures.


Computer Tips: Use Windows 8 Metro-style app called Camera

That’s pretty much all there is to the Camera app. I’m hoping they update it with effects and some other tools to edit photos as that would make it much more useful. 


"Computer Tips: Use Windows 8 Metro-style app called Camera"


Reference : online-tech-tips.com