Facebook Apps Tips: Disconnect Facebook from Skype, Instagram, Spotify and Other App

Over the years, I have installed various Facebook apps and didn’t even know what was connected to my account until recently.I am a person who very rarely installs Facebook apps, but I was surprised to find that I still had well over 20 apps connected to my account!

When you connect an app to Facebook, it usually has access to a pretty much everything in your Facebook account. The apps can access your data at any time, even when you’re not using it and they can post to your wall. 

I had apps like Instagram, Skype, Spotify, Twitter, Goodreads, etc installed and my activity was automatically being posted whenever I used the service! At first, I didn’t mind this, but then I realized I don’t really want everyone to know what I’m reading or what songs I’m listening too anymore. Here’s an example of a friend below:

 Facebook Apps Tips: Disconnect Facebook from Skype, Instagram, Spotify and   Other App


In this article, I’ll show you how to disconnect Facebook from apps so that you can control whether or not they can access your data or post to your wall. To start, go ahead and open Facebook.com.

Next, under Apps, click on App Center in the left-hand menu section:

 Facebook Apps Tips: Disconnect Facebook from Skype, Instagram, Spotify and   Other App

In the left-hand menu that shows up here, click on My Apps at the very bottom:

 Facebook Apps Tips: Disconnect Facebook from Skype, Instagram, Spotify and   Other App

Now you will see a list of all the apps connected to your Facebook account. A lot of them I don’t even know how they got installed because I don’t remember manually allowing that many apps. Either way, it was really annoying because if I used Pinterest or Bing or even played Doodle Jump on my iPhone, it would automatically get posted! I don’t mind a little sharing, but not this much!

There are two things you can do at this point.You can either remove the app altogether from your Facebook account by hovering over the app and then clicking on the X.

 Facebook Apps Tips: Disconnect Facebook from Skype, Instagram, Spotify and   Other App

The second thing you can do is to click on the Settings link below the app.

 Facebook Apps Tips: Disconnect Facebook from Skype, Instagram, Spotify and   Other App

This will bring up the settings dialog for that particular app. Here you can control exactly what the app can and cannot do.By default, pretty much every app can post on your behalf, which is pretty much the point of installing the app in the first place.However, if you decide you really don’t want to post that content anymore, you can click on the X next to the permission to revoke it.

 Facebook Apps Tips: Disconnect Facebook from Skype, Instagram, Spotify and   Other App


Some apps also can access your data at any time, which I don’t really like.I have no idea what that means, but it seems like they can grab whatever data they want whenever they want. I don’t see why Instagram or any other app would need that kind of access, so I revoke it.You can also control who sees the posts that are made on your behalf and change that to whatever you like.

You can also see when the service last accessed your data and see what data they requested. You can click on See details to get more information.


 Facebook Apps Tips: Disconnect Facebook from Skype, Instagram, Spotify and   Other App


For example, Spotify accessed my data about 2 months back and grabbed my birthday, education history, hometown, likes, music, TV, movies, books, quotes, current city and work history! And they also grabbed data from  my news feed.

 Facebook Apps Tips: Disconnect Facebook from Skype, Instagram, Spotify and   Other App

I think most people are in the same boat as me. You really don’t think about this stuff because you don’t even know it’s happening. The problem is not that Spotify is accessing this data, it’s the fact that they probably have it stored in some database and if that database gets hacked by someone later on, then your personal info is going to be out there on the Internet.

 The more access these apps have to your account, the more data they can capture.Managing your apps in Facebook is important not only to prevent accidental sharing or over-sharing of your activity, but it’s also important for protecting your privacy on the Internet. Don’t trust anyone, especially Facebook apps. Enjoy!


"Facebook Apps Tips: Disconnect Facebook from Skype, Instagram, Spotify and Other Apps"


Reference : online-tech-tips.com

Computer Tips: Ten(10) Dropbox via apps Tips for Beginners

Even though Dropbox has been around for a long time, I didn’t sign up for an account until a few months ago and now I don’t know why I didn’t sign up earlier! Dropbox is a pretty awesome service that has a lot of features I didn’t even know existed when I started using it.

If you’re new to Dropbox, here are 10 tips that I found to be useful when using the service. Of course, there are a lot of other things you can do with Dropbox via apps, but I’m just going to focus on on the Dropbox website and software that you can install on your computer or mobile device.

Tip 1-- Recover Deleted Files

By default, Dropbox will allow you to recover any deleted file up to 30 days old. That’s a pretty neat feature! I was mostly using Dropbox to store random unimportant files, but there was one time where I really needed to get back a file that I deleted. To view deleted files, just click on the trash icon at the top, which will toggle the Show deleted files option.


Computer Tips: Ten(10) Dropbox via apps Tips for Beginners


Browse into the folder you want to recover the deleted files from and you’ll see under the Kind column whether it’s a deleted image or something else.

Computer Tips: Ten(10) Dropbox via apps Tips for Beginners


Tip 2-- Restore Previous Versions

Another neat feature is versions in Dropbox. By default, this option is also only available for 30 days, but it works very well. Just go to the folder where you want to see a previous version of a file and click on the file to highlight it. Don’t click on the name of the file because that will open the file. Just click on the row to highlight it.

Computer Tips: Ten(10) Dropbox via apps Tips for Beginners

Then click on More at the top and click on Previous versions. You can now browse through the various versions of the file up to 30 days back.

Tip 3-- The Packrat

The Packrat is an option you can choose if you click on the Upgrade link from the main web site. It basically gives you unlimited previous versions and recovery of deleted files. It’s $40 per year, but it’s definitely worth it for anyone who needs the extra security.

Computer Tips: Ten(10) Dropbox via apps Tips for Beginners

Tip 4 -- Two-Step Verification

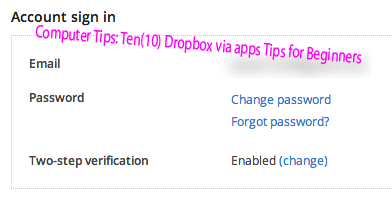
Dropbox just introduced two-step verification a few months back and it adds a layer of security that was greatly needed. If you were ever worried about someone hacking into your account by just figuring out your password, you can enable two-step verification, which will require you to type a code when logging in from the browser, desktop app or mobile app.

Computer Tips: Ten(10) Dropbox via apps Tips for Beginners

To enable it, click on your name at the top, then Settings and then click on the Security tab. Scroll down and you’ll see two-step under Account sign in.

Tip 5 -- Sync Any Folder

Dropbox is great, but a lot of people simply don’t like the fact that they have to move everything to the Dropbox folder in order to sync it. Well, there is a way around that in Windows. You can create junctions or aliases to folders in Dropbox and then they will sync without having to move the folder.


Computer Tips: Ten(10) Dropbox via apps Tips for Beginners


You can read my guide on how to sync any folder with Dropbox and other cloud storage services.

Tip 6 -- LAN Sync and Desktop Notifications

LAN Sync is a feature of the desktop app that speeds up syncing of files across your computers that are on the same LAN network. By default, Dropbox sync a file to the server and then downloads that file onto the other computers from the Dropbox server. Unless your upload and download Internet speeds are super fast, this can take a long time for large files.

Computer Tips: Ten(10) Dropbox via apps Tips for Beginners

LAN Sync is an option that will automatically allow Dropbox to find other linked computers on the same network and sync the files directly over the LAN, which is way faster than uploading and then download it again. I have 4 computers at home with Dropbox installed, so it’s convenient for me.

Desktop notifications is also nice because it will pop up a small message in your task bar whenever a file is added or deleted from Dropbox folders. This is useful if you have a shared folder with multiple users and you want to know when files are being added or deleted.

Tip 7-- Camera Upload

I love camera upload! Up until now, I had no way to backup the videos taken on my iPhone or iPad without using iTunes. iTunes is a royal pain and Dropbox saved me from having to use it anymore. Enable Camera Upload and Dropbox will automatically upload all your photos and videos to a folder called Camera Uploads. The only downside is that it stops after 10 minutes and you have to open Dropbox again, but still a great feature I use all the time.


Computer Tips: Ten(10) Dropbox via apps Tips for Beginners

Of course, be careful because I quickly realized that the amount of space I used in my Dropbox account shot up dramatically once I enabled this option! 

I was amazed at how many videos I take with my iPhone. I also installed it on my wife’s phone too and so I had to upgrade to the 100 GB plan to store all those videos and photos.

Tip 8-- View History

Another nice feature is the history viewer. Just click on Events at the left side and you can quickly see all the activity happening in your Dropbox account.

Computer Tips: Ten(10) Dropbox via apps Tips for Beginners


Tip 9-- Selective Sync

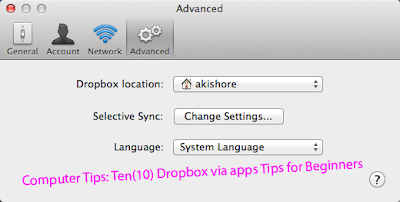
At first, I would just sync everything to all my linked devices, but quickly realized that was taking up a lot of space that was not really necessary. Instead, you can do a selective sync and only sync certain folders down to a particular computer.

Computer Tips: Ten(10) Dropbox via apps Tips for Beginners

Go to Preferences and then click on Advanced. Click the Change Settings button and then just uncheck the folders you don’t want to sync.

Tip 10-- Mark as Favorite

If you want to download a file to your mobile device, then you need to mark it as a favorite. I didn’t know this and it was annoying when I needed a file from my Dropbox account while not being connected to the Internet. Just press the start icon when you are viewing a file to mark it as favorite. It will now be downloaded locally to your mobile device so you can view it anytime.


Computer Tips: Ten(10) Dropbox via apps Tips for Beginners

That’s about i! Those are 10 quick tips for using Dropbox more effectively. Got a tip of your own? Post it in the comments. Enjoy


"Computer Tips: Ten(10) Dropbox via apps Tips for Beginners"


Reference : online-tech-tips.com


Windows 8 Tips: 8 BEST Task Manager Tips for Windows 8

As I mentioned previously in an article comparing Windows 7 to Windows 8, the Task Manager has been completely redesigned. It’s now a lot simpler to use by default, but if you really want to get all the details like before, you can still get those!

There are a couple of other little shortcuts and options that I found while playing around with Task Manage in Windows 8.

In this post, I’m going to go through just a few of the simple tricks/tips I learned and hopefully you’ll enjoy using the new Task Manager when you get a Windows 8 PC in a few weeks. If you have any tips of your own, feel free to post a comment.

Opening Task Manager in Windows 8

There are a couple of ways to get into the Task Manager in Windows 8 that are worth mentioning here.

1. You can press CTRL + SHIFT + ESC if you love keyboard shortcuts.

2. You can go to the Start Screen, then All apps and click on Task Manager.

Windows 8 Tips: 8 BEST Task Manager Tips for Windows 8

3. You can right-click on the Taskbar and click on Task Manager.

Windows 8 Tips: 8 BEST Task Manager Tips for Windows 8

4. Press the Windows key to go to the Start Screen and then just start typing “Task…”

Windows 8 Tips: 8 BEST Task Manager Tips for Windows 8

5. Press the Windows key + R and then type in taskmgr.exe.

Windows 8 Tips: 8 BEST Task Manager Tips for Windows 8

6. Press CTRL + ALT + DELETE and then choose Task Manager.

Windows 8 Tips: 8 BEST Task Manager Tips for Windows 8

That’s a lot of ways to access the Task Manager! Depending on how you use your computer, I’m sure one of those six will work for you.

Add Extra Columns

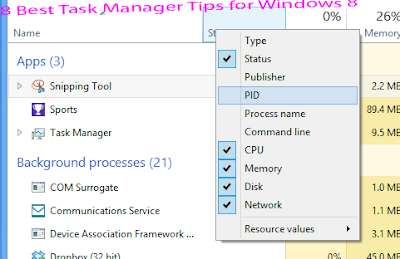
Every once in a while, I need to see extra information about a Windows process, such as the PID (process identifier). In Windows 8, you can just right-click on any header and add more columns by checking them.

Windows 8 Tips: 8 BEST Task Manager Tips for Windows 8


See Logical Processors

Nowadays a lot of consumer computers have more than one processor. If you have certain applications that can run on different processors and you want to check to make sure that the process load is actually being distributed, you can go to the Performance tab, click on CPU and then right-click and choose Change graph to and then choose Logical processors.

Windows 8 Tips: 8 BEST Task Manager Tips for Windows 8


By default, the Task Manager will only show the overall CPU utilization. Now you can see the utilization for each logical processor on the system! Sweet.

Windows 8 Tips: 8 BEST Task Manager Tips for Windows 8

Startup Impact

Task Manager in Windows 8 has a cool feature that lets you see the “impact” that a startup process has on the system. This is very helpful to quickly figure out which startup programs are slowing down the boot up process.

Windows 8 Tips: 8 BEST Task Manager Tips for Windows 8


Update Speed

By default, the data you see in the performance tab only shows you the past 60 seconds. If you want to change that, you can click on View, Update Speed and choose from High, Normal or Low.

Windows 8 Tips: 8 BEST Task Manager Tips for Windows 8

High will monitor over a 30-second time span and Low will monitor over a 4 minute time span. Low will also put less load on the machine when monitoring. The 4 minute time span is useful if you need to see the performance for any time frame longer than 60 seconds.


Network Stats

If you go to Network under Performance, you can right-click on the graph and choose View network details.

Windows 8 Tips: 8 BEST Task Manager Tips for Windows 8

Here you can see detailed information about your network connection including link speed, network utilization, bytes sent, bytes received and lots more.

Windows 8 Tips: 8 BEST Task Manager Tips for Windows 8


System UpTime

Thankfully, you don’t have to download a program to see the system uptime anymore in Windows. Just go to the Performance tab, click on CPU and you’ll see Up time down at the bottom:

Windows 8 Tips: 8 BEST Task Manager Tips for Windows 8

Summary View

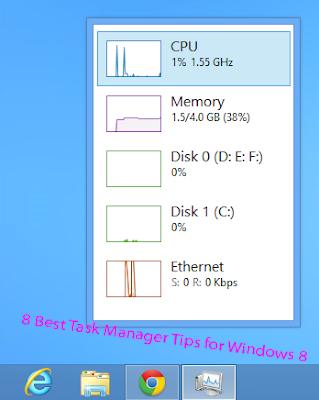
Another nice feature in the Task Manager is the summary view. Just right-click on any performance metric on the Performance tab and choose Summary view.

Windows 8 Tips: 8 BEST Task Manager Tips for Windows 8


Now you get a nice little compact dialog box that you can move anywhere on your desktop or to another screen if you have dual monitors and monitor the performance while you run other apps and programs.

Windows 8 Tips: 8 BEST Task Manager Tips for Windows 8

That’s about it! Windows 8 is definitely a nice upgrade from previous versions of Task Manager and hopefully this will give you a little more insight into how you can use it more efficiently. Enjoy!


"8 Best Task Manager Tips for Windows 8"


Reference : online-tech-tips.com


Computer Tips: 7 Programs to Turn Your PC into a Streaming Media Center

After I bought my iPad, I realized I don’t really use my laptop as much anymore. This means that I really use my desktop a lot a less! Unfortunately my desktop, which has some decent specs, is in sleep mode most of the time. I thought this was a little sad and a waste of money, so I decided to do some research and figure out some way to utilize it.

Previously, I wrote about how you can install Windows 8 on an older PC to revitalize it and that’s something that I did with my desktop. Also, I previously had written about how to automate your computer when you’re not using it to perform certain tasks. In addition to accomplishing these two tasks, I wanted the desktop to be even more useful!

After a few days of testing and playing around with software, I can now happily stream music and videos to any web browser or to my smartphone while not being at home! Since my desktop has some extra hard drives, I even turned it into a NAS also using some free software. Now I can FTP into my server to download/upload files and I can even use it for Time Machine backups for my Mac. Sweet! So here’s a list of programs you can use to convert your boring old PC into something a little more useful.


Free NAS


Computer Tips: 7 Programs to Turn Your PC into a Streaming Media Center

I bought a Synology DS411+II and even though I’m very happy with it, I realized I can pretty much do everything I want by just installing open-source software onto my desktop! One of the coolest programs out there that I had always heard about, but never used until now, was FreeNAS. It’s basically exactly what its name says: a free NAS OS for your PC, Mac or Linux box.

It’s a very capable and powerful OS that also supports additional features via plugins. I was amazed at what I was able to do with this software. Note that if you use FreeNAS on a computer, you really can’t use that computer for anything else. Some of the other programs I mention below run inside Windows. FreeNAS is it’s own OS and manages all the hard drives installed on the computer, etc.

Another thing to note that FreeNAS is that it’s really useful if you have a desktop with several hard drives and a at least 4 GB of RAM. The hard drives don’t have to be super fast or giant in size, but the whole point of using FreeNAS is to store files and then to either stream those files or utilize them in some other way.

To get your started on your way, check out these FreeNAS guide articles from Lifehacker and Engadget. They walk you through all the steps to setup the NAS and how to setup all the extra functionality like streaming, downloading and more.

XBMC

Computer Tips: 7 Programs to Turn Your PC into a Streaming Media Center


One of the best ways to convert a computer into a media center. XBMC is an open-source project that can pretty much play all of the popular audio and video formats. It can even play direct DVD and Blu-ray rips, which is really nice. You can stream any of your media around your house or across the Internet. You can also control the whole gig with a remote control and enjoy a ton of additional features with their large set of add-ons.

XBMC is absolutely awesome, but you get the max benefit if you have a small desktop. I have two desktop, one a giant Dell and another one is a smaller newer HP desktop. I decided to use the HP desktop and connect it to my HDTV at home running XBMC. It works great, but I realized I could not have done it unless I had that smaller desktop. If you have an older desktop that is fairly large, then you might want to try one of the other program mentioned below.

PS3 Media Server


Computer Tips: 7 Programs to Turn Your PC into a Streaming Media Center


PS3 Media Server is a client application you install onto your PC like XBMC, but unlike XBMC, you access all the content via streaming. XBMC can stream too, but it’s mostly meant to be connected to your TV since it has a software front-end. PS3 Media Center was originally designed to stream media to just the PS3, but it now supports a whole lot of devices including the xBox 360, Sony Bravia TVs, Android devices, Samsung TVs, Boxee box and even XMBC Media Center.

PS3 Media Server also has quite a few plugins so you can add extra content and channels to your streaming options. It’s quite popular amongst home-streaming junkies and that’s why I listed it here.

TVersity


Computer Tips: 7 Programs to Turn Your PC into a Streaming Media Center

TVersity is another good choice for media streaming. It used to be free, but now it seems you have to buy a license. You can get one for $4 or pay $20 for the Pro license. The Pro version basically lets you subscribe to premium online content like Hulu, NFL, CNN, etc. If you have your own videos and you just want them streamed around the house, then the standard license for $4 is worth it.

What’s neat about the Pro version is that you can stream Internet video streams from TVersity to an Xbox 360. This used to be more useful because you could subscribe to CNN, for example, through TVersity and watch it on the TV that your Xbox 360 is connected to. However, Xbox has added a lot of content recently and you can pretty much watch whatever you want using the built-in apps. Still, TVersity is great for streaming videos to other devices.

Subsonic

Computer Tips: 7 Programs to Turn Your PC into a Streaming Media Center


For audiophiles with huge music collections, Subsonic is the best way to stream your music all over the place! Subsonic can automatically resample songs that are streaming over the Internet to a bitrate that will prevent songs from skipping or stop playing. What’s awesome about Subsonic is that they have apps for Android, iOS, Windows Phone 7, Roku and lots more. Also, in addition to streaming music, it can stream video as well. However, this program is best suited for music streaming.

VLC Media Player

Computer Tips: 7 Programs to Turn Your PC into a Streaming Media Center

Not only does VLC Media Player play just about any music or video file you can throw at it, but it also lets you stream music and videos locally over the network or over the Internet! I really never knew this even though I’ve been using the program for 5 years now! Check out the How-to-Geek’s guide to setting up streaming using VLC. It’s not anything fancy, but it gets the job done and since most people already have it installed, it might be worth checking out.

Orb


Computer Tips: 7 Programs to Turn Your PC into a Streaming Media Center

Orb has been around for a long time and their products are pretty cool. Orb Caster is a personal media server that not only lets you stream your videos and music, but also can stream live TV if you have a TV tuner card installed on your PC. They also have a Orb Live, which includes apps for the iPhone, iPad and Android devices so that you can stream anything from Orb Caster to your mobile device, including live TV. You can basically use Orb as a SlingBox in some respects.

So these are 7 awesome programs that you can use to convert an idle PC into a streaming media server that you can then use to access your music and videos anywhere in the world. It will take a weekend to figure out which program you want to use and to setup everything, but it’s definitely worth the time. Enjoy!


"Computer Tips: 7 Programs to Turn Your PC into a Streaming Media Center"


Reference : online-tech-tips.com

Windows Tips: What is a Windows Service and Is It Worth Disabling

A Windows service is basically a continuously running executable that performs defined tasks in the background without the user having to provide any input. Services are running all the time and even though you may not notice them, they do everything from telling you the latest updates are available for your PC to checking that the time on your computer matches the Internet time.

Unfortunately, Windows services are also the cause of much debate. If you search online, you’ll find hundreds of articles tell you how you can speed up your computer by disabling various “useless” Windows services. In the end, there are a few legitimate cases where you might want to disable a 3rd-party service, but otherwise they are essential for Windows to function properly and should not be disabled.

How Windows Services Work


Windows Tips: What is a Windows Service and Is It Worth Disabling

Creating a Windows service is a fairly easy process. Anyone who can code a normal Windows application can also create a Windows service. Actually, you can create an application that can be installed as a Windows service.

Windows services all start as Microsoft Visual Studio projects. A programmer will write code that will define what commands can be sent to a service and what actions should be taken when the commands are received. For example,starting, stopping, resuming or pausing a service are some of the most common commands.

Windows Tips: What is a Windows Service and Is It Worth Disabling

Once the application is built, the service can be installed using the command line or by using one of the deployment features of Visual Studio.A service is very different than a traditional Windows program.Here are a couple of major differences:

1. There is no way for a Windows service to interact with a logged-in user via prompts, dialog boxes, or any other GUI element.

2. Windows services start before the user logs onto a computer.

3. Windows services run in their own security context, meaning they can have more system privileges than the logged in user.

4. Once started, a Windows service runs indefinitely until it is either stopped/paused or the computer is shut down.

There are three special accounts in Windows that exist just for services: LocalService, NetworkService and LocalSystem. If you look at the screenshot above, you’ll notice that those are the three that show up for pretty much all of the services running in Windows. What’s the difference?

LocalService – This is a predefined local account that has minimum privileges on the system and will give anonymous credentials on the network. 

This account does not have a password and therefore it doesn’t matter what you type into the password field when using this account.NetworkService – This service acts as the computer on the network. Again, this account does not have a password either. When connecting to remote servers, the NetworkService will provide the computer’s credentials to the server.

LocalSystem – This account has extensive privileges on the system and can also act as the computer over the network. It basically has the same right as the built-in Administrators. This account also does not have a password. This is the only account that is not associated with any logged-on user.

Myth – Disabling Services Increases Computer PerformanceAs I mentioned earlier, disabling Windows services is normally a bad idea under most circumstances.That is not to say you should never disable a service. There are a lot of third-party non-Microsoft services that may be taking up extra resources on your system that you might not been.

The only downside to disabling those services is that you end up with something not working about a week or two later and then tear your hair out because you forgot about the services that you disabled. For example, I once had disabled the Adobe Flash Player Update Service because I figured I would updated Flash myself whenever I felt like it. 

Unfortunately, a few weeks later there was a security hole in the current version of flash and I just kept using it because I didn’t realize that there was an updated version with a security fix.

Also, if you look at the resources most services take up on your system using a tool like ProcessExplorer, you’ll find that unless the service is activated for some reason (maybe to download updates, etc), they leave a very small footprint in terms of memory and CPU use.

You’ll also notice that a lot of services are in the Stopped status. So even though you may have a lot of services installed, there are only a small subset of those services that are actually running.Lastly, Windows itself has also gotten smarter. In Windows 8, for example, if you install any third-party anti-virus program, Windows Defender will automatically be disabled. Sweet! No need to go disabling it yourself.

Managing Windows Services

The first place most people know to go to manage services in Windows is MSCONFIG. If you click on start, type in MSCONFIG and go to the services tab, you’ll get a full list of all services installed on your machine.

Windows Tips: What is a Windows Service and Is It Worth Disabling

You can check the Hide all Microsoft services box and then see only third-party services. Again be very careful when unchecking stuff here. A lot of people will tell you just to uncheck everything and your computer will boot up super fast. That’s true, but half the hardware and software on your system wont’ work either.

If you’re really keen on disabling a third-party service (like one of those updater-type ones), do a Google search and do a little research before you just uncheck it. Using this tool is great for troubleshooting problems in Windows, but it’s not the best way to increase computer performance.

You’re probably familiar with the first screenshot in this guide because it’s the second most common place to manage Windows services. Open Control Panel, then Administrative Tools and click on Services. Here you can double-click on any service and you’ll have four tabs: General, Log on, Recovery and Dependencies.

On the General tab, you can start, stop, pause and resume the service. If anything is greyed out, it probably means the service does not support that command.

Windows Tips: What is a Windows Service and Is It Worth Disabling

You can also see the exact path to the executable that is being run and you can change the Startup type (Automatic, Automatic (Delayed Start), Manual, Disabled). Automatic (Delayed Start) is a new option starting in Windows Vista that basically delays the start of the service so that Windows can boot faster to the desktop. If you check out the Windows Update service, for example, you’ll notice that it’s default setting is Delayed Start.

Windows Tips: What is a Windows Service and Is It Worth Disabling

In addition to delaying the loading of the service until after all the normal Automatic services are started, the delayed start services are loaded with the lowest priority for disk I/O and CPU usage, which means they won’t slow your system down in order to start up. The Log On tab is where you choose one of the special accounts or choose a user-created account for the service to run under. Changing the account that a service uses is not recommended at all unless it’s a service you created yourself.

Windows Tips: What is a Windows Service and Is It Worth Disabling

On the Recovery tab, you can specify what should happen if the service were to crash for example. By default, most Windows services have it set to Take no action, but there are some like the Print Spooler service that are set to automatically restart, which is good since you don’t want to lose your ability to print just because the print spooler service crashes once.

Windows Tips: What is a Windows Service and Is It Worth Disabling

The last tab basically shows you which services the current service depends on and which services are dependent on the current service. A lot of times if you have to restart one service, you will have to restart multiple services since they are all dependent on each other.

Conclusion

Windows services are essential for Windows to run properly and disabling services should be done with extreme care. It should only be done by someone who understands processes and can run and analyze tools like Process Explorer and Auto runs. You should also always do a bit of Googling to make sure what you’re doing is not going to mess something up. The worst thing you can do is read an article by random tech guy, disable a bunch of services and then go back to using your computer like normal.

Eventually, you’ll run into some problem and it’ll be very hard to figure out what the root cause is. Having a few extra processes running on your system with current hardware these days is really not an issue. Unless there is a very specific and urgent need, do not disable services in Windows.


"Windows Tips: What is a Windows Service and Is It Worth Disabling"


Reference : online-tech-tips.com