So what is a fairly simple task in Windows 7 turns out to take a bit of time in Windows 8. What task might that be? Hmm, maybe changing the IP to a static IP address! Granted, 80% of the extra time it takes to do it in Windows 8 is because of the new Metro UI, which makes it difficult to even get to the Control Panel easily.
In this article, I’ll walk you through the steps necessary to configure a static IP address in Windows 8. Along the way, I’ll mention a few things about Windows 8 and how you can make it a little less frustrating. For example, it’s nice to just add the Control Panel to your desktop rather than going through the whole Metro UI.
To get started, let’s go to the Start Screen. You can do that by moving your mouse to the lower left part of the screen (where the start button used to be), opening the charms bar by moving your mouse to the upper right corner of the screen and clicking on Start, or by simply clicking on the Windows key on your keyboard.Once on the Start Screen, right-click on a blank space and you’ll see the All Apps icon appear at the bottom.
Now you will see Control Panel if you scroll to the right side.
Go ahead and right-click on Control Panel and you’ll see it gets checked and a few options appear at the bottom of the screen. Go ahead and click Pin to Start and Pin to Taskbar. You may have to right-click on it again to do both.
Now you can open the Control Panel from the Windows 8 desktop or from the Start screen. Open the Control Panel and click on Network and Sharing Center.
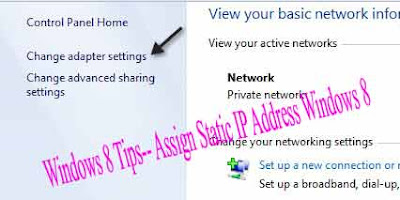
Now click on Change Adapter Settings in the left-hand pane.
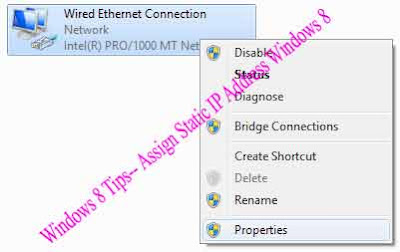
Right-click on the network adapter you want to make static and click on Properties.
Now click on Internet Protocol Version 4 (TCP/IPv4) and then click on the Properties button.
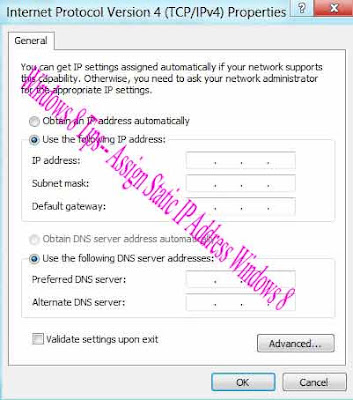
Finally, click on Use the following IP address and type in your static IP address. Whew!! That’s a long process for something so simple.
And that’s it! Yes a little long and drawn out, but it’s the same process once you get into the Control Panel. If you have any issues or problems, post a comment and we’ll try to help.
"Windows 8 Tips-- Assign Static IP Address Windows 8"
Reference : online-tech-tips.com


0Awesome Comments!