iPad and iPhone Tips: Remotely View Webcam on iPad or iPhone Apps

I have a 2 year old child and I also happen to have a computer in pretty much every room in my house. When I need to do something in another part of the house, it’s a real pain having to stop what I’m doing and go check to make sure my daughter is not about to dive off the bed. Once I realized I had a webcam already in every room of my house because of the laptops, I figured there had to be an iPad/iPhone app that would let me wirelessly stream a live webcam feed.

Actually, there ended up being a lot of apps! Too many to write about here. What I also realized is that most of them don’t work very well. After going through about 6 or 7 apps, I ended up sticking with 3 apps that work pretty well. Each has it’s own advantages and disadvantages. In this article, I’ll go through the three apps I tested and verified that work well in streaming a live feed of your webcam to your iPad or iPhone over WiFi. I didn’t test the whole 3G/4G remote viewing capabilities because that doesn’t seem like it would work well in any app and I didn’t need that feature.

iPad and iPhone Tips: Remotely View Webcam on iPad or iPhone Apps


iCam

iPad and iPhone Tips: Remotely View Webcam on iPad or iPhone Apps

The first app that I found when doing a generic search was iCam for $4.99. It seems to be the most popular and has the highest ratings in the AppStore. It’s pretty simple to setup. Just install the Windows or Mac software and install the app on your iPad or iPhone. The interface for the Windows software looks like this:

iPad and iPhone Tips: Remotely View Webcam on iPad or iPhone Apps

You can add a USB, Firewire or built-in camera or you can click on the Ethernet/Wi-Fi tab and add an IP camera also if you like. Just give your camera a iCam Login and iCam password and click the Start button. That’s it! Now go to the app on your iPhone or iPad and it will automatically find the source camera as long as it’s on the same network. The iPad version of the app is also designed to use the bigger screen real estate, so that’s a plus.

Overall, the process was easy to setup, but I was not happy with the quality of the video. For some reason, the video was very choppy and also pixelated. The program has a slider bar that lets you move it from Better Frame Rate to Better Image Quality, but neither one worked too well. When I moved it to better frame rate, the video was delayed by several seconds and was very grainy. When I moved it to better quality, the image got better and the delay became even worse!

I thought it had something to do with the computer or my Wi-Fi network, but when I installed the other two apps I am about to mention, the video quality was much better and the delay was usually under a second. I still recommend this app because it’s very highly rated and it could have just been some issue with my setup.


AirCam

iPad and iPhone Tips: Remotely View Webcam on iPad or iPhone Apps

AirCam was probably my favorite out of all the three apps. It worked well, had only a slight lag and the quality of the video was pretty good, especially for a cheap built-in webcam on my 3 year old laptop.

iPad and iPhone Tips: Remotely View Webcam on iPad or iPhone Apps

AirCam also lets you add IP cameras, so that is another plus. If you want, you can also remotely access it, but that requires extra configuration of your router, etc, which I didn’t do.

iPad and iPhone Tips: Remotely View Webcam on iPad or iPhone Apps


If you click on Options, you can enable night vision, configure remote access, setup the listening port, setup recording, motion detection, email notifications and more. The program has quite a few options, including the ability to choose your resolution, which really made a big difference. One downside is the iPad/iPhone app. It’s a little unpolished in the sense that when you start viewing a video stream, there is no way to go back to the main menu! 

You literally have to exit the app and then go back into it. Very strange and hopefully something that’ll be fixed in future releases. The other downside is that it’s $7.99! A little expensive if you ask me.

Overall, though, the app works well and does a good job of streaming video from your webcam and the setup process was again very easy. It automatically finds the sources and lists them in the app.


JumiCam



iPad and iPhone Tips: Remotely View Webcam on iPad or iPhone Apps


JumiCam is also $4.99 and also had very good video quality, even better than AirCam. The big downside to JumiCam in my opinion is that the iPad app just displays the iPhone app window. The iPad app is not optimized for the iPad interface and therefore you see everything in the smaller iPhone-sized window. I hope they release a version soon that takes advantage of the extra real estate on the iPad.

iPad and iPhone Tips: Remotely View Webcam on iPad or iPhone Apps

The other big downside to JumiCam is that it only has software that will run on Windows and not Mac. AirCam and iCam have both Windows and Mac software. The last downside is that you can only use it with webcams attached to your computer not IP cameras. However, for me it worked because I was only using built-in webcams on Windows machines. 

The quality of the video is where JumiCam stands out. Apparently, they wrote their own optimization algorithms and that’s why the quality is good. I would have preferred JumiCam over AirCam if only they had an optimized iPad version since the price is a lot better.So those are three apps you can use to wireless stream your webcam to your iPhone or iPad. If you have used a different app or software or have issues setting these up, post a comment. Enjoy!


"Remotely View Webcam on iPad or iPhone Apps"


Reference : online-tech-tips.com


Computer Tips: Network Folder Add to the search index in Windows 8

In Windows 8, the default search function indexes your Internet Explorer history, Start Menu, and the entire users folder on the system partition. What if you want to add a network folder to the search index in Windows 8? For example, let’s say you have a NAS (network attached storage) device and you have a bunch of videos, pictures and files on there that simply won’t fit on your PC?

In this article, I’ll show you how to go about adding a network folder to the search index so that when you search for a file from Explorer or from the Search Charm, you will also get results that include files stored in the network folder.

Step 1 – Share Folder

The first thing you want to do is actually share the folder you want to include in the index. You’ll need to share the folder on your NAS or on the host machine, if it’s files stored on a Windows 7 PC, for example. As an example, I wanted to include some files stored on my Windows 7 PC in the Windows 8 search index. These are the three test files I want to include:

Network Folder Add to the search index in Windows 8


So I went to Windows 7 and shared the folder by right-clicking and choosing Properties.


Network Folder Add to the search index in Windows 8


Then I clicked on the Sharing tab, Advanced Sharing, checked Share this folder, clicked on Permissions and gave Everyone Full Control. You obviously don’t have to give everyone full control, I’m just doing it here because it’s easier to setup.

Step 2 – Map Network Drive

Next you have to map the folder as a drive in Windows 8. You can do this by opening Explorer and then clicking on Network at the bottom. Find your NAS, file server or PC in the list and then double-click on it to see the shared folders.

Network Folder Add to the search index in Windows 8


Go ahead and click on the shared folder and then click on Easy access and Map as drive. Note that you can also just right-click on the folder and choose Map network drive. You’ll need to provide credentials to log into the file server or network PC.


Network Folder Add to the search index in Windows 8


Note that unless both machines have the same username and password, you’ll need to check the Connect using different credentials box and then type in the username and password for that computer or file server. Now when you go to computer, the mapped drive should be listed.

Network Folder Add to the search index in Windows 8


Now right-click on the network drive and click on Include in library. Then go ahead and pic the appropriate library: documents, music, pictures or videos. I suggest creating several shared folders if you have different types of content you want to include in the Windows 8 index. Then include each shared folder into the appropriate library on Windows 8.

Once you do this, the new files will be scanned and included in the Windows 8 search index. Depending on how many files have been added, it could take some time before you start seeing the results. Now when I perform a search, I see documents from my network folder:

Network Folder Add to the search index in Windows 8

Sweet! And notice that for certain file types like Word documents, it also indexes the contents of the files, so you can search inside text files, etc. This also works from the Search Charm in Windows 8:

Network Folder Add to the search index in Windows 8


That’s about it! If you have any problems adding a network folder to your Windows 8 search index, post a comment here and I’ll try to help. Enjoy!


"Network Folder Add to the search index in Windows 8"


Reference : online-tech-tips.com


Computer Tips: Save Files in Computer By Default And access them from anywhere,Office 2013


In Office 2013, if you are logged in using your Windows Live account, by default when you go to save a file, it will try to save the file to your Windows SkyDrive account. This is a new feature of Office 2013 that aims to help you move your documents to the cloud so that you can access them from anywhere.

Computer Tips: Save Files in Computer By Default And access them from anywhere,Office   2013

I think this is a great feature, but I’m not really too happy that Microsoft defaults saving of all files to SkyDrive! I personally don’t want to save most of my documents to the cloud and find it rather annoying to have to keep clicking on Computer to save an Office 2013 file locally.

Luckily, there is a setting you can change so that Office 2013 will save files locally by default and if you want, you can always manually save the file to your SkyDrive account. 

Here’s how to do it.First, open any Office 2013 program like Word 2013. Then click on File and click on 
Options.

Computer Tips: Save Files in Computer By Default And access them from anywhere,Office   2013

Now go ahead and click on Save in the left-hand pane and then check the box that says Save to Computer by default.

Computer Tips: Save Files in Computer By Default And access them from anywhere,Office   2013

You can also change default local file location if you like in the box below the checkbox. Now when you go to save a file, it will save it locally rather than to your SkyDrive account.

Computer Tips: Save Files in Computer By Default And access them from anywhere,Office   2013

The one nice thing about Office 2013 is that when you make that change in Word 2013, for example, then it automatically changes the default Save location on all the other Office programs like Excel and Powerpoint, so you don’t have to change if for each individual application. Enjoy!


"Computer Tips: Save Files in Computer By Default And access them from anywhere,Office 2013"


Reference : online-tech-tips.com


Computer Tips: Mount ISO images in Windows 8 without any additional third-party software


There is one great new feature of Windows 8 that has made life easier for some of us out there: you can now mount ISO images in Windows 8 without any additional third-party software! Yay! I’ve played around with mounting various ISO images and so far I have found that it works most of the time.

Unfortunately, there seem to be a few bugs that are preventing Windows 8 from mounting all ISO images and I can’t figure out why some mount and some don’t. I’m hoping they release a few Windows updates in the coming months to fix the outstanding issues.

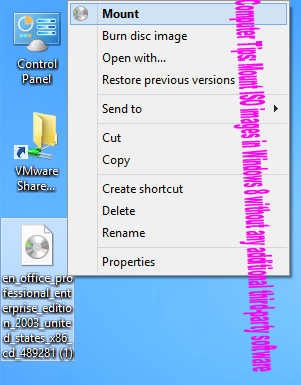
Overall, however, it works great and here’s how you can mount ISO images in Windows 8.Mount ISO Image in WIndows 8 by Right-Clicking.The easiest way to mount an ISO mount is to simply right-click on the ISO file and choose Mount.

Computer Tips: Mount ISO images in Windows 8 without any additional third-party software

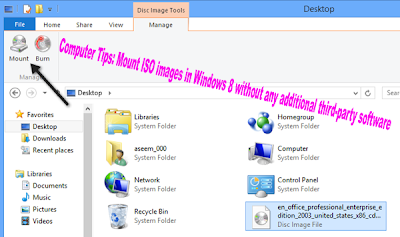
Mount ISO Image in Windows 8 using Explorer.The second way to mount an ISO image is to go to Windows Explorer and select the file. Windows 8 will detect that it’s an ISO image and will show another tab in the ribbon interface called Disc Image Tools. Under Manage, click on Mount.

Computer Tips: Mount ISO images in Windows 8 without any additional third-party software

That’s about it! Once the image has been mounted, you will see it appear as a new drive in My Computer.

Computer Tips: Mount ISO images in Windows 8 without any additional third-party software

By default, Windows 8 will just pick the next letter available when mounting an ISO image, but if you want to change the drive letter you have to right-click on My Computer and go to Manage.

Computer Tips: Mount ISO images in Windows 8 without any additional third-party software

Then click on Disk Management and right-click on the drive letter and choose Change Drive Letter and Paths.

Computer Tips: Mount ISO images in Windows 8 without any additional third-party software

Now just choose the drive letter that you want to use for the mounted ISO image.

Computer Tips: Mount ISO images in Windows 8 without any additional third-party software


You can mount multiple ISO images on Windows 8 at the same time if you like and you can also burn ISO images on Windows 8 without any additional software by clicking on the Burn button in the above screenshots. Enjoy!


"Computer Tips: Mount ISO images in Windows 8 without any additional third-party software"


Reference : online-tech-tips.com


iPhone Tips: You Really Need to Buy an iPhone See few points

If you’re someone who is still using a “dumb” phone as it’s called, then you might be considering either replacing it or getting an additional phone that is a smartphone like the new iPhone 5 coming out soon. Why? Well, there are a ton of reasons. But first, I want to go through the reasons why people still using dumb phones.

Of all the people I know, there are only a couple of people who carry non-smartphones. I asked them why and basically the reasons could be broken down into a few points:

1. They don’t want to be contacted anytime by anyone. They prefer to turn off their phones and use it only when needed.

2. They don’t use email and don’t understand what an app is. They also don’t understand finger swiping and touch screens.

3. Browse the Internet? Why browse the Internet when I can read a book and watch the nightly news and favorite TV shows every week at the same time?

4. Why pay lots in monthly data fees when I use my phone for calls only?If you’re one of those people, I completely understand the lack of interest in a smartphone.

Not using any apps makes pretty much any smartphone about 70% less useful. No email? Another 10% less useful. So is there really any reason for someone like this to buy a smartphone? Maybe not,

iPhone Tips: You Really Need to Buy an iPhone See few points


Firstly, it’s worth making the point that unless you actually start using something, you really can’t be certain how much you’ll end up using it. For example, my brother had a regular phone until the age of 30 and was always against getting an iPhone because it was “hyped” and he didn’t want to follow the bandwagon. He used his computer a lot for tracking stocks and kept notecards in his pocket to jot down tasks and thoughts!

He eventually got an iPhone as a gift and it changed his life literally! He uses the thing constantly and readily admits that it has made him a hundred times more productive. Now that being said, we bought my mom an Android phone and she used it for 2 weeks and then returned it because she wasn’t using any data or apps, but was forced to pay for a data plan. She ended up getting a regular phone again. My brother was a lot younger and that could have helped in his getting over the learning curve much faster.

But there is a middle ground solution that I have found works great for people who don’t feel they need smartphones, but maybe want to get some of the benefits of touch screens, bigger screens, apps, etc. Instead of getting an iPhone, you can buy an iPod Touch and get everything that the iPhone has except for the ability to make phone calls and the ability to connect to a 3G or 4G network.

I have found that this reduces the cost significantly since you don’t have to pay for the extra data plan and you still get all the benefits that the iPod Touch provides. It also lets the person learn how to use a smartphone-type device slowly without all the extra costs.Unless you travel a lot, finding a good Wifi connection is a piece of cake these days and rarely do I ever need to use the 3G/4G connection to do something.

iPhone Tips: You Really Need to Buy an iPhone See few points

I quickly realized this was the best thing for my parents. They had phones for making calls already and getting them an iPod Touch let them connect with the rest of the family who have a combination of iPhones and iPads. So what are the benefits to getting an iPod Touch?

1. You can FaceTime with any Mac, iPad or iPhone, so if your friends and family have them, then it’s perfect for video calling.

2. iMessage lets you send text messages for free to iPhones, iPads and Macs. Also, you can download WhatsApp messenger and SMS to other devices like BlackBerrys all for free.

3. The camera is pretty awesome and lets you capture pictures and videos you could never get with a regular phone.

4. Even though it does not have a built-in GPS, the iPod Touch can still find your location very accurately using Wifi connections. That means you can still use it for directions and maps.

5. Browse the web on the iPod Touch. Even if you don’t use the Internet that much, having the option is still a good thing since pretty much everything has some manifestation online too.

6. Unless you are really out of the modern world, you probably have a personal email or at least a corporate email account. Even if you just receive emails like discount coupons or Facebook notifications, it’s nice to have it available.

Of course, you can do lots more with an iPod Touch than listed above, but it all depends on the comfort level of the user. My main point is that you only need an iPhone for the following reasons:

1. You have the extra cash to pay for a monthly data plan that you will actually use.

2. You know how to use a smartphone way more than the basic level, i.e. tapping to open apps, navigating around by swiping, etc.

3. You need the ability to use apps, email, text messaging, etc while not connected to a Wifi network.

That’s about it! If you don’t have the extra cash for monthly fees and you can live off Wifi, go for something like the iPod Touch. If you only know how to use a smartphone at a basic level and will never use the more advanced features mentioned above, then you probably don’t need either and a regular phone would work just fine. What’s your take? Need one or not.


"iPhone Tips: You Really Need to Buy an iPhone See few points"


Reference : online-tech-tips.com


Computer Tips: Protection in Internet Explorer 10,Do Not Track and Tracking

By default, Internet Explorer 10 turns on a feature called Do Not Track. It basically relates to how much information a website and advertisers can capture about you as you browse the web. By default, Do Not Track is turned off on all the other major browsers including Firefox, Safari, Chrome and Opera. Only IE 10 has it turned on by default.

This has caused quite a storm of controversy because a lot of groups feel it should be explicitly turned on by the user instead of being chosen for them automatically. Either way, if you want to turn off Do Not Track in IE 10 (meaning you can be tracked online), here’s how to do it.

First, open the desktop version of IE 10. Then press the ALT key on your keyboard to get the file menu. Click on Tools and Internet Options.

Computer Tips: Protection in Internet Explorer 10,Do Not Track and Tracking

Click on Advanced and then scroll down to the Security section and uncheck the “Always send Do Not Track header” box.

Computer Tips: Protection in Internet Explorer 10,Do Not Track and Tracking


That’s about it. In Internet Explorer 10 (and first introduced in Internet Explorer 9), you can also enable Tracking Protection Lists for even more tracking protection. To do this, click on Tools – Tracking Protection.

Computer Tips: Protection in Internet Explorer 10,Do Not Track and Tracking

You can either create your own personalized list and add sites that you do not want to track you or you can click on Get a Tracking Protection List online and download ones that have been created and updated by third-parties. Once you download a TPL, click on it and then click Enable.

Computer Tips: Protection in Internet Explorer 10,Do Not Track and Tracking


Those are two ways that Internet Explorer 10 enables tracking protection. By default, tracking protection is disabled, but Do Not Track header is enabled. You now know how to enable or disable either one. Enjoy!


"Computer Tips: Protection in Internet Explorer 10,Do Not Track and Tracking "


Reference : online-tech-tips.com


Computer Tips: Software Programs Updated Support Windows 8 and new Metro UI


With Windows 8 right around the corner, it’s time to start looking for software that is designed for the new OS. So far, a few companies have released new versions of their software packages that support Windows 8 and the new Metro UI. In this article, I’ll mention a couple of the early-adopters and what you can expect from the software.

Auslogics BoostSpeed 5.4

Computer Tips: Software Programs Updated Support Windows 8 and new Metro UI

The latest version of Auslogics BootSpeed supports new Windows 8 features, except the new Metro UI. The program will still run on the Windows 8 desktop, but it has several major enhancements that are specifically for Windows 8 including:

1. Redesign of the Tweak Manager tool for support of new Windows 8 tweaks

2. Support for Metro processes in the Task Manager

3. An optimized installer made for the Metro UI

4. Updated support for Internet Explorer 10

5. Updates to Rescue Center to support Windows 8

Cyber Link Digital Media Software

Computer Tips: Software Programs Updated Support Windows 8 and new Metro UI

Cyber Link is a digita media company that sells a lot of multimedia applications including Power DVD, Photo Director, You Cam and more. All of their software is now updated to work with Windows 8 and they also have 3 Metro apps you can download from the Windows Store.

Power DVD is a powerful media player, You Cam is web cam software that lets you create some cool videos with your web came, Power Directory is video editing software and Photo Directory is an advanced photo editing tool.

Paragon Image Backup for Windows 8

Computer Tips: Software Programs Updated Support Windows 8 and new Metro UI

Paragon Software has released a freeware backup tool for Windows 8 called Image Backup. It’s one of the first backup programs to support the new ReFS (Resilient File System) that is in Windows 8. You can also create a live backup while running Windows 8 to backup the entire disk system. It also has a DOS and Linux recovery environment to restore your data.

VLC Media Player

Computer Tips: Software Programs Updated Support Windows 8 and new Metro UI

Since Windows 8 lacks native support for playing DVDs, then you’ll definitely want a great media playback software. VLC Media Player has been around for a long time and plays pretty much everything. VLC was recently updated to version 2.0.3, which now includes support for Windows 8 and corrects the GUI so that it displays properly on the new OS.

The VLC team may release a full Metro-style version of the media player in the future, but at this point, this update just makes the software compatible with Windows 8.

Ease US Todo Backup Free

Computer Tips: Software Programs Updated Support Windows 8 and new Metro UI


Ease Us Todo Backup Free 5 is another free backup tool that also has been updated to support Windows 8. In addition to Windows 8 compatibility, it also supports hard drives larger than 2 TB and the ability to backup by file type. They also have paid versions of the software that include other features like Outlook backup and restore, Windows 7 Libraries backup/restore, support for dynamic volumes, ability to backup to a NAS and lots more.

There will obviously be a lot more software applications that will get updated in the next two months before the official release of Windows 8, so I will keep this post updated. Enjoy!


"Computer Tips: Software Programs Updated Support Windows 8 and new Metro UI"


Reference : online-tech-tips.com


Computer Tips: Computer would login Automatically to Windows 8 with Microsoft or Local Account

With Windows 8, there are now two ways to log into your computer: via a Microsoft account that syncs your settings and apps across Windows 8 PCs and via a local account that has been the standard since the beginning. For my computer at home, I’ve always removed any passwords and set it up so that the computer would login automatically.

When I started using Windows 8, I realized I liked using the Microsoft account so that I could easily transfer apps and settings between different Windows 8 machines. However, this requires logging in using my email address and password. I wasn’t so sure I was going to be able to configure automatic login since it was an online account.

Luckily, even with the Microsoft account, you can configure Windows 8 to login automatically. In this post I’ll walk you through the steps to do this.

Login to Windows 8 Automatically
To get start, go to the Start screen and then open the Charms bar by either moving your mouse to the top right corner of the screen or pressing Windows Key + C. Then click on Search.

Computer Tips: Computer would login  Automatically to Windows 8 with Microsoft or Local   Account

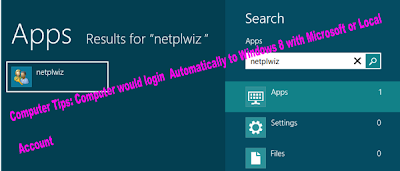
Now in the search box, type in “netplwiz” and you should see one app result pop up in the left hand pane.

Computer Tips: Computer would login  Automatically to Windows 8 with Microsoft or Local   Account

Next click on the username in the bottom window, which should be your email address if you are using the Microsoft account to log into your Windows 8 PC.

Computer Tips: Computer would login  Automatically to Windows 8 with Microsoft or Local   Account

Now you need to uncheck the Users must enter a username and password to use this computer box. After you do that, click OK and you’ll get a pop up dialog that asks you to enter your login credentials.

Computer Tips: Computer would login  Automatically to Windows 8 with Microsoft or Local   Account

For some reason, it uses some odd username that is not the same as your email address, so don’t change it. It must be some internal representation of your email address that 

Windows 8 actually uses to log into Windows. Just type in your Microsoft account password twice and click OK.

Now go ahead and restart your computer and Windows 8 should automatically boot up to the Start Screen, bypassing the login screen altogether.

Computer Tips: Computer would login  Automatically to Windows 8 with Microsoft or Local   Account


That’s it! Hopefully, it worked for you. If you have any issues, please post a comment here and I’ll try to help you out. Enjoy--


"Computer Tips: Computer would login  Automatically to Windows 8 with Microsoft or Local Account"


Reference : online-tech-tips.com


Computer Tips: Change from Public network or Private network in Windows 8

In Windows 8, when you connect to a wireless network, it will either register it as a Public network or a Private network. Private networks are basically home and work whereas private is anywhere else. Sometimes Windows 8 detects a private network as a public one and vice versa. You can manually make some changes to ensure that you are not accidentally sharing either too much on a public network or blocking all sharing on a private network.

First, right-click on the network icon in the Windows 8 system tray and click on Open Network and Sharing Center.


Change from Public network or Private network in Windows 8


Here you will see the network you are connected to and what type of network Windows 8 has identified it as.


Change from Public network or Private network in Windows 8


As you can see above, my network is considered a Private network, which is correct since I’m at home and connected via Ethernet. If this is incorrect, there are a couple of things you can do. First, you can click on Change advanced sharing settings in the left-hand pane.


Change from Public network or Private network in Windows 8


Click on Private and then make sure you have these options enabled:

- Turn on network discovery

- Turn on file and printer sharing

- Allow Windows to manage home group connections


Change from Public network or Private network in Windows 8


Then collapse Private and expand Guest or Public and make sure you have these options set:

- Turn off network discovery

- Turn off file and printer sharing


Change from Public network or Private network in Windows 8


Once you have done this, you then need to go to the Windows 8 desktop and open the Charms bar. Click on Settings and then click on the Network icon.


Change from Public network or Private network in Windows 8


You’ll see Network and then Connected. Go ahead and right-click on that and choose Turn sharing on or off.


Change from Public network or Private network in Windows 8


Now choose Yes if you want your network to be treated like a private network and no if you want it to be treated like a public network. Note that the label Private or Public may remain the same in Network and Sharing Center, but once you choose the sharing settings manually, the network will have the appropriate settings applied.


Change from Public network or Private network in Windows 8


As a last resort, if you really can’t stand that the label is Public when the network is actually private, you can manually change the network location using a tool called secpol.msc. Click on the Start Screen, then right-click and choose All apps, then click on Run. Type in secpol.msc into the run dialog box.


Change from Public network or Private network in Windows 8


Then click on Network List Manager Policies at the left and on the right-hand side you should see a couple of items with descriptions and then something called Network, which is the current network you are connected to. It may also be called something else, but it doesn’t have a description.


Change from Public network or Private network in Windows 8


Double-click on it and click on the Network Location tab. Here you can manually change the network location from Private to Public and vice versa.


Change from Public network or Private network in Windows 8


That’s about it! Not the easiest thing in the world, but it’s Microsoft! If you are having problems with changing network locations in Windows 8, post a comment here and we’ll help. Enjoy--.


"Change from Public network or Private network in Windows 8"


Reference : online-tech-tips.com