I barely use Office 2010 nowadays, so when I actually need it for something, it takes me more time to understand how to do something than it does to actually do it. Case in point: I wanted to make a document read-only in Word 2010 and I thought it would be fairly easy to setup.
Unfortunately, it’s easy, but there are literally 5 different ways you can restrict editing or protect a document in Word and depending on which option you choose, you’ll get a different outcome. On top of that, you can enable multiple of these options at the same time, which makes it even more confusing. In this article, I’m going to walk you through all the different options for protecting a document or making it read-only and explaining the advantages and disadvantages for each.
Note that you can also save yourself some hassle and make a document read-only by converting it to a PDF file. However, I’m assuming if you’re reading this,you need to use a Word document over a PDF format.
Before we start,let me mention the different options so that we can have a clear understanding of what all the options are. Here are the options I found in Word 2010:
A- Save As, Tools, General Options (Read-only and passwords)
B- Mark as Final
C- Restrict Editing (Protect Document)
D- Encrypt with Password
E- Restrict Permission by People
I’ll start out with the easier stuff and then move on to the more technical options.There are a couple of options that “discourage” editing, but don’t really mark the document as read-only.Those are Mark as Final and Read-only check box when doing Save As.
Mark as Final
You can mark a document as Final in Word 2010, meaning that it is complete and there should be no more changes to it. You can do this by going to the File ribbon, clicking on Info and then clicking on Protect Document and choosing Mark as Final.
When you do this, it will disable all the ribbons in Office 2010 so you cannot edit the document. However, it’s pretty weak in the sense that a big toolbar pops up saying the following:
An author has marked this document as final to discourage editing. Edit Anyway.
All you have to do is click on the Edit Anyway button and you can now edit the document again! So not really protecting it, but just giving users a default read-only which can be turned off if they want.
So if you need something a little more controlled by you and not the reader, then you’ll have to try some of the more advanced read-only options.
Save As Read Only
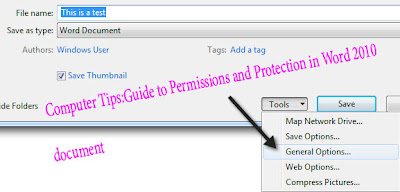
The next option is when you are saving a document.You can click on Tools and then General Options.
Here you’ll see a couple of options including adding a password for opening the document, adding a password for modifying it, checking read-only and the option to Protect Document.
Let’s start off with just checking Read-only recommended. If you check just this box, then next time you open the document, you’ll get this dialog saying the document “should” be opened as read-only unless you want to make changes. Again, the user could just click No and then edit the document.
Now here is where things start to get confusing.What’s the difference between the password to open, password to modify and the Protect Document option? Well let’s go through them below.
Password to Open
If you type a password in the Password to open box, the next time you try to open the document, you’ll be asked to enter the password before you can even view the document. Note that with this option, you can even view the document in read-only mode either.You have to know the password in order to view the document.
Once you are in the document, you can still editing everything as long as editing has not been restricted, which I’ll explain in just a minute.Note that using the password to open option also encrypts the document, so it’s much harder to hack the password. If you just type in a password for Password to modify, it can be hacked.
Password to modify
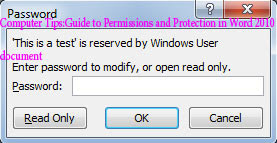
With this option, you’ll see a dialog again when you first open the document. If the user knows the password, they can type it in and edit the document. If not, they can click the Read-Only button and view the document, but not edit it.
When you open the document in read-only mode here, it does not disable all of the ribbons.The person can type or do whatever to the document, they just can’t save over the original file.This means they can edit the file and then do a Save As and save it under a different name.
This is the first real option for actually making the original document read-only. Note, however, that the document is not encrypted and that means the password can easily be hacked.
Protect Document
If you click on Protect Document from the dialog above or if you click on the Review ribbon and click on Restrict Editing, you’ll get the following sidebar pop up in Word 2010:
Here you can limit the editing within the document after the user has already opened it. So let’s say you didn’t want to worry about having user enter passwords to view the document, you could just come straight to restrict editing, check the box under number 2 for no changes and then click Yes, Start Enforcing Protection.
You’ll have to enter a password here too.
When you do this and you don’t set password to open or password to modify, then anyone can open the document, but when they go to try and edit anything, it’ll ask them for the password. Note that this password is different, so you can literally have 3 passwords to
protect one Word document!
Again, this password is also not encrypted, so it can be hacked fairly easily if you know what you are doing. For complete protection, you would have to enable encryption, which you can do by typing in a password for Password to Open or going to File, Info, Protect Document and clicking on Encrypt with Password.
Restrict Permission by People
The last option you have is to restrict the document by person. You can do this by clicking on File, Info, Protect Document, Restrict Permission by People, and then click on Restrict Access. In order to use this feature, you have to use the Information Rights Management service from Microsoft, which means you to
either already have or create a Windows Live ID.
Once you sign up, you can them manage the read and modify permissions, which will basically be someone’s email address.If you don’t add any email address, then only you can open the document. Also note that you can’t open the document unless Word can connect to the Internet and verify your credentials.
As I mentioned before, you can turn on multiple forms of protection and permissions if you like. Word 2010 has quite a few ways to configure your document for sharing, so hopefully one of the methods above meets your needs. If you have any questions, post a comment and I’ll try to help. Enjoy.
"Computer Tips:Guide to Permissions and Protection in Word 2010 document"
Reference : online-tech-tips.com


0Awesome Comments!