Windows 8 Tips: You can Enable God Mode in Windows 8

Windows 7 users were delighted when they found out about a secret feature called God Mode. It basically lets you create a folder with a special name that then gives you access to just about all of the controls, options and settings for the OS.

Luckily, you can enable God Mode in Windows 8 too! This is actually really useful because in Windows 8, you have system settings in two different places: one set of settings for the Start Screen and a second set of settings for the Desktop environment. If you hate the Start Screen and don’t like the fact that you have to use the Charms bar to get to the Start Screen settings, you can use God Mode to access all of the settings via the familiar desktop environment.

To get started, just create a folder on the desktop and name it whatever you like. After that, right-click and it and choose Rename.

Now just add the following to the end of the folder name:

.{ED7BA470-8E54-465E-825C-99712043E01C}

As you can see, you need to include the . before the opening bracket. Here’s my mine looks like:

All Settings.{ED7BA470-8E54-465E-825C-99712043E01C}

Windows 8 Tips: You can Enable God Mode in Windows 8

If you’re not able to do this, you might have to show hidden files and show file extensions in Windows Explorer first. You can do that by going to the desktop, opening a Windows Explorer window and then clicking on the View tab. Now check the “File Name Extensions” and “Hidden Files” boxes.

Windows 8 Tips: You can Enable God Mode in Windows 8


When you press Enter, the icon on the folder changes into one that is exactly the same as the Control Panel.

Windows 8 Tips: You can Enable God Mode in Windows 8

However, if you click on the new GodMode icon, you’ll get a folder with a bunch of links to all kinds of settings on Windows 8. It’s nice because it even breaks it down by category like Action Center, Administrative Tools, Devices and Printers, Date and Time, Display, Folder Options, Troubleshooting, etc.


Windows 8 Tips: You can Enable God Mode in Windows 8

Now you can access every single setting and option in Windows 8 from one folder! So if you are having a hard time finding a particular setting or control panel item, just open this folder and do a search. It’s great because you can narrow down the huge list by typing in a few keywords.


Windows 8 Tips: You can Enable God Mode in Windows 8

Sweet! So that’s how you enable GodMode in Windows 8. You can also go ahead and pin the Gode Mode shortcut to your Start Screen for easier access. Just right-click on the icon on the desktop and choose Pin to Start.

Windows 8 Tips: You can Enable God Mode in Windows 8

Now you can access all of the settings available in God Mode via the Start Screen also.

Windows 8 Tips: You can Enable God Mode in Windows 8

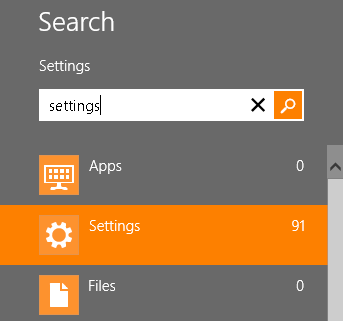
However, there is also another way to get access to a lot of settings in Windows 8. The new Start Screen has a built-in search option that lets you search all system settings. Go to the Start Screen and type in the word Settings.

Windows 8 Tips: You can Enable God Mode in Windows 8

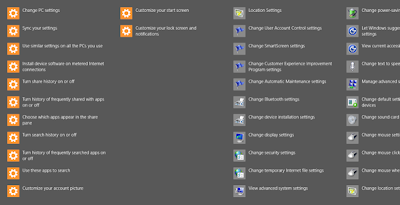
You get a pretty big list of 91 settings you can adjust. Just swipe with your finger or scroll with your mouse to access all of the settings.


Windows 8 Tips: You can Enable God Mode in Windows 8

Pretty cool! So those are two ways you can make it easier to find system settings on Windows 8: GodMode and via the search option on the Charms bar. Enjoy!


"Windows 8 Tips: You can Enable God Mode in Windows 8"


Reference : online-tech-tips.com


Windows 8 Tips: Use 5 Tasks That Should Have Been Simpler In Windows 8


I’ve been using Windows 8 for a while now and even though I like using it, there are still some really annoying aspects of the OS that I just don’t get. For instance, why is it so hard to do things that used to be so easy? Restart your computer? Print from a Windows app? The OS has been “re-imagined”, but I find some of the new ways to get simple things done frustrating. Here’s my gripe list for Windows 8.

Windows 8 Tips: Use 5 Tasks That Should Have Been Simpler In Windows 8


Shutting Down and Restarting Windows 8

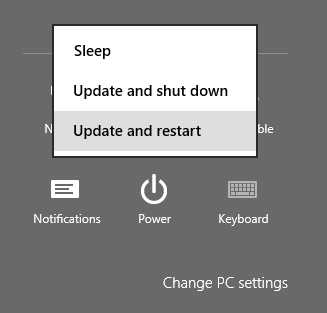
I don’t restart or shutdown my computer often, but it really should be easier than opening the Charms bar and having to click three times! I’m not really sure why Microsoft didn’t put a shut down and restart option on the Start Screen somewhere just click they have the Lock and Sign out options. Instead you have to open the Charms bar, click on Settings, then click on Power and then click on Restart or Shutdown.

Windows 8 Tips: Use 5 Tasks That Should Have Been Simpler In Windows 8

You can add the shutdown and restart options to the right-click menu or create shortcuts on the Start Screen, but at the end of the day, it should have been a simpler task to accomplish.


Printing from Windows Apps

This one really gets me too! It took me a while to figure out how to print from a Windows app. I tried my best not to search on Google because I wanted to figure it out myself. I assumed it would be easy enough since that is something that just about everyone under the sun does quite often.

Windows 8 Tips: Use 5 Tasks That Should Have Been Simpler In Windows 8

Again, you have to open the Charms bar and click on Devices. There you will see your list of printers. Not very intuitive if you ask me. Thankfully, you can still press CTRL + P to print while inside of Windows apps. If you’re trying to print a PDF using the built-in Reader app, that’s how you do it!


Closing Apps in Windows 8

Going from clicking the X in a normal desktop app to closing apps in Windows 8 is going from Earth to Mars. Basically, Microsoft’s perspective is that you can just leave Windows apps open all the time and switch back and forth between them. I personally don’t like that idea too much.

There are a couple of ways to close an app in Windows 8. The easiest way is to move your mouse up to the top center of the screen, click your left mouse button and then start dragging down. The app windows becomes smaller and then simply disappears once you reach the bottom of the screen. You’ll be brought back to the Start Screen once the apps closes.

Windows 8 Tips: Use 5 Tasks That Should Have Been Simpler In Windows 8

You can also read my previous post on using the hot corners on the left side of the screen to close running Windows 8 apps. However, that method still requires you to manually close each app. What if you have 20 apps open? Check out the last tip in my 5 tips for speeding up Windows 8 to see how you can close all running Windows apps at once.


Booting to Safe Mode

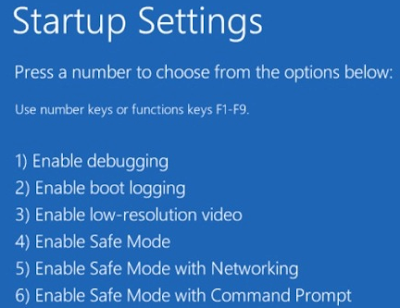
Gone are the days of pressing F8 to get your list of boot options. Now you have a multi-step process to get into Safe Mode in Windows 8. First, you have to boot into System Recovery Options. Once you are there, you then have to go through a bunch of prompts before you finally get the option to boot into Safe Mode.

Windows 8 Tips: Use 5 Tasks That Should Have Been Simpler In Windows 8

The new boot screens are a lot nicer looking than previous versions of Windows, but it makes the process a lot more complicated. Getting into Safe Mode used to be so easy, now it’s not!


Playing DVDs

Microsoft removed the ability of Windows 8 to play DVDs due to licensing costs, but if you have included something in Windows for that long, just removing it without any clear guidance is frustrating. 

Obviously, most consumers buying new Windows 8 PCs won’t be affected because the manufacturer will probably install some kind of DVD playing software.

However, if you are upgrading to Windows 8, even Windows 8 Pro, you still either have to download third-party software or purchase the Windows Media Center add-on pack. It’s not that expensive for the add-on pack and you can always download a program like VLC media player, but it is definitely confusing to novice users.

Over time, I’m sure everyone will get used to these new ways of doing things, but for right now, it’s something that makes me feel I have to do extra work. What do you think? Do you like Windows 8? Any tasks you feel take longer in Windows 8 than in previous versions? Let us know in the comments. Enjoy!


"Windows 8 Tips: Use 5 Tasks That Should Have Been Simpler In Windows 8"


Reference : online-tech-tips.com


Computer Tips: Child Proof your Computer use 7 Ways


I have a 2 year old daughter and I have realized the importance of child-proofing my computer! The second I turn around, she runs to my desk, jumps on the chair and starts banging away at the keys. If the computer is already on, she has figured out how to move the mouse and click on anything she can. It’s great fun for her, but a major headache for me.

I didn’t really think she could do anything, but apparently randomly pressing a bunch of keys on the keyboard can accomplish a lot more than you think! My daughter sent emails, deleted folders, opened programs, and even moved files with her keyboard slamming. In this article, I’ll talk about a few ways you can child-proof your computer and hopefully save yourself some grief. If your kids are older, I’ll also give you some tips for them too!

Method 1 – Lock Your Computer

This simple option solved most of my problems with my daughter. If the computer was off and she slammed the keys, it would turn on, but remain on the locked screen. Thankfully, she’s too small to enter a password just yet!

Computer Tips: Child Proof your Computer use 7 Ways

Before my computer goes to sleep, the screen saver usually comes on. I also enabled the password on the screen saver in case she gets to it before the computer sleeps. I have my computer sleep after about an hour, so there are a lot of times when the screen saver is on.

Method 2 – Use a Limited Account or UAC

The first method only works for really young toddlers, not with kids that are older than 3. By that age, they will probably scream and yell until you let them on the computer. At this point, you need to give them access to the computer so they can play games or do whatever, but also make sure they can’t do anything else.

Computer Tips: Child Proof your Computer use 7 Ways

One way to do this is to use a locked down user account. You can use the Guest account in Windows, which has limited user rights across the system. The Standard user account still has a lot of permissions and 
can do quite a bit. The guest account is disabled by default, but you can enable it and it prevents the user from installing software, changing settings, etc.

Another feature in Windows is UAC (User Account Control). You can set this to the highest setting and any standard user account will have to enter a password in order to complete the task. UAC pops up quite a bit if you  have it set to the highest setting, so those users will not be able to change most of the settings on the computer.

Computer Tips: Child Proof your Computer use 7 Ways


Method 3 – Parental Controls

Windows 7 and Windows 8 have built-in parental controls that let you restrict the programs that can be run on the computer, the time the computer can be used and even filter web sites the user can visit.

Computer Tips: Child Proof your Computer use 7 Ways

You can Google on how to enable Parental Controls and this may suit your needs. It’s not total protection, but it can help you control what can be done on the computer. If you are worried about data being deleted or getting a virus, this method won’t work very well.

There is also a feature in Windows 7 (not the Home version) called AppLocker that prevents programs from being run. You can basically choose which programs you want to allow to be run and the user will only be able to open those programs. You can learn about AppLocker here.


Method 4 – Group Policy

Parental Controls is nice, but if you want access to a ton more rules and restrictions, you’ll have to familiarize yourself with group policy. You can restrict access to drives, restrict access to the Control Panel, remove tabs from IE options dialog, restrict access to the registry, command prompt or task manager, prevent users from deleting browsing history, and all kinds of other stuff. Group policy can control every aspect of Windows, so you can really lock down a computer hardcore by using it. To get to the local group policy for a PC, just type gpedit.msc when you click on the Start button.

Computer Tips: Child Proof your Computer use 7 Ways


If you are running Windows 7 Home or Starter, you won’t be able to use local group policy settings. Unfortunately, it only works on Windows 7 Pro, Ultimate and Enterprise. If you have any of these versions, it’s super useful for locking down a PC. There are a ton of articles online that explain how to use local group policy, so have fun!


Method 5 – Encryption

If you’re looking for a way to keep your data safe, you may want to look into creating a secure encrypted container on your system. You can do this using a program called TrueCrypt. It’s a free program that has been around for a long time and does an amazing job.

Computer Tips: Child Proof your Computer use 7 Ways

If you have important files you don’t want anyone to access or accidentally delete, you can create a encrypted container that you can mount to the system only when you need to use it. Otherwise, it doesn’t even show up on the system. The HowToGeek has a great guide on getting started with TrueCrypt that explains how to do this.

Method 6 – Deep Freeze It


There is this amazing program for IT people called Deep Freeze, which is about $35, but is something that a lot of parents would love. Maybe you don’t care about setting up parental controls or learning group policy or encrypting your hard drives, etc, etc. What if you could let your kids do anything to the computer: delete files, change settings, install crapware, download viruses, etc and then magically get everything the way it was with a restart?


Computer Tips: Child Proof your Computer use 7 Ways

Deep Freeze does exactly that. It’s absolutely awesome. A lot of companies and schools use this software because you can setup your system the way you want, let users wreak havoc, and then simply restart the computer to get it back to the original state. 

They can literally delete system files and it won’t matter. If you want need something like that, then buy this software. I’ve used it myself and it works amazing well. Read more about it on their site.

Method 7 – Install Another OS

One method I use to make sure guests coming over to my house don’t access my personal files or mess up my system is to install another copy of Windows on the same PC. You probably have some old computer running XP or something, so just install a dual boot system with your main OS and a secondary OS that you can boot up to for other users.

I have a Windows 7 machine that also has Windows XP installed along with Deep Freeze. Firstly, there are no perosnal files or programs on XP other than the basic stuff. Even if someone does something or installs a program, etc, I just restart it and I’m back to my clean install of Windows XP. Of course, you need to get another copy of Windows, but if you don’t have a copy, then just use Linux!

I also have Ubuntu installed and that’s totally free. You can even download a specific flavor of Ubuntu that matches the style of Windows, so users won’t be disoriented if they have never seen Linux before.Those are seven quick tips that I’ve used in the past to secure my computers from children, nosy people and everyone else. How do you child-proof your computer? Let us know in the comments. Enjoy!


"Computer Tips: Child Proof your Computer use 7 Ways"


Reference : online-tech-tips.com


Windows 8 Tips: check Your PC is Ready for Windows 8

Windows 8 was officially released yesterday and it’s now time to decide whether you want to upgrade or not. If you have decided to upgrade a Windows XP, Windows Vista or Windows 7 machine to Windows 8, you probably want to make sure your system can support Windows 8 before you buy the upgrade.

To check if your PC is compatible with Windows 8, you can download and run the Windows 8 Upgrade Assistant. The upgrade assistant will go ahead and scan your hardware, programs, and even any connected devices to make sure they will work with Windows 8. Windows 8 requires certain CPU features like PAE, NX, SSE2, etc, so it’s a good idea to use this tool if your computer is a bit on the old side.

The tool will also give you a compatibly report for your programs and let you know whether you need to uninstall the program or update the program before upgrading. Once you download it, install it and run it, the program will automatically start scanning your computer for apps and devices.

Windows 8 Tips: check Your PC is Ready for Windows 8

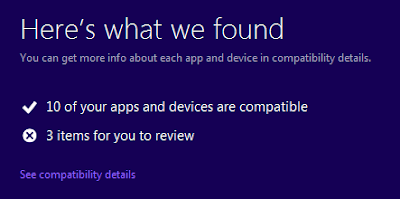
It will then tell you which apps are compatible and which apps you need to review.

Windows 8 Tips: check Your PC is Ready for Windows 8

There are some new features in Windows 8 like secure boot, snap, and fast startup. Upgrade assistant will notify you if any of those items are not supported by your system:

Windows 8 Tips: check Your PC is Ready for Windows 8

If you didn’t already know, Windows 8 does not include built-in software to play DVDs. If you want that feature, you’ll have to buy the Pro pack and get Windows Media Center. Note that if you already have Windows 8 Pro, you can get Windows Media Center Pack for free until January 31st, 2013, so get it fast!

Also, Microsoft Security Essentials is being replaced by Windows Defender in Windows 8. It’s basically the same thing, but for whatever reason they are including Windows Defender built into Windows 8. So if you have Security Essentials installed on Windows 7, you’ll have to remove it before upgrading.

You also get a list of compatible software and hardware that will work with Windows 8:

Windows 8 Tips: check Your PC is Ready for Windows 8

When you click Next, you’ll be asked what you would like to keep. This will determine which version of Windows 8 will work best for you.

Windows 8 Tips: check Your PC is Ready for Windows 8

Note that depending on what version of Windows you have, you can only upgrade to certain editions of Windows 8. For example, if you have Windows 7 Ultimate, you can only upgrade to Windows 8 Pro. If you have Windows 7 Pro, you can upgrade to Windows 8 Pro or Enterprise. If you have Windows 7 Enterprise, you can only upgrade to Windows 8 Enterprise. Check out the Wikipedia article for more details.

In my case, since I have Windows 7 Ultimate, any option I selected gave me the same result: Windows 8 Pro for $39.99.

Windows 8 Tips: check Your PC is Ready for Windows 8

That’s about all there is to the Windows 8 Upgrade Assistant. It’s mostly useful for figuring out which hardware and software will not work on Windows 8. It’s also useful if you have an older PC and you’re not sure if your CPU is going to be supported by Windows 8. Enjoy!


"Windows 8 Tips: check Your PC is Ready for Windows 8"

Reference : online-tech-tips.com


iPhone Tips: Your iPhone or Smartphone Gets Water"What to do"


It happens to everyone at some point in their lives: their wonderful and precious phone slips out of their hand and into a toilet, sink or some other unforgiving liquid! I remember when I jumped into a swimming pool and forgot to take the phone out of my pocket first. Not so smart. 

At that time, I had no clue what to do and after some vigorous shaking, blowing air into it with my mouth and using a hair dryer, it died.

Luckily, if your phone has not been submerged underwater for a long time, there are some things you can do to fix it and possibly save yourself the cost of having to replace it. Some of the stuff I mention you think would be common sense, but for some reason it didn’t click in my head at that moment when my phone got wet. Hopefully, some of these tips will help you one day if you’re in a similar situation.

iPhone Tips: Your iPhone or Smartphone Gets Water"What to do"


First Things First

Before we get into the different ways you can dry out your phone, there are a couple of things you want to do immediately. If your phone had a quick dip or got splashed, your chances are going to be a lot better than if you drop it in the deep end of a pool and it takes 30 seconds to get it out. Either way, here’s what you should do first:

1. Make sure the phone is off or that you turn off the phone. Most phones die because they short circuit due to the fact that the electronics inside are still being powered. Water and electricity don’t mix@

2. Take out the battery if you have a phone that allows you to access the battery. For something like the iPhone, you can only turn it off, but if you can get to the battery, go ahead and take it out quickly.

3. Next, take out the SIM card if you can access that. If you have important data saved on the SIM card, it might be worth the few seconds to take it out. If you can’t figure it out or it’s taking too long, just forget about it and move on. On the iPhone, the SIM card is along the side or top of the phone depending on your model and requires using a paper clip to open it. 

However, the iPhone doesn’t store much of anything on the SIM card, so it’s not a huge worry if the card goes bad.


iPhone Tips: Your iPhone or Smartphone Gets Water"What to do"


You can always go to your cell phone company and get another SIM card. Now on to the most important thing, which is the process of drying your phone. And don’t even think about turning it on for at least a day or two until you are super sure it’s dry. Even a drop or two of water can cause the phone to corrode or short-circuit.

4. Remove all cases or covers or anything else that might be attached or covering the phone. You basically want it to be bare so that you can start the process of getting all the water out of it.

More Water, Maybe?

As crazy as this may sound, you may need to pour water into your phone depending on what it got splashed in. For example, if your phone gets dumped into the ocean or if a can of coke spills into it, only drying it out will not help. Why is that?

Because of residual salts and substances! Even if you dry a phone that’s been in the ocean, it probably won’t turn on because all the components will have salt stuck to them. In these types of cases, you can do one of two things.

1. You can use alcohol to give your phone a bath. Put it inside of a container and pour in rubbing alcohol until it’s covered. You can gently move the phone around so that the alcohol can properly move around in the device. Note that you can’t use just any alcohol, it has to be a denatured alcohol or at least 95% alcohol. You can probably find this in a local hardware store or you can get it online too.

iPhone Tips: Your iPhone or Smartphone Gets Water"What to do"

The alcohol evaporates completely, so it won’t damage your phone in any way. This is also something I wish I knew earlier! I figured any liquid would damage the phone, but that’s not correct.

2. The second thing you can try is distilled water. Do this only if you dropped the phone in salt water of any kind or anything that would leave a lot of residue behind once dried up. It’s not the best option since you have to wet your phone even more, but as long as you have the power off and it’s already wet, using a little distilled water will not hurt.

Initial Drying
One of the first mistakes I made when my phone got wet was that I started shaking the crap out of it. I thought that if I shook it really hard, I could force all the water out of the open ports and holes at the top and bottom. Big mistake! Shaking your phone really hard will just allow the water to find it’s way to the other dry parts of your phone. DO NOT SHAKE!

Now you want to get a dry cloth and slowly and gently wipe your phone. Try your best to keep the phone flat and horizontal as that will prevent the water from moving around inside the phone. If you are able to open the battery compartment, go ahead and wipe the inside also.

If you have an iPhone or device that cannot be opened at all, you’ll have to wipe the outside and then try some of the methods mentioned below. So the two important things for initial drying are:

1. Do not shake the phone

2. Try not to move it around a lot. Keep it horizontal as much as possible.Drying Techniques Hair Dryer

There are a bunch of different things you can at this point. Your phone should still be off and you don’t want to turn it back on or even try to turn it on yet. Another big mistake that I had made was using a hair dryer incorrectly. It seems like the perfect choice for drying something out right? You have a head of wet hair and a hair dryer will dry your hair in just a few minutes! So why not turn it on full blast with high heat and stuff it into every hole in the phone?

iPhone Tips: Your iPhone or Smartphone Gets Water"What to do"

Using a hair dryer I learned can cause moisture to be pushed further inside the phone! And if you use the hotter settings, it can actually melt the components inside! You have to use it correctly, which I describe below.

Fans and Blowers

Obviously, using air in some form is not bad. What you can do is put your phone in front of a fan or in front of a heater where the air is warm. If you have a space heater that can blow air, prop up your phone on something and let it sit in front of the blast for a few hours at least.

You can use a hair dryer, but it should be at the warm setting and also should be a decent distance away from the phone. The problem I mentioned above is when it’s really hot and you put the hair dryer right up against the device. As long as the warm air is just blowing over the phone, it’s not a problem.

Vacuums

Another thing you can use is a standard vacuum. Obviously, you’ll need to use some of the attachments and get something small enough that can actually move around on the phone. Even though this can work, there are some risks you should know.

1. Vacuums can cause static electricity, which can short circuit your phone!

2. It’s hard to create a tight seal around the phone to get really good suction.

iPhone Tips: Your iPhone or Smartphone Gets Water"What to do"

If you do use a vacuum, make sure you keep it a little bit away from the phone. Again, this is one of those things that I would have never known unless someone told me (and because I suck at science). The other thing you can try if you’re reading this and want to be prepared for a future disaster is to buy a mini vacuum. They have a lot of tiny ones for desktop keyboards, but you could technically use it for sucking the water out of your phone!

I even found a set of micro vacuum attachments that you can just attached to your current vacuum. Of course, this only makes sense if you haven’t already gotten your phone wet. I’ll mention other emergency water kits at the end of this post if you like to be one of those people who have stuff ready ahead of time.

Uncooked Rice

A lot of people swear by uncooked rice! Go ahead and take out a bowl of dry uncooked rice and stick your phone right in the center of it. It will naturally soak up the moisture, but it’s a fairly slow process. I only mention it because a lot of people use it.

The downside is that it’s really slow. You should only use the bowl of rice if your phone got only a small amount of water inside. If there is a large amount of water that is in the phone, you’ll need a faster method to get the water out otherwise it will damage the phone.

iPhone Tips: Your iPhone or Smartphone Gets Water"What to do"

Also, you’ll probably have better luck if you put the phone and the rice in a ziplock bag or something similar. How long should you leave it in? At least for 18 to 24 hours in my opinion, though some people say you don’t have to wait that long. If your phone is an expensive smartphone, the extra time is definitely worth it. If you try too early and it shorts, your phone is dead.

The other thing to note about rice is that you should use rice that is from a sealed pack. If you use rice that’s been exposed to air for weeks, it probably won’t be able to absorb much of anything. If it’s sealed and hasn’t been exposed to air for a long time, it will soak up more of the moisture from your phone.

Desiccants

What the heck are those? I had no clue either until I started doing some research on the topic. Apparently, it’s those small little packets of silica that you find in shoes and other clothing all the time.

iPhone Tips: Your iPhone or Smartphone Gets Water"What to do"

You can buy these from Amazon on the cheap and basically stuff your phone and a bunch of these into a tightly sealed bag. You can also buy other desiccants like drierite and use it in the same way. This method is way faster than rice because these things can really absorb moisture.

The main thing here is that you need to create a tight seal so that the moisture from the phone is being absorbed and not from the outside air. Once you do that, leave it for as long as you can. Again, the longer the time, the more dry your phone will become. It takes a really long time for water to dry up, so be ready for a 2 to 3 day wait to get your phone completely dry.

Commercial Drying Products

If all else fails or you don’t want to try some of the more advanced stuff yourself, you can always buy a drying kit. iFixIt has a product called the thirsty bag that goes for about $10. Put your phone in, seal it and wait.

iPhone Tips: Your iPhone or Smartphone Gets Water"What to do"

Another one I found is the Dry-All Wet Emergency Kit that again just uses a type of desiccant. Or if you have a smartphone and feel you might need one of these in the future, it’s a good idea to get a kit and have it ready. Our family has 4 iPhones between all of us, so it was a no-brainer for me to purchase a thirsty bag for some future calamity.

Other Methods

There are other methods of drying that you should avoid like placing your phone in the sun, using a microwave or using an oven. All bad ideas. The sun might be ok, but you have to do it properly. For example, place it on a towel to avoid excessive heat from the ground and leave it out for no more than 15 to 20 mins.

Some people have tried putting their phones in freezers and though it could work, it’s best to try this after you have done everything else above. 

Excessive heat or excessive cold can harm the components in your phone, so its best to avoid those extremes, if possible.Vacuum chambers are another great way to dry out phones, but you won’t have one at home. Usually, these are at schools or universities, so if you are lucky enough to be around one and have access or can get access, then you are lucky! It’s one of the few ways to dry out a phone fast without heating it up.

Last, but not least, even if your phone does not turn back on, don’t think it’s dead. It could be just a dead battery. If the batter is dead and the components are fine, you just need to replace the battery. You can try to do this yourself or you have have to find a local cell phone repair company and have them do it. It might be worth the cost if your phone is brand new and expensive!

Hopefully this guide is comprehensive enough to help you gain a better understanding of phone to dry out a cell phone! I didn’t realize it was so complicated and there were so many ways to do the wrong thing when it seems right. Take your time and be patient and hopefully you’ll have a working phone again. Enjoy!


"iPhone Tips: Your iPhone or Smartphone Gets Water"What to do"


Reference : online-tech-tips.com


Windows Tips: Hosts File in Windows "What is" and How Can You Use It

The hosts file in Windows is like an address book for your computer. It is loaded into memory (cache) when Windows starts and associates host names, such as www.google.com with IP addresses, such as 74.125.224.72 for Google. 

The IP address is like the telephone number for that site. However, so we don’t have to remember a string of numbers for every site we want to visit, we enter easy-to-remember host names.

Because the computer uses IP addresses to find sites, it needs to translate the host name for a site into an IP address. If the IP address for a site is in your hosts file associated with a host name, your computer can use that to “call” the site when you enter the host name in your browser’s address bar. If not, your computer must contact a DNS (domain name server) computer on the Internet for the IP address before it can contact the site.

Initially, there are no host name/IP address associations in the hosts file. Examples of the format and layout of the IP addresses and host names are listed in the comments in the file.

Windows Tips: Hosts File in Windows "What is" and How Can You Use It

If you add host names and their associated IP addresses into the hosts file for sites you visit often, access to those sites becomes faster.Your computer doesn’t have to query DNS servers on the Internet to get the IP addresses for those sites. If there are any sites that don’t have a domain name, you can enter the site’s IP address in your hosts file with a custom domain name which can serve as a “shortcut” to the site.

So how can you use a HOSTS file in Windows? Well, websites can collect various types of information about you as you surf the web. The hosts file can help block sites from tracking you, as well as block ads, banners, third-party cookies, and other annoying parts of web pages.

Each computer has a host address of its own, known as the “localhost” address. The IP address for localhost is 127.0.0.1. This can be used to block sites serving ads or objectionable content by entering a site’s host name in the hosts file and associating it with the localhost IP address

That refers the host name to your own computer, which then thinks it found the site and displayed it already, even though that site was never actually contacted.

For example, DoubleClick is an ad server that, in some cases, will quietly try to open a separate connection on the current webpage and record your activity on that page as well as follow you to other sites you visit. Adding the following entry to your hosts file, prevents DoubleClick from ever serving you any ads or tracking your activity.

127.0.0.1 ad.doubleclick.net

NOTE: The entries in the hosts file allow you only to block entire sites. Therefore, if you are viewing a site, any ads that are served to you by that site, cannot be blocked with the hosts file without blocking the whole site.

Another advantage of blocking ads, banners, hit counters, and other annoying webpage elements is that it can also speed up your browsing experience. You don’t have to wait for all those webpage elements to load before viewing the page.

You can set up the hosts file yourself to block websites or you can download a hosts file that is already filled out with common sites you may want to block. The following image shows a ready-made hosts file created by the MVPS site.

Windows Tips: Hosts File in Windows "What is" and How Can You Use It

NOTE: You cannot use wildcards for the host names in the hosts file. For example, *.sitehostname.com will not work.

If you decide to edit the hosts file yourself, it is located in the following directory for Windows 7, Vista, and XP. The file does not have an extension, but it is a standard text (.txt) file. An easy way to open it is to open Notepad, or other text editor, first and then open the hosts file from within the editor program.

C:\Windows\System32\drivers\etc.

Windows Tips: Hosts File in Windows "What is" and How Can You Use It


NOTE: If you choose to download and use a ready-made hosts file, be sure to make a backup copy of the original hosts file, in case you want to use that again. The easiest way to do that is to add an extension to the original hosts file, such as .mvp (for the site from which you downloaded the file) before copying the new hosts file to the directory listed above.

The hosts file is an easy way to restrict undesirable websites from accessing your computer and tracking your web activity without using third-party software and to speed up your browsing experience for sites you visit often.


" Windows Tips: Hosts File in Windows "What is" and How Can You Use It"


Reference : online-tech-tips.com