Computer Tips: Software Programs Updated Support Windows 8 and new Metro UI


With Windows 8 right around the corner, it’s time to start looking for software that is designed for the new OS. So far, a few companies have released new versions of their software packages that support Windows 8 and the new Metro UI. In this article, I’ll mention a couple of the early-adopters and what you can expect from the software.

Auslogics BoostSpeed 5.4

Computer Tips: Software Programs Updated Support Windows 8 and new Metro UI

The latest version of Auslogics BootSpeed supports new Windows 8 features, except the new Metro UI. The program will still run on the Windows 8 desktop, but it has several major enhancements that are specifically for Windows 8 including:

1. Redesign of the Tweak Manager tool for support of new Windows 8 tweaks

2. Support for Metro processes in the Task Manager

3. An optimized installer made for the Metro UI

4. Updated support for Internet Explorer 10

5. Updates to Rescue Center to support Windows 8

Cyber Link Digital Media Software

Computer Tips: Software Programs Updated Support Windows 8 and new Metro UI

Cyber Link is a digita media company that sells a lot of multimedia applications including Power DVD, Photo Director, You Cam and more. All of their software is now updated to work with Windows 8 and they also have 3 Metro apps you can download from the Windows Store.

Power DVD is a powerful media player, You Cam is web cam software that lets you create some cool videos with your web came, Power Directory is video editing software and Photo Directory is an advanced photo editing tool.

Paragon Image Backup for Windows 8

Computer Tips: Software Programs Updated Support Windows 8 and new Metro UI

Paragon Software has released a freeware backup tool for Windows 8 called Image Backup. It’s one of the first backup programs to support the new ReFS (Resilient File System) that is in Windows 8. You can also create a live backup while running Windows 8 to backup the entire disk system. It also has a DOS and Linux recovery environment to restore your data.

VLC Media Player

Computer Tips: Software Programs Updated Support Windows 8 and new Metro UI

Since Windows 8 lacks native support for playing DVDs, then you’ll definitely want a great media playback software. VLC Media Player has been around for a long time and plays pretty much everything. VLC was recently updated to version 2.0.3, which now includes support for Windows 8 and corrects the GUI so that it displays properly on the new OS.

The VLC team may release a full Metro-style version of the media player in the future, but at this point, this update just makes the software compatible with Windows 8.

Ease US Todo Backup Free

Computer Tips: Software Programs Updated Support Windows 8 and new Metro UI


Ease Us Todo Backup Free 5 is another free backup tool that also has been updated to support Windows 8. In addition to Windows 8 compatibility, it also supports hard drives larger than 2 TB and the ability to backup by file type. They also have paid versions of the software that include other features like Outlook backup and restore, Windows 7 Libraries backup/restore, support for dynamic volumes, ability to backup to a NAS and lots more.

There will obviously be a lot more software applications that will get updated in the next two months before the official release of Windows 8, so I will keep this post updated. Enjoy!


"Computer Tips: Software Programs Updated Support Windows 8 and new Metro UI"


Reference : online-tech-tips.com


Computer Tips: Computer would login Automatically to Windows 8 with Microsoft or Local Account

With Windows 8, there are now two ways to log into your computer: via a Microsoft account that syncs your settings and apps across Windows 8 PCs and via a local account that has been the standard since the beginning. For my computer at home, I’ve always removed any passwords and set it up so that the computer would login automatically.

When I started using Windows 8, I realized I liked using the Microsoft account so that I could easily transfer apps and settings between different Windows 8 machines. However, this requires logging in using my email address and password. I wasn’t so sure I was going to be able to configure automatic login since it was an online account.

Luckily, even with the Microsoft account, you can configure Windows 8 to login automatically. In this post I’ll walk you through the steps to do this.

Login to Windows 8 Automatically
To get start, go to the Start screen and then open the Charms bar by either moving your mouse to the top right corner of the screen or pressing Windows Key + C. Then click on Search.

Computer Tips: Computer would login  Automatically to Windows 8 with Microsoft or Local   Account

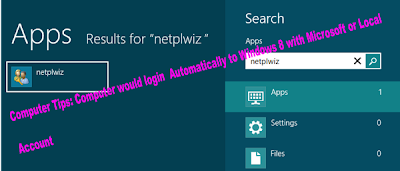
Now in the search box, type in “netplwiz” and you should see one app result pop up in the left hand pane.

Computer Tips: Computer would login  Automatically to Windows 8 with Microsoft or Local   Account

Next click on the username in the bottom window, which should be your email address if you are using the Microsoft account to log into your Windows 8 PC.

Computer Tips: Computer would login  Automatically to Windows 8 with Microsoft or Local   Account

Now you need to uncheck the Users must enter a username and password to use this computer box. After you do that, click OK and you’ll get a pop up dialog that asks you to enter your login credentials.

Computer Tips: Computer would login  Automatically to Windows 8 with Microsoft or Local   Account

For some reason, it uses some odd username that is not the same as your email address, so don’t change it. It must be some internal representation of your email address that 

Windows 8 actually uses to log into Windows. Just type in your Microsoft account password twice and click OK.

Now go ahead and restart your computer and Windows 8 should automatically boot up to the Start Screen, bypassing the login screen altogether.

Computer Tips: Computer would login  Automatically to Windows 8 with Microsoft or Local   Account


That’s it! Hopefully, it worked for you. If you have any issues, please post a comment here and I’ll try to help you out. Enjoy--


"Computer Tips: Computer would login  Automatically to Windows 8 with Microsoft or Local Account"


Reference : online-tech-tips.com


Computer Tips: Change from Public network or Private network in Windows 8

In Windows 8, when you connect to a wireless network, it will either register it as a Public network or a Private network. Private networks are basically home and work whereas private is anywhere else. Sometimes Windows 8 detects a private network as a public one and vice versa. You can manually make some changes to ensure that you are not accidentally sharing either too much on a public network or blocking all sharing on a private network.

First, right-click on the network icon in the Windows 8 system tray and click on Open Network and Sharing Center.


Change from Public network or Private network in Windows 8


Here you will see the network you are connected to and what type of network Windows 8 has identified it as.


Change from Public network or Private network in Windows 8


As you can see above, my network is considered a Private network, which is correct since I’m at home and connected via Ethernet. If this is incorrect, there are a couple of things you can do. First, you can click on Change advanced sharing settings in the left-hand pane.


Change from Public network or Private network in Windows 8


Click on Private and then make sure you have these options enabled:

- Turn on network discovery

- Turn on file and printer sharing

- Allow Windows to manage home group connections


Change from Public network or Private network in Windows 8


Then collapse Private and expand Guest or Public and make sure you have these options set:

- Turn off network discovery

- Turn off file and printer sharing


Change from Public network or Private network in Windows 8


Once you have done this, you then need to go to the Windows 8 desktop and open the Charms bar. Click on Settings and then click on the Network icon.


Change from Public network or Private network in Windows 8


You’ll see Network and then Connected. Go ahead and right-click on that and choose Turn sharing on or off.


Change from Public network or Private network in Windows 8


Now choose Yes if you want your network to be treated like a private network and no if you want it to be treated like a public network. Note that the label Private or Public may remain the same in Network and Sharing Center, but once you choose the sharing settings manually, the network will have the appropriate settings applied.


Change from Public network or Private network in Windows 8


As a last resort, if you really can’t stand that the label is Public when the network is actually private, you can manually change the network location using a tool called secpol.msc. Click on the Start Screen, then right-click and choose All apps, then click on Run. Type in secpol.msc into the run dialog box.


Change from Public network or Private network in Windows 8


Then click on Network List Manager Policies at the left and on the right-hand side you should see a couple of items with descriptions and then something called Network, which is the current network you are connected to. It may also be called something else, but it doesn’t have a description.


Change from Public network or Private network in Windows 8


Double-click on it and click on the Network Location tab. Here you can manually change the network location from Private to Public and vice versa.


Change from Public network or Private network in Windows 8


That’s about it! Not the easiest thing in the world, but it’s Microsoft! If you are having problems with changing network locations in Windows 8, post a comment here and we’ll help. Enjoy--.


"Change from Public network or Private network in Windows 8"


Reference : online-tech-tips.com


Computer Tips: Formatting hard drives and external hard drives

Formatting hard drives and external hard drives is usually a fairly straightforward process. The two most popular operating systems, Windows and Mac OS both have formatting utilities built-in, which makes formatting external drives even more convenient. However, with all of the different drive manufacturers, interfaces and other compatibility and formatting issues that hard drives can have, sometimes the best choice is to use specialty formatting apps and utilities.

Computer Tips: Formatting hard drives and external hard drives


The Windows Disk Management function, pictured above, allows Windows users to simply format and partition external drives. However, there are times when it simply doesn’t cooperate very well. For example, the drive that you are trying to select for formatting may not be recognized by the utility, or it may be greyed out and not clickable.

If you are unable to get a hard drive formatted or partitioned correctly using the built-in apps that are offered by Microsoft and Apple, then your next step may be to try and format the drive directly, using command line. If you’re comfortable using command line, then you may want to check out our guide on how to format external hard drives to FAT32.

Additionally, your computer may not recognize the external hard drive whatsoever. If this is happening, this guide may be useful.In those cases where a hard drive is simply not formatting, partitioning, etc… you may want to consider using a specialty hard drive formatting utility, which will often times make things simpler. In many cases, these utilities are often more effective than the built-in options that Windows and OS X offer as well.


EaseUS Partition Master Home Edition

If you need to manage partitions, copy partitions or even create boot disks, EaseUS Partition Master Home Edition is an excellent utility that can handle all of that and more.Currently one of the highest ranked hard drive utilities on download.com, this lightweight Windows app is a bit more intuitive than the built-in Windows Disk Management function, offering several additional options and features.

Computer Tips: Formatting hard drives and external hard drives


Tokiwa Fat32 Formatter

If your objective is to format a hard drive to FAT32, then you may want to give Tokiwa Fat32Formatter a try. This utility was actually recommended by several of our site visitors in the comments section of one of our more popular posts. Several site visitors have noted that this utility has been successful at partitioning to FAT32, when other programs would not work or not recognize the drive.

Computer Tips: Formatting hard drives and external hard drives


Western Digital Align

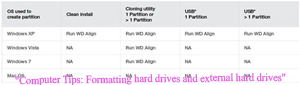
For more advanced disk formatting options, particularly with Western Digital brand external hard drives, you may want to use the WD Align software for drives that aren’t formatting using Windows built-in options. Most of the advanced features and formatting options with Align revolve around optimizing the drive for speed and compatibility with newer operating systems.

Computer Tips: Formatting hard drives and external hard drives

Partition Wizard

Partition Wizard is a freeware disk partitioning and formatting utility that is simple to use and effective. The interface is quite straightforward and the software is excellent at making complex formatting options simple.

Computer Tips: Formatting hard drives and external hard drives

HP Disk Storage Format Utility

While the other software on this list focus specifically on external hard drive formatting, the HP Disk Storage Formatter specializes in USB devices such as flash drives. This ultra simple formatting utility has just a few options, but it is effective and has received some great reviews.

Computer Tips: Formatting hard drives and external hard drives

Overall, the formatting utilities that are offered by Windows and OS X will format hard drives, but there may be cases when they will fail to format a hard drive correctly. The next option is to use command line, but that’s more complex and not for everyone. 

Using the variety of hard drive formatting and partitioning utilities featured in this post, you should have no problems getting hard drives or even USB flash drives formatted correctly. Thank you for stopping by the site for today’s post.


"Computer Tips: Formatting hard drives and external hard drives"


Reference : online-tech-tips.com


Computer Tips: Delete Messages on Facebook


Hmm, so you sent an inappropriate message to someone on Facebook two years ago and now it’s coming back to haunt you? Well, that’s Facebook! They will keep every last detail you ever click or type into their website. Since the launch of messages on Facebook, you can view your chat/message history all the way back to the beginning. This is great most of the time, but there are instances when you really need to get rid of a conversation to save yourself.

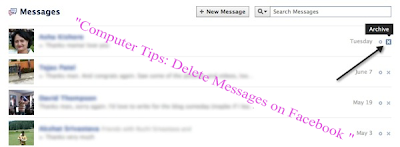
By default, when you want to delete a message in Facebook, it actually just archives it. Yes, they try their best to make it hard for you to actually delete anything from their massive database. So let’s say I’m looking at a message and I click on the little X at the far right:

Computer Tips: Delete Messages on Facebook

As you can see, a big Archive appears at the top indicating this won’t really be deleted. For example, go ahead and archive the message. Note that this will remove the entire conversation you have had with this person, even if it’s over several weeks, months, or years.

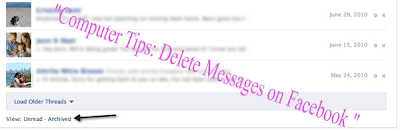
Now in order to see the archived messages, you have scroll all the way down to the bottom while on the messages screen. What’s really annoying is that when you get to the bottom, 

Facebook automatically loads another set of older message and then you have to scroll more to get to the bottom. I believe it does this twice before it finally lets you click on a link if you want to see even older messages.

Computer Tips: Delete Messages on Facebook

Go ahead and click on the Archived link and you’ll only see the archived messages now.


Computer Tips: Delete Messages on Facebook


I thought once it was archived, I might have an option to delete the message here, but that was not the case. Then it kind of clicked that maybe there is no way to delete an entire message history with one person since it combines everything from the past into one giant chat window. Instead, I realized, Facebook probably lets you delete individual entries in a conversation with a person. And that’s exactly how it works.

So if I really wanted to delete that message in the example above, I go to Messages and then click on the name of the person. Here I’ll see the conversation with that actual person and you’ll see a drop down at the top called Actions.

Computer Tips: Delete Messages on Facebook

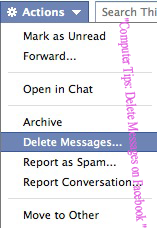
Click on the Actions button and you’ll see a list of options, one of them being Delete Messages.

Computer Tips: Delete Messages on Facebook

Click on that and now you’ll get the option to select individual entries in the chat history and delete them or you can click the Delete All button and that will delete the entire conversation you’ve had with that person since the beginning of Facebook.

Computer Tips: Delete Messages on Facebook

And that’s it! Now once you delete it, it’s really gone! Well, I’m sure Facebook keeps a backup for a certain time, but you won’t be able to see that message in your account anymore. Questions? Post a comment! Enjoy!


"Computer Tips: Delete Messages on Facebook "


Reference : online-tech-tips.com


Computer Tips: Windows 7 Start Orb Changer

For some reason, I didn’t know until this point that you can change the start orb in Windows 7 to something other than the default one! Considering I use Windows all the time and customize just about everything, it’s pretty sad I didn’t know about this!

Anyway, there are a few nice freeware programs that you can use to customize the start orb with some crazy looking graphics.

Computer Tips: Windows 7 Start Orb Changer

Nice! Of course, the only thing with these types of customizations is that it requires system files to be changed. Normally, things go fine and all is well, but sometimes things can go awry and you could end up with a corrupted Windows machine that you can’t log into anymore! So be careful when using this software and make sure you have a backup of everything before trying it.

Door2Windows Start Orb Changer


Computer Tips: Windows 7 Start Orb Changer

This free program seems to have the most options for changing the orb. You can change the default, the hover image and the pressed image. You can also choose between patching memory or editing resources to change the orb. You can download it here:

http://www.door2windows.com/windows-7-start-button-changer-change-your-windows-7-

start-button-with-one-click/Start Button Changer by The Windows Club

Computer Tips: Windows 7 Start Orb Changer


The guys over at The Windows Club always release some really useful utilities, one of those being the start button changer. It’s free and they have instructions on how to use the program properly and what to do if something goes wrong. You can download it here:

http://www.thewindowsclub.com/windows-7-start-button-changer-released

So those are pretty much the only two programs out there that let you change the start orb and I think they are both written by the same person! Anyway, you will also need to find a good start orb image unless you are a pro at Photoshop. Here are some links to free start orb images:

http://browse.deviantart.com/customization/skins/windows7/startorbs/

http://browse.deviantart.com/customization/skins/windows7/startorbs/?q=Bar

http://www.vikitech.com/3193/50-start-orbs-for-windows-7

http://www.sevenforums.com/themes-styles/34951-custom-start-menu-button-collection.html

If you go to DevianArt and just search start orb, you’ll also find a lot of individual artists who have created start orbs that you can download for free. And that’s pretty much it! If you like to customize your Windows 7 desktop, this is probably one of the better customizations since you see that start button all the time! Enjoy!


"Computer Tips: Windows 7 Start Orb Changer"


Reference : online-tech-tips.com


Computer Tips: Remove Programs and All Apps Screen in Windows 8


One annoying feature I have noticed in Windows 8 is when you install a new program, the All apps screen ends up getting cluttered with a bunch of useless links to not only the program, but to all finds of other files associated with that program.

For example, I installed a program on Windows 8 and when I go to the Start Screen, I see it now has a bunch of links to the program and to the help file, links to the site, etc. In previous versions of Windows, it was all there too, but it was nicely tucked away in a folder.

Computer Tips: Remove Programs and All Apps Screen in   Windows 8


That’s just one app! You can only imagine if you start installing a bunch of desktop apps. Of course, all Metro apps are listed on the left side and only take up one slot! It’s the desktop apps that cause all the issues. But luckily, there is a way to clean it up. In some cases, you can just right-click and choose Unpin from Start, but I noticed that the option does not come up for all the items. So here’s how to do it properly.

There are basically two locations for all the shortcuts that show up on the All apps screen:

1. C:\ProgramData\Microsoft\Windows\Start Menu\Programs and

2. C:\Users\aseem_000\AppData\Roaming\Microsoft\Windows\Start Menu\Programs

Now by default, you won’t be able to see these folders since they are hidden. You can easily see hidden folders by going to Explorer, clicking on the View tab and checking the Hidden Items box.

Computer Tips: Remove Programs and All Apps Screen in   Windows 8

Go to both locations and in one of them you should see the folder that has all the links that are showing up in the All apps screen.

Computer Tips: Remove Programs and All Apps Screen in   Windows 8

You can do one of two things here. You can either delete the entire folder and then nothing will show up in the All apps screen or you can go into the folder and delete out the other useless stuff you don’t want and leave the main program file.

Computer Tips: Remove Programs and All Apps Screen in   Windows 8


As you can see, I went ahead and deleted the other shortcuts that I didn’t want. Now when I go to the Start Screen, I immediately see that it is now just one item instead of 5!

Computer Tips: Remove Programs and All Apps Screen in   Windows 8

Nice! Much cleaner looking All apps screen. But wait, we can make it even better! Let’s say that you only want to open that program from the desktop and don’t care to have it in the All apps screen. Is there a way to show a  program shortcut on just the desktop and not on the All apps screen? Yes!

To do this, first go into the folder and copy the program file shortcut or whatever shortcut you want to the desktop. I copied the main file shortcut to my desktop like shown below:

Computer Tips: Remove Programs and All Apps Screen in   Windows 8

Once you have copied the shortcut to the desktop, go ahead and delete the folder in the Programs folder. Note that these are all shortcuts, so no files are actually being deleted. Once you have done this, you need to restart Windows 8. Not sure why, but you won’t see the changes in the All apps screen until you restart.

Now I have a shortcut on the desktop to my program and my All apps screen is clear of useless extra links and shortcuts.

Computer Tips: Remove Programs and All Apps Screen in   Windows 8

So that’s how you can keep your Windows 8 system looking clean! You would have thought Microsoft would have made the All apps screen a little more customizable, but unfortunately, it’s a little clunky.


"Computer Tips: Remove Programs and All Apps Screen in Windows 8"


Reference : online-tech-tips.com


Computer Tips: Pin Windows 8 Metro Apps to the Taskbar

So if you have been tinkering with Windows 8, you have probably read about the trick you can use to create a desktop shortcut to the Applications folder in Windows 8.

 It basically lists out all the apps and programs that show up in your All apps screen in Windows Explorer. It looks like this:

Computer Tips: Pin Windows 8 Metro Apps to the Taskbar


I personally find this very useless as you can pin it to the task bar, but it looks horrible. Not only that, but you’ll spend more time looking for the Metro app in this explorer window than you would just going to the start screen and clicking on the app.

I figured there had to be a better way and I ended up finding a program called Metro App Link, which apparently lets you create desktop shortcuts to Metro apps like Travel, Sports, News, etc. However, I downloaded it and it didn’t work! I clicked the buttons to create the shortcut and nothing happened.

So finally, I had to find out some other way, which I eventually did. This is definitely the best way that actually works in the final release of Windows 8. The first step is to create a desktop shortcut, followed by changing the icon to match the Metro app, and then to pin it to the task bar.

Pin Metro Apps to Taskbar in Windows 8 First, we have to create a new shortcut. Go to the desktop, right-click and choose New – Shortcut. Now here’s where the magic happens. In the location box, type in the following:

C:\Windows\System32\cmd.exe /c start "" "APPNAME:" && exit

All you have to do is replace APPNAME with the name of the Windows 8 metro app. Now that’s the tricky part. I have gone through the registry to figure out what these apps like Bing, Travel, Music, etc are actually called in the system. Here’s a current up-to-date list that is working on my final release version of Windows 8. The first name is the APPNAME you’ll use in the command above and the second name is the name you see when you go to All apps in Windows 8.

bingtravel – Travel

bingsports – Sports

bingnews – News

mschat – Messaging

bingfinance – Finance

bingweather – Weather

bingmaps – Maps

xboxgames – Games

microsoftmusic – Music

microsoftvideo – Video

ms-windows-store – Windows Store

Once you have created the shortcut, test it out and it really works! Yay! You can access Metro apps from the desktop! Of course, the icon looks ugly and needs to be replaced:

Computer Tips: Pin Windows 8 Metro Apps to the Taskbar

At this point, all you have to do is download a Metro icon pack from somewhere and change the icon by right-clicking on the shortcut and choosing Properties.

Computer Tips: Pin Windows 8 Metro Apps to the Taskbar

Click on Change Icon and you can pick one of the Metro icons you downloaded to replace the command prompt icon. Here are a couple of places where you can find Metro icons for free:


After that, just right-click on the shortcut and choose Pin to Taskbar and you can now open your Metro apps in one click!

Computer Tips: Pin Windows 8 Metro Apps to the Taskbar

Now the only problem so far is that I can’t find all the app names for some of the other Metro apps like Mail, Camera, Reader, etc. As I find more, I will post them here in the comments. 


"Computer Tips: Pin Windows 8 Metro Apps to the Taskbar"


Reference : online-tech-tips.com


Computer Tips: Default Web Browser Change in Windows 8

Windows 8 comes with two flavors of Internet Explorer 10, one for the Metro U I and one for the desktop. If you don’t care to deal with either version, then you can go ahead and install a different browser like Google Chrome, Firefox or Safari. However, choosing to set the browser as the default browser in Windows 8 during the install does not really seem to work, at least not for Chrome.


It seems like Microsoft just ignores that option and keeps IE as the default browser. In order to change it, you have to manually set the third-party browser as default. In this article, I’ll show you how to do that.

First, go ahead and install whichever browser you want to use instead of Internet Explorer. Then go to the Control Panel in Windows 8.

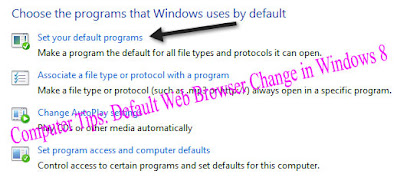
You can read my post here on how to access the Control Panel quickly in Windows 8. Then go ahead and click on Default Programs.

Computer Tips: Default Web Browser Change in Windows 8


Then click on the Set your default programs link.


Computer Tips: Default Web Browser Change in Windows 8

Next find the browser in the left-hand pane and then click the Set this program as default link.


Computer Tips: Default Web Browser Change in Windows 8


That will set Chrome or whichever browser as the default for whatever file types and protocols are allowed. To see which files and protocols have been transferred, you can click on the Choose defaults for this program link.


Computer Tips: Default Web Browser Change in Windows 8

As you can see, any HTM or HTML file will now open in Chrome. However, there are some things you 
currently can’t override IE as the default. If you click on Internet Explorer in the left-pane and then click on Choose defaults for this program, you’ll see the following items:

Computer Tips: Default Web Browser Change in Windows 8

Unfortunately, it doesn’t let you uncheck those items, so MHTML, pinned site shortcuts and Internet 
Shortcuts will still open in Internet Explorer. Even though this is set for IE, I created an Internet shortcut on my desktop and it opened in Chrome rather than IE.

Also, I tried clicking on a link in a Word doc and it also opened in Chrome. Lastly, I tried clicking on a link in a Metro app and it also opened in Chrome, though it looked like a Metro version of Chrome rather than the desktop version.

So at least for Google Chrome, you can set it as default through the Control Panel and Windows 8 will pretty much open all links and URLs in Chrome rather than IE. If you have tested other browsers, feel free to post your comments and results here.


"Computer Tips: Default Web Browser Change in Windows 8


Reference : online-tech-tips.com