Computer Tips: Advanced Boot Windows 8 into Safe Mode for Computer

We all have gotten accustomed to pressing either F2 or F8 to get the advanced boot options since Windows 2000, probably even before that. In every version of Windows, you always could count on the slower boot process to actually press the key when the text message appeared.

Computer Tips: Advanced Boot Windows 8 into Safe Mode for Computer


Well, those days are gone! In Windows 8, the boot time has been dramatically decreased and the screenshot you see above appears for about 200 milliseconds and that’s it! So if you want to get into Safe Mode in Windows 8, you have to go a different route. Instead of the Advanced Boot Options of earlier versions of Windows, you now first have to go through the System Recovery Options of Windows 8. It’s pretty much the same thing, but just looks a lot nicer and you have to click a few more menu options to get there. Here’s how.

Startup Windows 8 in Safe Mode

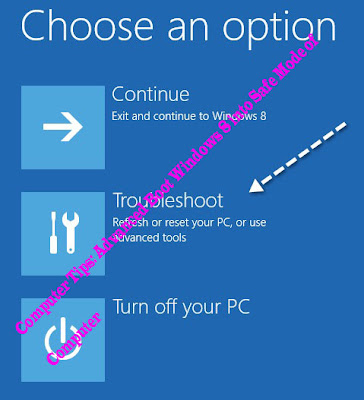
To get started, you first need to boot Windows 8 into the System Recovery Options. You can read my previous post on how to do that; there are basically three methods. Once you are there, you need to click on the Troubleshoot option.
Computer Tips: Advanced Boot Windows 8 into Safe Mode for Computer

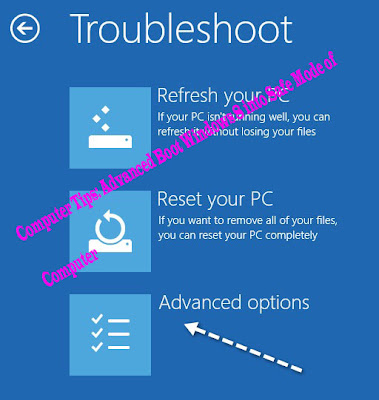
On the next screen, you need to click on Advanced Options.
Computer Tips: Advanced Boot Windows 8 into Safe Mode for Computer

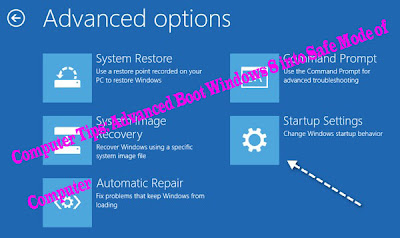
Then you need to click on Startup Settings on the last dialog.
Computer Tips: Advanced Boot Windows 8 into Safe Mode for Computer

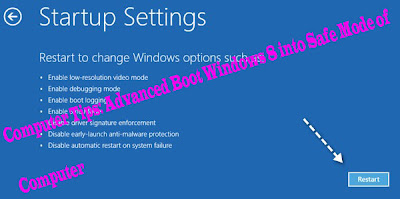
Finally, you have to click on the Restart button, which will give you options to start up in low-resolution mode, debugging mode, enable boot logging, and start in safe mode! Kind of a long process, but that’s the new way.
Computer Tips: Advanced Boot Windows 8 into Safe Mode for Computer

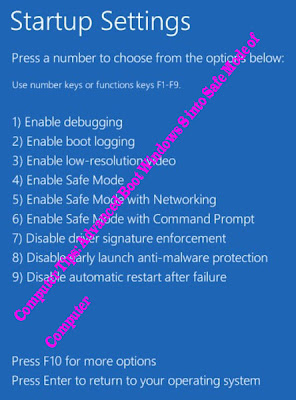
Now you will finally get to the Startup Settings screen, where you can press 1 thru 10 or F1 thru F10 to pick your different settings. Press 4 or F4 to enable Safe Mode.
Computer Tips: Advanced Boot Windows 8 into Safe Mode for Computer

That’s it! Windows 8 will now load in Safe Mode! You’ll have to type in your password to log in once it starts back up. I noticed that while in Safe Mode in Windows 8, I could not bring up the Charms bar. Not sure why, but I could not figure out how to restart the system. What I ended up doing was going to the Start Screen, then clicking on my name at the top and there was an option to signed out. Once I signed, there was an option to Shutdown or Restart when I clicked on the Power button at the bottom right. So if you’re stuck in Safe Mode and can’t get out, that’s how do to it.

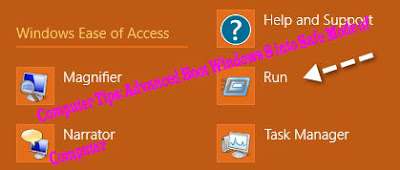
Also, it should be noted that you can use the MSCONFIG utility to startup in safe mode also. Go to the Start Screen, right-click, then choose All apps and then click on Run.
Computer Tips: Advanced Boot Windows 8 into Safe Mode for Computer

Next, type in msconfig in the run dialog and then click on the Boot tab:

Computer Tips: Advanced Boot Windows 8 into Safe Mode for Computer


Check the box that says Safe boot and then choose an option. You can pick from:

Minimal – Normal Safe Mode

Alternate shell - Safe Mode with command prompt

Network – Safe Mode with networking

Don’t worry about Active Directory repair, that’s some IT-related option. You can also check the boxes for No GUI boot, Boot log, Base video and OS boot information. Note that when you boot into safe mode using msconfig, it will continuously boot until you go back into msconfig and uncheck the Safe boot option. 


"Computer Tips: Advanced Boot Windows 8 into Safe Mode for Computer"


Reference : online-tech-tips.com


Computer Tips: WIndows 8 tips Create Bootable System Recovery USB Drive in WIndows 8

Yesterday, I wrote about how you could boot into the system recovery options in Windows 8 using various methods. Two methods involved loading Windows 8 and the other method is when Windows 8 will automatically load the recovery options if it finds that Windows is unable to load properly.

This is great, but there will be cases when something goes so terribly wrong that even the automatic loading of recovery options fails. In this case, you’re out of luck unless you have a system repair disc or a system recovery USB drive. Both are essentially the same, one just is on a CD and the other is on a USB flash drive.

In this article, I’ll walk you through the steps to create a USB system recovery drive that you can boot to in case Windows 8 fails to load completely. Note that if you didn’t create the recovery drive beforehand, you can use another Windows 8 machine to create it and then use it on the broken PC.


System Recovery USB Flash Drive in Windows 8

To get started, open the Control Panel and click on Recovery. You may need to switch to the large or small icons view in order to see it like shown below:

Computer Tips: WIndows 8 tips Create Bootable System Recovery USB Drive in WIndows 8


Now go ahead and click on Create a recovery drive:


Computer Tips: WIndows 8 tips Create Bootable System Recovery USB Drive in WIndows 8

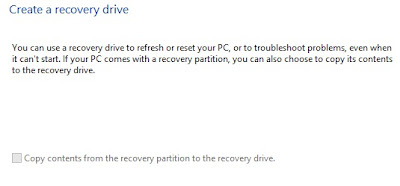
The recovery wizard will start and if your computer already has a built-in recovery partition, you’ll have the option to check the box at the bottom which will copy of the contents of the partition to your USB flash drive. If you don’t have a recovery partition, it will just be greyed out.

Computer Tips: WIndows 8 tips Create Bootable System Recovery USB Drive in WIndows 8

Click Next and it will automatically search for all available drives that you can use for the recovery drive. Choose your flash drive and click Next.

Computer Tips: WIndows 8 tips Create Bootable System Recovery USB Drive in WIndows 8

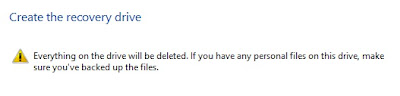
Windows will tell you that everything on the drive will be deleted, so make sure to backup any data you might need.


Computer Tips: WIndows 8 tips Create Bootable System Recovery USB Drive in WIndows 8


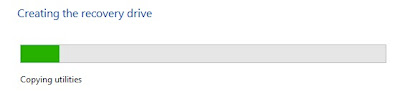
Now go ahead and click the Create button to start the process. Windows will copy the appropriate utilities to the flash drive.


The process takes just a couple of minutes and that’s it! You now have a bootable system recovery USB flash drive that you can use in case your copy of Windows 8 crashes and burns.


"Computer Tips: WIndows 8 tips Create Bootable System Recovery USB Drive in WIndows 8 "


Reference : online-tech-tips.com

Computer Tips: Should You Shutdown Your PC, Mac, at Night


I get this question asked all the time and the answer varies depending on the device and the person. There are times when you would not want to shutdown your computer or smartphone because there is something running in the background. On the other hand, shutting down every so often can really fix a little strange problems/glitches that occur if you have had your computer or device on for a really long time.

In this article, I’ll try to go through various points and reasons you may want to either keep your device on or shut it down. There’s no single answer, but in general, shutting down is a good thing that can’t hurt your device. Just as you turn on and off your TV everyday, doing so with your PC, Mac or iPhone or iPad every once in a while is not a bad idea.

Computer Tips: Should You Shutdown Your PC, Mac, at Night


When to Shutdown a PC or Mac


Let’s start with the PC and Mac. So should you shut your PC or Mac down every night? Well a lot of people say turning it off and on will damage your computer, but this is a myth. Just search on the Internet and you’ll see that there is no harm in turning your computer on and off unless you do it 10 times a day. Also, it’s a myth that turning a computer on and off uses more power than putting your computer to sleep. It’s actually the same.

Computer Tips: Should You Shutdown Your PC, Mac, at Night

So here are a few reasons why you should shut it down:

- Leaving a computer on will consume more power, especially if it’s a desktop and does not go into a power saving mode like sleep. Of course, if you look at overall power usage in your house, the computer will probably take up only a tiny portion of total consumption. Power consumption is one of those things people will debate forever. I personally don’t turn off my computer because of power savings, but because it helps keep my computer running smoothly and I feel it will last longer.

- Shutting down a computer will increase the life of the computer because your components will get less wear and tear. When the computer is on, everything is getting power and the temperature of the memory chips, graphics card, etc are higher than if the computer were off.

- If you computer has a traditional spinning hard drive, shutting down will reduce the total overall spinning of the drive and extend it’s life. However, there is a second side to spinning drives. Since it takes some time for a drive to get up to normal spinning speed, forcing it to stop and then start again and again can also cause more wear on the drive. From what I’ve read, if you turn off your computer once a day or a few times in a week, you’ll be just fine. However, if you turn it on and off several times in a  day, it could cause your hard drive’s life to be shortened instead of extended.

For an SSD (solid state drive), this is not as much of an issue. You can turn off and on as much as you like. SSDs wear down with writes. SSDs use a lot less power also, so if you have to leave your computer on, it’s better having an SSD as it will consume less power. The other thing to consider is that booting back up from a powered down state with an SSD is much faster, so shutting down is a good choice with SSDs also. Again, as long as you’re not doing it 10 times a day.

- If your computer does absolutely nothing at night (downloading, converting, backing up, etc), then there really is no reason to keep it on. You can search the Internet for shutting down a PC automatically and you’ll find lots of programs, etc that you can use to turn off your computer at a set time so you don’t have to worry about it.

- If you don’t use any power-saving modes, then it’s a really good idea to shut your machine down. Power saving modes like turning off a monitor or hard disks or putting the computer to sleep are almost as good as shutting down, but if you don’t have those enabled for whatever reason, then shutting down is essential.

- Shutting down and rebooting either every day or once or twice a week can also help reset the operating system and make it run smoother. Windows and Mac OS X both start to have issues after a few days either with memory or something else and restarting always helps improve the responsiveness of my system.


"Computer Tips: Should You Shutdown Your PC, Mac, at Night"


Reference : online-tech-tips.com


iPhone or iPad Tips: When to Shutdown an iPhone or iPad


Devices like the iPhone and iPad are not anything like a running PC or MacThe components are completely different and the way the devices work cannot be compared. Therefore, you can’t just apply the same rules for shutting down a computer to an iPhone or iPad.

iPhone or iPad Tips: When to Shutdown an iPhone or iPad

For iPhones and iPads, the only real reason you would ever need to shut it down completely is if the device is not working properly and if you want better battery life. If your apps are freezing or not opening properly, etc, then it’s probably a good idea to do a full shutdown and reboot. An Apple Genius employee told me that turning off the iPhone or iPad at night will help extend the life of the battery. Why? Because most people keep their phones connected to the charger all night and that doesn’t help the battery.

Otherwise, you can pretty much leave them on the whole time. The iPhone and iPad have short sleep times and therefore don’t stay on for terribly long anyway. The sleep setting will also lower the power usage of the device.

The only other time I could think of that you would want to shutdown is if you wanted to really conserve batter power. Maybe you got stuck somewhere and you only have 15% battery life left. Even on the sleep setting, the battery will be used. So you can turn off the device to converse battery power.

iPhone or iPad Tips: When to Shutdown an iPhone or iPad

For iPhones and iPads, if you just want to conserve battery, you can also put the device into Airplane mode, which turns off the WiFi radio and 3G/4G. In terms of extending the life of the flash storage, it’s probably better to keep the iPhone or iPad on as long as you can. Since it’s using flash storage, the more writes to the drive, the shorter the life. Turning your device on and off probably performs extra reads and writes to the storage, so just leave it on unless the OS starts acting funny.

The optimal configuration is probably to turn if off once at night unless you need it for important calls/emails (to extend the battery life) and that’s it. It will take a lot of on/off to really reduce the life of the storage, but the battery will definitely lose it’s luster faster so shutting down could help. Again, though, since people tend to use their phones at night also for messages, email, etc, turning off is not a big deal if it’s inconvenient.

Conclusion

As you can see, there were a lot of If this, then do that, else… in this post. For each specific person, shutting down depends on what you value more. As a general rule, if you do want to shut down, do no more than once a day. 

And doing so once a day will not damage your PC, Mac or any other device.If you’re not using your device or computer for anything at night, it is better to shut down. It will extend the life of a PC/Mac and let your iPhone or iPad battery last longer. This is a hot debate topic, so what are your thoughts on shutting down every night?


"iPhone or iPad Tips: When to Shutdown an iPhone or iPad"


Reference : online-tech-tips.com


Show Hidden Files and File Extensions in Windows 8


Microsoft has learned a few things in the last couple of years and one of those is that it was always a pain to view file extensions and hidden files in previous versions of Windows. You had to go to Folder and search options and check off a few boxes there. Then when you were finished, you had to go back and do it again.

Luckily, in Windows 8, Microsoft has made it really easy to show file extensions and to show hidden files. Here’s how. Open Explorer in Windows 8 and navigate to the folder where you want to see the file extensions or hidden files.

Show Hidden Files and  File Extensions  in Windows 8


By default, you’ll see the Home tab where you can perform common tasks on files and folders like copy, paste, move, delete, rename, new folder, etc. Go ahead and click on the View tab.

Show Hidden Files and  File Extensions  in Windows 8


On the right hand side of the View ribbon, you’ll see the Show/Hide panel. Here you can simply check the File name extensions box to show file extensions.

Show Hidden Files and  File Extensions  in Windows 8


You can also just select a file or multiple files and click on the Hide selected items button to hide files and folders in Windows 8. To see hidden items, just check the Hidden items box and you’ll see the hidden items. Note that showing hidden items via Explorer will not display hidden operating system files. If you want to see all hidden files including protected system files, you have to click on the Options button and click on Change folder and search options.

Show Hidden Files and  File Extensions  in Windows 8


Then click on the View tab and scroll down to the Hide protected operating system files and uncheck the box. You’ll get a warning pop up saying it could be unsafe to unhide protected system files.

Show Hidden Files and  File Extensions  in Windows 8


That’s about it! Windows 8 makes it a little easier to access these features that a lot of people use fairly often. 


"Show Hidden Files and  File Extensions  in Windows 8"


Reference : online-tech-tips.com


Computer Tips-- Transfer Files Windows XP,Windows Vista,Windows 7 to Windows 8 using Windows Easy Transfer

Whether you plan to upgrade your Windows XP, Vista or Windows 7 machine to Windows 8 or buy a new PC with Windows 8 pre-installed, you can use Windows Easy Transfer to copy all your files and settings from your old machine or old version of Windows to your new machine running Windows 8. In this article, I’ll walk you through the steps to configure Windows Easy Transfer.

Before we get started, let me clarify exactly what you can transfer using Windows Easy Transfer:

-- User Accounts

-- Documents

-- Videos

-- Music

-- Pictures

-- Email

-- Browser Favorties

It will not transfer over the programs. You will have to reinstall any programs that you want on your new Windows 8 PC. To get started, you need to open Windows Easy Transfer on your old PC or the PC that is running Windows XP, Vista or 7. Note that if you are doing an upgrade, think of the old machine as the old version of Windows, in this case Windows XP, Vista, or 7.

Also note that if you are upgrading Windows XP or Vista, you will need to download and install Windows Easy Transfer as it does not come with the program built-in. If you are running Windows 7, it’s already there and you can just search for it. You can download Windows Easy Transfer for XP and Vista here:

http://windows.microsoft.com/en-us/windows7/products/features/windows-easy-transfer

Note that it says it’s for transferring from XP or Vista to Windows 7, but you can use it to transfer to Windows 8 also. In Windows 7, just search for Easy Transfer and you’ll see it show up:

Transfer Files Windows XP,Windows Vista,Windows 7 to Windows 8 using   Windows Easy Transfer


To start, we will open Easy Transfer on the old machine, in my case Windows 7. Once you start it, the Welcome dialog will pop up and give you an overview of what items you can transfer:

Transfer Files Windows XP,Windows Vista,Windows 7 to Windows 8 using   Windows Easy Transfer


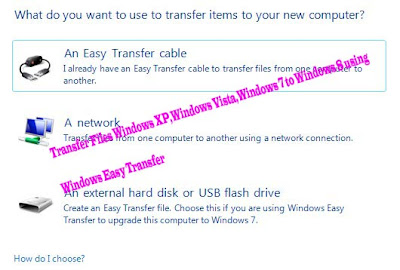
Click Next and then choose the method you want to use to transfer between the old PC and Windows 8. You can choose from Easy Transfer Cable, a Network, or an external hard disk or USB flash drive:

Transfer Files Windows XP,Windows Vista,Windows 7 to Windows 8 using   Windows Easy Transfer


If you are upgrading a computer to Windows 8, then you can choose external hard disk or USB flash drive since the old and the new computer is actually the same computer. You’ll, of course, have to have a external drive or USB flash drive in order to do this.

If you’re transferring between two computers, then the best option is a network connection since you probably have the computers on the same wireless home network. If you don’t have any network setup at home, then you can use an Easy Transfer Cable, which is a special cable you have to buy. Here is a list from Amazon:

http://www.amazon.com/Easy-Transfer-Cables/lm/R3G7LKPRYOEDL

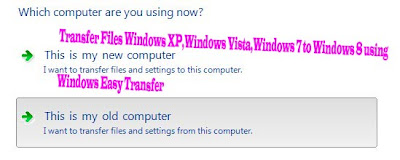
In this article, I’ll go through the network method since that is what most people will be using. Click on A network and choose whether this is the old or the new computer. In our case, we are starting with the old computer, so click on This is my old computer.

Transfer Files Windows XP,Windows Vista,Windows 7 to Windows 8 using   Windows Easy Transfer

On the next screen, you’ll see some instructions and you’ll see a Windows Easy Transfer key. You will need to use this key on the new computer.

Transfer Files Windows XP,Windows Vista,Windows 7 to Windows 8 using   Windows Easy Transfer

Now go to your Windows 8 machine and start the Windows Easy Transfer wizard.  You can open it in Windows 8 by going to the Start screen and then right-clicking anywhere until you see All apps at the bottom right. Then scroll to the right and you’ll see it under Windows System.

Transfer Files Windows XP,Windows Vista,Windows 7 to Windows 8 using   Windows Easy Transfer

Now follow the same steps as above: click Next on the welcome screen, choose a network for how you want to transfer, and then choose This is my new PC. On the next screen, you have to tell Windows whether you installed Easy Transfer or if you’re running Windows 7, in which case it’s already installed.

Transfer Files Windows XP,Windows Vista,Windows 7 to Windows 8 using   Windows Easy Transfer

In my case, I am transferring from Windows 7, so I chose My old PC is running Windows 7 or Windows 8. Click Next. You’ll get the instructions to go to your old PC and get the key, which we already did. Click Next again.

Transfer Files Windows XP,Windows Vista,Windows 7 to Windows 8 using   Windows Easy Transfer

Now go ahead and type in the key that you got from your old computer and click Next. The program will download any updates to the Easy Transfer program first:

Transfer Files Windows XP,Windows Vista,Windows 7 to Windows 8 using   Windows Easy Transfer


Once it has done that, it will scan the user accounts on the old computer (which takes a few minutes) and tell you exactly how many MBs worth of data will be transferred:

Transfer Files Windows XP,Windows Vista,Windows 7 to Windows 8 using   Windows Easy Transfer

You can click on the Customize link to see exactly how big each folder will be and you can uncheck specific folders if you don’t want to transfer everything like Music or Videos, etc. If you click on the Advanced link here, you will get an Explorer dialog where you can check and uncheck specific folders under each of the main folders.

Transfer Files Windows XP,Windows Vista,Windows 7 to Windows 8 using   Windows Easy Transfer

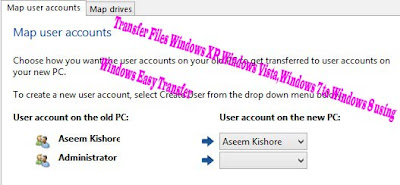
If you click on Advanced Options, you can change how the mapping of the user accounts will occur. If the names of the accounts on both computers are the same, it will automatically link them, but you can change it here:

Transfer Files Windows XP,Windows Vista,Windows 7 to Windows 8 using   Windows Easy Transfer

That’s pretty much it. Click on Transfer and your files and settings will be transferred over! The most important thing here is the App Settings, which is really useful if you installed some heavy-duty programs on your computer like MS Office, customized them, and now have to reinstall them on Windows 8. If you transfer the settings using the Easy Transfer wizard, you can install the app on Windows 8 and retain all those settings and customizations. If you have any questions about the transfer process, post a comment here and I’ll try to help. 


"Transfer Files Windows XP,Windows Vista,Windows 7 to Windows 8 using Windows Easy Transfer"


Reference : online-tech-tips.com


Secure your Google Account Use 5 Ways


We recently posted an article 5 Ways to Secure Your Data and Information, which provided you with some great tips for adding more security to your home network and personal computer. However, much of your data may not be stored on your home network or computer at all, but rather on the internet. In today’s post, we will review 5 ways to secure your Google account.

Secure your Google Account  Use 5 Ways


Your Google account may also be also linked to the many Google services that you use. These services could be your YouTube account, Google Plus account or even your Google Checkout account that you use to purchase items online. Thus, it may be wise to maximize the security of your Google account by configuring some settings and taking some other actions, to minimize risk of compromised passwords and hacking attempts. Here are 5 things you can do to add more security to your Google account:


"Secure your Google Account  Use 5 Ways"


Reference : online-tech-tips.com

Way 1. Setup Account Recovery --Secure your Google Account


Account recovery can be extremely valuable if you forget your Google password, but even more valuable if your account is hacked and you need to recover it. To get started with account recovery, navigate to Google.com/settings and proceed to sign-in to your account. From there, click the Security listing.

Way 1. Setup Account Recovery --Secure your Google Account

Under the Security page, select the option Account recovery options.

Way 1. Setup Account Recovery --Secure your Google Account

Google will then redirect you to the Account Recovery homepage, where you can add a phone number for recovery purposes or an alternative email address which can be used to verify an account, should it be compromised or hacked.

Way 1. Setup Account Recovery --Secure your Google Account


"Ways 1. Setup Account Recovery --Secure your Google Account"


Reference : online-tech-tips.com


Way 2. Enable 2-step verification --Secure your Google Account


By enabling 2-step verification on your G account, you can add an extra layer of security. With verification enabled, whenever your Google account is accessed from an unknown computer, login will require an extra step, or second step in order to successfully sign you in (text message verification).

To get started, navigate to Google.com/settings/security and select the Edit button next to 2-step verification.


Way 2. Enable 2-step verification --Secure your Google Account

From here, Google will prompt you to enable 2-step verification and setup your phone.

Way 2. Enable 2-step verification --Secure your Google Account

Note: You will not have to enter a code from your phone every time you sign in to Google. The only time that you will be required to enter the pin, is when you Google account is accessed from an unknown computer, location or IP address.


"Ways 2. Enable 2-step verification --Secure your Google Account"


Reference : online-tech-tips.com


Way 3. Application Specific Passwords --Secure your Google Account


Accessing your Google account from the web browser on your computer is a bit different than accessing the account from another device such as smartphone. By setting up application specific passwords, you can create unique login passwords for apps and devices, which will be different from your standard Google password that you use to login from your PC.

For example, with application specific passwords enabled, if you access Google from your smartphone, you would sign in to your Google account using a specific password, rather than your regular Google password.

You can enable Application specific passwords on your account from the Google.com/settings/security page via the Authorizing applications and sites link.

Way 3. Application Specific Passwords --Secure your Google Account


"Ways 3. Application Specific Passwords --Secure your Google Account"


Reference : online-tech-tips.com



Way 4. Use Strong Passwords --Secure your Google Account


We always encourage you to use strong passwords for any account, but because your G account is linked to many other services that you use also, including Gmail, it’s particularly wise to use a smart password for your main Google account.

If you currently have any dictionary words, meaning any word that is grammatically correct, in your Google password, you may want to consider changing it for better security against dictionary attacks and brute forcers.

Way 4. Use Strong Passwords --Secure your Google Account


A strong password will not make any sense, and involve uppercase and lowercase characters along with numerical characters and other symbols. 

For example: OtT2359%$8*#^:)

Strong passwords like these are more difficult to remember, but they are important to strong account security.


"Way 4. Use Strong Passwords --Secure your Google Account"


Reference : online-tech-tips.com


Way 5. Setup HTTPS --Secure your Google Account


HTTPS is a more secure connection than the standard HTTP, that specializes in better protection and securing online data transfer. You can setup HTTPS for your Gmail account using the following steps:

Way 5. Setup HTTPS --Secure your Google Account


By setting up the security options listed in today’s post, you can add several additional layers of security to your Google account, to minimize risk of being hacked or other malware or password attacks, all leading to a safer and more secure Google environment! Thank you for stopping by the site for today’s post.


"Ways 5. Setup HTTPS --Secure your Google Account"


Reference : online-tech-tips.com


Methods of Boot to Windows 8 System Recovery Options


Windows 8 has drastically redesigned the boot menu to not only look more modern, but also to be a lot easier to use. I have to say they have done a good job. All older versions of Windows used the basic DOS-looking text interface to choose options like Safe Mode or Advanced Boot Options.

Methods of Boot to Windows 8 System Recovery Options

Most people didn’t even bother looking at anything below Safe Mode because it’s pretty technical for the average user. Now when you enter Windows 8 boot menu, you see a nice GUI interface that is Metro-styled. This is also called Windows RE (Recovery Environment) or the System Recovery Options.

Methods of Boot to Windows 8 System Recovery Options

You have three options: load Windows normally (Continue), Troubleshoot Windows or turn off your PC. A lot fewer choices to start off with, making it easier for people to use the tool. I know a lot of people who have had problems with Windows 7, but could not figure out how to load startup repair or get into Safe Mode. In this article, I’ll walk you through the steps and different methods to get into the boot menu.


"Methods of Boot to Windows 8 System Recovery Options"


Reference : online-tech-tips.com


Method 1 – SHIFT + Restart --Windows 8 System Recovery Options


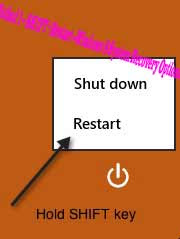
One way to start Windows 8 in Windows Recovery Environment is to simply press SHIFT and then click on Restart. What’s good about this method is that you can do it from within Windows or you can do it even if no one is logged onto the system.

Method 1 – SHIFT + Restart --Windows 8 System Recovery Options

So if you need to troubleshoot a Windows 8 machine or boot from a secondary device and you can’t log into the system, then you can still restart in Windows RE by clicking on the power button icon at the bottom right of the login screen.


"Method 1 – SHIFT + Restart --Windows 8 System Recovery Options"


Reference : online-tech-tips.com


Method 2 – PC Settings --Windows 8 System Recovery Options


The second way to do it is to go to PC Settings in Windows 8. You can do that by opening the Charms bar and then clicking on Settings.

Method 2 – PC Settings --Windows 8 System Recovery Options

Then click on Change PC Settings at the bottom of the settings bar:

Method 2 – PC Settings --Windows 8 System Recovery Options
Finally, click on General and then click on Restart now under the Advanced startup section.

Method 2 – PC Settings --Windows 8 System Recovery Options


"Method 2 – PC Settings --Windows 8 System Recovery Options"


Reference : online-tech-tips.com