Computer Tips: Virtual Desktop Infrastructure(VDI) in Windows 8

VDI is an alternative desktop delivery model that can help you embrace BYOD. It gives users secure access to centrally managed desktops running in the data center.Using their  personal devices, users can access their hosted desktops for work, while keeping their work and personal environments separate.

However, this only makes sense if you can host a full fidelity desktop experience and keep the corporate environment secure at the same time.Windows 8 supports this scenario, similar to Windows 7, by providing capabilities like a rich user experience, centralized management of apps and data, and enhanced security and compliance. But Windows 8 goes even further than Windows 7 did. 

For example, by tapping the remote access icon on employees’ Windows 8 tablets, they can login and open a VDI session running in the data center with all their data, applications, and settings—as if they were working right in the office.Windows 8 can give them a high-fidelity experience by using RemoteFX, including:

1-Touch

2- 3D graphics

3- Full multimedia experience

4-USB device redirection

Microsoft VDI is powered by Windows Server 2012 Remote Desktop Services (RDS). It provides a single platform to deliver any type of hosted desktop, while RemoteFX provides a consistently rich user experience:

1- Rich experience  As previously mentioned, RemoteFX provides a rich multimedia experience by using a built-in software graphics processing unit (GPU) or hardware GPU on the server. Users can use tablets and most USB devices, because it offers true USB and multi-touch redirection. Users get a consistently rich performance over high latency, low bandwidth networks, including wide area networks (WANs).

2- Lower cost  FairShare ensures high system performance by distributing system resources dynamically. User profile disks provide the flexibility to deploy lower-cost pooled- and session-based desktops while enabling users to personalize their experience. Last, it supports lower-cost disk storage like Direct Attached Storage.

3- Streamlined management  A simplified wizard makes setting up VDI easier with automatic configuration of virtual machines (VMs). The included management  console provides powerful administration of users, VMs, and sessions, without requiring additional tools. VMs and sessions can be intelligently patched through randomization and throttling of tasks, ensuring high system performance.

Installing and configuring RDS in Windows Server 2012 is very quick and easy by using the Add Roles and Features Wizard (Figure 11-1). In a lab environment, starting with a bare-metal server-class computer, you can install Windows Server 2012, install RDS, and deploy session- and VM-based desktops in less than an hour.You can find good lab guides instructions for 

various scenarios on TechNet in the article titled “Remote Desktop Services Overview”at 
technet.microsoft.com/enus/library/hh831447.aspx.Another good resource for  learning more about RDS in Windows Server 2012 is the book titled “Introducing Windows Server 2012,” which you can download from go.microsoft.com/FWLink/?Linkid=251464.

Computer Tips: Virtual Desktop Infrastructure(VDI) in Windows 8


"Computer Tips: Virtual Desktop Infrastructure(VDI) in Windows 8"


Reference : www.microsoft.com

Computer Tips: Choosing the right VDI deployment in Windows 8

As this chapter already mentioned, RDS provides one platform to deliver desktops by using multiple methods, including:

1- Personal VMs  Personal VMs give users access to a dedicated, high-performance desktop over which they have full administrative control.

2-  Pooled VMs  Pooled VMs give users access to high-performance desktops from connected devices. RDS assigns VMs on-demand from an existing pool to users. When they log off a VM, RDS returns the VM to the pool for another user.

3-  Session-based desktops  Session-based desktops provide access to applications, data, and shared desktops that are centralized in the data center.This is the typical terminal services approach to virtualization a desktop.

NOTE With pooled VMs and session-based desktops, users can still personalize their experiences considerably, although they still cannot install applications. Roaming user profiles and folder redirection are still available, but RDS adds support for user profile disks.With user profile disks enabled, RDS mounts a virtual hard disk containing the user’s settings and data to their user profile folder (C:\Users\Username).User profile disks persist between sessions.A great thing about user profile disks is that they are very simple to set up and manage.


RDS powers all three Microsoft VDI deployment methods, and they all have common benefits.They provide powerful administration features through the built-in management console (Figure 11-2).They offer a powerful and scalable virtualization platform, regardless of whether you are deploying session-based desktops, pooled VMs, or personal VMs. Lastly, they give users a consistently rich experience across LAN and WAN.

Computer Tips: Choosing the right VDI deployment in Windows 8


Regardless of their common benefits, your choice depends on the following points, and Table 11-1 summarizes them for easy comparison:

1- Personalization  Do users need the ability to customize their desktops? If so, what level of customization do they need? With session-based desktops and pooled VMs, users have limited personalization capability with user profile disks (i.e., the ability to persist their data across different logins). However, they cannot keep their user- installed applications across logins. On personal VMs with administrator access, 
users can change any aspect of their desktop, including installing applications that persist across multiple logins.

A-- Application compatibility  Session-based desktops share a common server operating system; therefore, any applications that are to be installed need to be compatible with Windows Server 2012. In both VM scenarios, however, Windows 8 is running in the VM. So application compatibility is always higher for VMs.With  personal VMs, users can install their own applications, but you decide what   applications to  install on pooled VMs. As a result, personal VMs provide the highest level of application compatibility across all three deployment methods.

B-- User density  Because session-based desktops share a single server operating system, the number of users that a single server can accommodate is always going to be higher than either VM scenario. With pooled VMs, because user data is not stored locally (but can be stored on a separate user profile disk), the sizes are typically smaller than personal VMs.As a result, pooled VMs have slightly higher density. You can improve the density of pooled and personal VMs by using user state virtualization and application virtualization technologies on the VM, but they will always have a lower density than session-based desktops.

C-- Image count  If maintaining a single image is important, the best way to achieve that goal is through session-based desktops or by deploying pooled VMs. In a session-based desktop, all users share a single server image. With pooled VMs, all users use a cloned copy of a single master image. Single image configurations are easier to manage and have lower costs in comparison to personal VMs, in which each user uses an individual image.

D-- Cost  Because session-based VDI offers the highest densities and a single image, it is usually easier to manage, so it offers the lowest cost. Pooled VMs have the single image and management benefits of session-based VDI, but reduced densities and increased management effort means that they are more expensive to deploy. Personal VMs have the lowest density and highest management efforts, making them the most expensive deployment method. However, Windows Server 2012 helps organizations reduce overall costs for VDI with support for lower-cost storage (e.g., SMB and DAS), application virtualization, dynamic memory, and user profile disks.

Computer Tips: Choosing the right VDI deployment in Windows 8


"Computer Tips: Choosing the right VDI deployment in Windows 8"


Reference : www.microsoft.com


Computer Tips: Complete desktop virtualization in Windows 8

Microsoft VDI can provide users a work desktop environment on multiple devices, but what about their applications, settings, and data? Microsoft has elegant solutions for both problems that work across all VDI deployment methods:

A-- Application virtualization  Microsoft offers two technologies for providing users access to their applications across devices: RemoteApp and App-V. Each solves the problem in a different way and has different strengths.

B--User state virtualization  User state virtualization maintains users’ data and  settings across physical and virtual sessions. User state virtualization is not a new concept. 

You might have known it as IntelliMirror back in the Windows 2000 era.  Modern technologies in the Windows 8 era provide many new, exciting possibilities for virtualizing users’ data and settings, however.

Application virtualization

Microsoft offers two solutions for application virtualization. The first is RemoteApp.RemoteApp is a Windows Server 2012 feature that is based on session virtualization.It enables you to provisionapplications remotely through RDS. Applications run on IT-managed hardware in the data center. By moving them from the endpoint to the data center, you can better manage the security and continuity of confidential data.

Users can easily access their remote applications from a variety of clients—through a webpage or an RDS client. Additionally, remote applications run side-by-side with local applications. For example, they run in their own resizable windows, can be dragged between multiple monitors, and have their own icons on the Start screen or taskbar.

The second solution is App-V. It enables you to meet user and IT needs by allowing users to work productively almost anywhere and by accelerating application deployment. Users can access their applications dynamically from almost anywhere on any authorized PC without first installing them or rebooting their PCs.

Virtual applications run in their own self-contained virtual environments on users’ PCs. This eliminates application conflicts and allows you to reduce application-compatibility testing time, resulting in faster application deployment and updates. Virtual applications and user settings are preserved whether users are online or offline. 

Combined with user state virtualization, App-V provides a consistent experience and reliable access to applications and business data, regardless of users’ locations or the PCs they are using.

You can deploy virtual application packages by using App-V servers, which stream virtual applications on demand to users’ PCs and cache them locally so that they can be used offline. 

Another option is to use Configuration Manager to deploy, upgrade, and track usage of both physical and virtual applications in a single management experience. As a result, you can use existing processes, workflows, and infrastructures to deliver virtual applications to users.

App-V 5.0 offers a number of exciting enhancements over earlier versions, including:

A-- A new, easy-to-use web-based management interface that makes it easier to discover and use its features (see Figure 11-3). Also, it offers support for Windows PowerShell that enables you to script complex or repetitive tasks.

B-- Dynamic Configuration enables you to deliver a single virtual application package to users or PCs in a variety of configurations. Rather than creating separate packages for Marketing, Sales, Engineering, and so on, you can deploy and customize one package to all of the departments.

C-- Virtual Application Connection is a huge enhancement for App-V 5.0. With previous versions of App-V, you packaged applications and their dependencies together.When you had to update an add-in, though, you had to repackage the whole thing. Now you can package applications and add-ins separately, and connect them together when they need to interact. Updating individual components is easier.

D-- Virtual Application Extension helps virtual applications to work like locally installed applications, so users don’t run into unexpected user interface or functional changes due to virtualization. In fact, users might not even realize they are using virtual apps.

Computer Tips: Complete desktop virtualization in Windows 8


"Computer Tips: Complete desktop virtualization in Windows 8"


Reference : www.microsoft.com

Computer Tips: User state virtualization And Client Hyper-V in Windows 7 and Windows 8

With user state virtualization, user data and settings are centralized in the data center,eliminating the constraints of local storage and giving users the ability to access their data and settings from any PC. It makes backing up, securing, and managing the availability of users’ data and settings easier for IT.

First, UE-V is a new part of MDOP that can roam users Windows and application experiences across devices—no matter how you deliver desktops or applications to them.It addresses challenges that user might face when logging onto multiple desktops at the same time, and it can roam experiences across physical PCs and session-based desktops. (It even roams settings between Windows 7 and Windows 8.) For example, UE-V can roam users’ experience between a desktop PC running Windows 7, a tablet PC running Windows 8, and a session-based desktop running either operating system.They will have the same Windows and application experiences each time they log on to their desktop environments.

Additionally, UE-V synchronizes experiences intelligently. When users log on to their PCs, UE-V synchronizes only the settings required to get them to their desktop, instead of synchronizing an entire profile. It also synchronizes Windows settings when users lock or unlock their PC. It synchronizes application settings when users open or close the application, and not during logon.

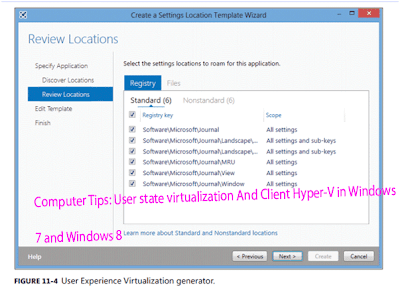
The result of smart synchronization is that it makes logons faster when compared with roaming user profiles.UE-V is also very flexible.It uses settings location templates to define the paths of settings and files that it should roam. Settings location templates help UE-V quickly and  precisely identify settings instead of grabbing the entire profile. You can create custom settings location templates very easily for applications that UE-V doesn’t support natively by  using the UE-V Generator (Figure 11-4).


For example, you can create custom settings  location templates for the line-of-business (LOB) that your company deploys. Allyou do is run the UE-V  Generator, launch the application for which you want to create a custom settings location template, and then close the application.UE-V will automatically discover where the  application stores its settings, but you can refine the template by editing it in the UE-V Generator.

For such a powerful and useful tool, it can be incredibly simple to deploy:


1-- Create and share a folder to store users’ experiences (i.e., settings store).

2--  Install the UE-V agent on the desktops where you want to synchronize settings.

3--  Configure the location of the settings store. You can do this on the installation command line, by configuring a home folder in Active Directory, or by using Group Policy. Group Policy is usually the most flexible way. (You can optionally configure the location of your custom settings location templates that is, settings catalog.)UE-V also supports

Windows PowerShell. For example, you can roll back a single application’s settings for a specific user by using Windows PowerShell.

Computer Tips: User state virtualization And Client Hyper-V in Windows   7 and Windows 8


You can learn more about UE-Vat http://www.microsoft.com/technet/mdop.Although UE-V roams users
settings, Folder Redirection compliments UE-V by  centralizing user data folders (e.g., Documents, Pictures, and Videos) in the data center, making these folders accessible to users from any PC they log on to by using their domain credentials.

Folder  Redirection in Windows 8 works largely the same as it did in Windows 7. Folder Redirection is not new, but it’s an essential part of Microsoft’s user state virtualization story.


Users have  full-time access to their documents, pictures, videos, and other files from any PC.For both technologies, Offline Files in Windows 8 helps ensure that users have access to their files even if they aren’t
connected to the network. To do so, Offline Files caches copies of the files and folders locally, then synchronizes changes the next time a connection is available. It works with UE-V and Folder Redirection to give users a consistent experience even when they are offline.


Client Hyper-V


On PCs running Windows 8, Client Hyper-V provides a robust virtual platform for  developers and IT pros. It leverages the security, scale, and manageability of Windows 8 and Server Hyper-V platforms, providing developers with a robust development platform and IT pros with a convenient lab and test environment. Client Hyper-V uses the same VHD format as Hyper-V on the server.


Client Hyper-V in Windows 8 supports 32-bit and 64-bit operating systems in extremely large VM configurations (i.e., 32 virtual processors and 512 GB of memory). It supports multiple forms of storage, including IDE, iSCSI, SMB, and USB flash drives. Also, Client Hyper-V takes advantage of the security and management enhancements of Windows 8, such as BitLocker Drive Encryption, Secure Boot, and so on.

You can install Client Hyper-V on each 64-bit device that has Second Level Address Translation (SLAT) enabled. Most modern PCs have support for SLAT. It supports as many as 12 monitors, most USB devices, wireless networks, and sleep and hibernate states. It also offers a full fidelity experience, including 3D, audio, multi-touch, and so on.


In short, Client Hyper-V can help you work more efficiently. It’s not really a feature intended for user virtualization. Instead, it can help you avoid buying new hardware to setup lab and test environments. You can easily transfer VMs between Client and Server Hyper-V environments. Most IT pros will have a zero learning curve for using Client Hyper-V, because it is almost identical to Server Hyper-V.


"Computer Tips: User state virtualization And Client Hyper-V in Windows   7 and Windows 8"

Reference : www.microsoft.com


Computer Tips: Guide to Chkdsk in Windows 8

Chkdsk has been one of those great little tools built into just about every version of Windows that help fix NTFS file system errors, corruption in file system metadata, or hard disk errors. Before Windows Vista and Windows 7, chkdsk hadn’t changed much at all. In Windows Vista and 7, there were some significant speed improvements made to allow chkdsk to run faster, but chkdsk still depended on the number of files stored in a volume.

Because of that inherent design, it could take several hours for chkdsk to finish scanning a large drive with lots of files. Luckily in Windows 8, chkdsk has been completely revamped. What’s even better is that there have been several other additional features added to Windows 8 to catch and repair file system errors so that you may never have to run chkdsk again.

In this article, I’ll tell you about the changes to chkdsk in Windows 8 and the additional file system health tools that have been added. With Windows 8, a lot of errors will now be fixed automatically while running Windows that used to require running chkdsk after a reboot.

Windows 8 – Chkdsk and File System Health

First off, I immediately noticed the number of new options included with chkdsk on Windows 8 as opposed to Windows 7. Here is a screenshot of the list of parameters for chkdsk in Windows 7:

Computer Tips: Guide to Chkdsk in Windows 8

Here are the list of parameters for chkdsk in Windows 8:

Computer Tips: Guide to Chkdsk in Windows 8

As you can see after /B, there are about 6 more new parameters. I’ll go through those in more detail in just a bit. First, let’s go into detail about how the new health model works in Windows 8. To begin, you probably remember how a drive was marked as healthy or not (dirty). That’s not the case anymore. Now there is a whole set of stages or states for the health of the file system:

Computer Tips: Guide to Chkdsk in Windows 8

Let’s go through these. First is Healthy. This means just that: the system is healthy and there are no issues. After that, there is something called Online Self-Healing, which is not shown as a stage, but occurs between Healthy and Spot Verification Needed. Online Self-Healing is a feature of NTFS introduced in Windows Vista that lets the file system fix itself while still online (meaning Windows can still be running). In Windows 8, the number of issues that can be self-healed has been increased.

After self-healing, a corruption needs to be verified. This is because some corruptions are memory-related and not actually disk-related. To detect this, Windows 8 has added a new service called Spot Verification Service. The service is only activated by the file system and it will verify if the corruption is actually disk corruption or not. If so, then we move to the next stage: Online Scan Needed.

Windows 8 has built-in maintenance tasks that run every day. Windows 8 will check these verified corruptions and log them into the system for later fixing. Again, this is all done while the system is online. The next stage is Spot Fix. This is where chkdsk in Windows 8 is completely different. Spot Fix is a new parameter that checks the disk and fixes any problems in just a few seconds. The time it takes to run chkdsk using spotfix is based on the number of corruptions instead of the number of files as in older versions of Windows. This means everything is fixed in seconds. Here’s a graph that shows the time using chkdsk /f vs the new chkdsk /spotfix.

Computer Tips: Guide to Chkdsk in Windows 8

As you can see, you can wait 6 hours running the chkdsk the old way or 2 seconds running it the new way! Awesome! Now to be clear, a spotfix means you need to restart the system in order to fix the problem. In Windows 8, there are two ways to manually run a chkdsk on your system. Firstly, you can go to Computer, click on the drive and then click on Properties.

Computer Tips: Guide to Chkdsk in Windows 8


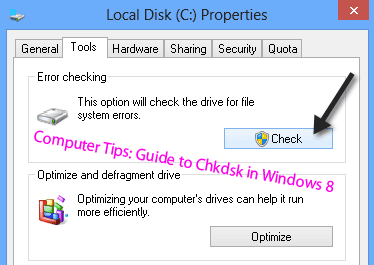
Click on Tools and then click on Check.

Computer Tips: Guide to Chkdsk in Windows 8

Most errors can be fixed without restarting, but if a spotfix is needed, you’ll be prompted to restart. Again, remember, it’ll only take seconds to fix though! The other way is the command prompt, which you saw before. The new options are:

- /scan - runs an online scan meaning it will fix whatever can be fixed without restarting.

- /forceofflinefix - has to be used with /scan and is basically the same thing as running /spotfix

- /perf - You can make the online scan even faster by using this parameter. It will eat up more resources and slow down other tasks.

- /spotfix - The new magical spot fixing feature of chkdsk that fixes errors in seconds rather than hours

- /offlinescanandfix – Will run an offline scan and fix

When you run /spotfix or /offlinescanandfix on the current used volume, you’ll be asked to schedule the scan the next time the system restarts.

Computer Tips: Guide to Chkdsk in Windows 8

You can check to see if a drive is scheduled to be scanned by typing in chkntfs c: or whatever the volume you want to check.

Computer Tips: Guide to Chkdsk in Windows 8

Overall, the new chkdsk in Windows 8 has some great improvements and the new file system health states make the detection, verification and repair of file corruption quick and easy. Enjoy


"Computer Tips: Guide to Chkdsk in Windows 8"


Reference : online-tech-tips.com


iPad-iPhone tips: Increase iPad Battery Life Use 5 Ways

I have an iPad 2 and I realized over the last few months that my battery was draining faster than I would have liked. I was determined to increase the battery life and I was suprisingly successful. At first I thought the battery was just getting old and could not hold the charge as long, but I had been so particular with charging the iPad that luckily that wasn’t the case.

Before I started this endeavor, I noticed that the iPad would last about 3 to 4 days with my regular use, which was about 30 mins to an hour a day. After I implemented some changes, I was able to get the iPad to last almost 7 to 8 days without having to charge it! And a lot of them were very easy fixes that just never occurred to me before. In this article, I’ll mention the 5 tweaks that increased the battery life of my iPad. If you have others not mentioned here, let us know in the comments.

iPad-iPhone tips: Increase iPad Battery Life Use 5 Ways

Method 1 – Charge When Low Battery

One of the main reasons why my iPad battery has lasted two years is because I still follow the charge only when the battery is really low rule. Yes there are some that say that doesn’t matter as much now, etc, etc, but whatever. I still do it and it seems to work. For example, I usually wait till the iPad is below 5% and then I start charging it.

Also, I do a couple of other things. Firstly, I make sure that I let it charge all the way to 100% without disconnecting it. A battery gets worn down by charge cycles, so if you stop in-between and then charge it again and then stop, over and over, the life of the battery will decrease.

Lastly, I try my best to disconnect it immediately after it hits 100%. The iPad has some mechanism to let the device run on battery and then re-charge when it hits 100% and you keep it connected to the power source. It’s supposed to make the battery last longer, but the fact that it keeps having to do that just means you’re wearing the battery down more. If you can disconnect it ASAP after a full charge that is best.

Method 2 – Disable Lock Screen Notifications

The next major tweak that made a whole lot of difference was disabling notifications on the lock screen. Basically, whenever you get a notification from any app (and I got a whole lot because I have 100+ apps installed), it will appear on the lock screen and they display will turn on in order to show it. The display comes on for a short time, but I realized that this was happening all the time. Every 15 to 20 minutes, my iPad would turn on to display a Facebook notification, iMessage notification, new magazine notification or something else.

All that time the display was on for showing notifications, the battery was being slowly eaten up. I quickly realized that I had to just turn off notifications on the lock screen and no more constant screen light-ups.


iPad-iPhone tips: Increase iPad Battery Life Use 5 Ways

You’ll have to go through each app under Notifications, but it’s well worth the time. You don’t have to turn off notifications completely, just make sure that you turn off View in Lock Screen for anything you don’t feel is very important. I switched off notifications on the lock screen for pretty much everything except a few apps I wanted to get visual alerts for.

What’s nice is that once you unlock the iPad, you’ll then see all the notifications appear in the banner at the top. Make sure you also turn on Banners instead of Alerts. Recently, I also turned mine off for iMessage because I realized with the new unified iMessage in iOS 6, my iPad would keep turning on every time I got a new iMessage on my iPhone. If I had an extended conversation, the iPad would light up the whole time. Definitely not necessary.

Method 3 – Auto-Lock

If you go to Settings, General, and Auto-Lock, you should set this value to the lowest possible, which is 2 minutes.


iPad-iPhone tips: Increase iPad Battery Life Use 5 Ways

Unless you really need the display on for longer, 2 minutes without using it is more than enough. After that, you want it to automatically turn off. The less the screen is on when you’re not using it, the longer your iPad battery will last.

Method 4 – Turn Off Cellular Data

My iPad is Wifi+3G and the 3G used to always be on. I realized this was pretty useless since I only used it when I left the house. So maybe a few times a week, I would be using 3G, otherwise it was always connected to WiFi.

For the new iPad, you’re talking 4G, which probably eats up even more battery. I just turn off cellular data until I actually need it. Just go to Settings and tap on Cellular Data and switch it to Off. 

iPad-iPhone tips: Increase iPad Battery Life Use 5 Ways


Method 5 – Bluetooth

Lastly, I also disabled Bluetooth as I didn’t use this feature all the time either. Whenever I needed to connect my bluetooth headset, I would just go in and turn it back on. After I’m done, I turn if back off. It saves quite a bit of battery if you can be disciplined about it and turn it off when you don’t need it.


iPad-iPhone tips: Increase iPad Battery Life Use 5 Ways


Bonus Method – Do Not Disturb

if you recently updated to iOS 6, then you probably heard of Do Not Disturb. It’s a new feature that will silence all FaceTime calls and any alerts. This is useful if you don’t feel like doing Method 2 mentioned above. Then you can just leave everything and turn on Do Not Disturb for the portion of the day you don’t use the iPad.

If you go to Settings, first turn on Do Not Disturb. After that, tap on Notifications and turn Scheduled to On. Then choose the time you want to enable do not disturb. You can also allow FaceTime calls from favorites if you like or disable it. They even have a feature so that if you get a repeated FaceTime call within three minutes, it’ll ring.


iPad-iPhone tips: Increase iPad Battery Life Use 5 Ways

That’s about it! Using these methods, I was able to significantly increase the battery life of my iPad. If you do something different than what I mentioned here, post it in the comments. Enjoy!


"iPad-iPhone tips: Increase iPad Battery Life Use 5 Ways "


Reference : online-tech-tips.com

Windows 8 Tips: An Old PC Revitalize by Installing new Windows 8

Got an old computer sitting around running Windows XP? Don’t use it for anything other than as a dust collector? Well, maybe it’s time to try out the fresh new Windows 8 and give it some life back. Now I’m not super supporter of Windows 8, but I’ve been using it for a few months and something has become clear to me.

I don’t plan on replacing my primary Windows 7 machine with Windows 8 as I just can’t get quite used to the whole mix of Metro and desktop, however, for an entertainment or play-around PC, it’s absolutely perfect. What I really like about Windows 8 are the Metro apps.

 Actually, I find ti harder to use the desktop on Windows 8 and actually like doing things through the new Metro UI. Everything just looks better.

Windows 8 Tips: An Old PC Revitalize by Installing new Windows 8


It’s like the iPad for PCs. I love the iPad because apps for custom designed for that screen and look gorgeous. Even though I can’t convert my PC into a touch screen device, I still like the full-screen apps and the fact that the customized look gives me a tablet feel to my PC. Suddenly, my old boring PC is interesting 
again and I check the News app, Messaging, Weather, Travel, Finance, etc, etc. For getting real work done, I still use my Windows 7 machine because I know things just work there, however, it’s great to go to the Windows 8 machine and then browse the web in Metro IE 10 or play a game in full-screen.

Now let’s not forget about Macs. OS X has been getting iOS features for a while and I love the full-screen apps in OS X. However, I definitely think Microsoft beat Apple to the bunch in terms of making the desktop OS a lot more tablet-like. Yes, there is the Mac app store, but for some reason it’s just not the same as Windows 8. I think because of the new Start Screen, Windows 8 really bakes the experience right into the OS. OS X still is your standard desktop with a few iOS-like apps that you can install.

So what are the advantages of installing Windows 8 on an older machine you have sitting around? Here are my reasons:

1. Windows 8 is finally cheap. It’s going to be $40 to upgrade your Windows XP, Vista or Windows 7 machine. That’s not bad at all.

2. The system requirements to run Windows 8 is the same as Windows 

7, which isn’t a lot. Basically, 1 GHz processor, 1 GB RAM (32-bit), 2 GB RAM (64-bit), 20 GB of space, and a DirectX 9 supported video card.

3. You get a tablet-like full-screen set of apps for news, games, etc that look much better than traditional Windows programs.

I definitely like the viewing experience more than just going through a web browser on my Windows 7 or OS X machine. Here are some screenshots of Windows 8 that make me use it for Internet browsing and other entertainment tasks:

Windows 8 Tips: An Old PC Revitalize by Installing new Windows 8


Windows 8 Tips: An Old PC Revitalize by Installing new Windows 8


Windows 8 Tips: An Old PC Revitalize by Installing new Windows 8

These are the kind of interfaces you are used to seeing on a tablet like the iPad, not on your PC. It’s definitely refreshing and even though some people may not like Windows 8 and the whole Metro UI for their office work or main computer, it’s definitely a nice second PC to run for reading, browsing, playing games, etc. 

That’s why this post is all out using an old PC.You’ll hear other says things like “Try Linux instead” or “Upgrade the computer by buying more memory, an SSD, or a new graphics card”, but that’s not the point of this article. This is not to replace your current primary desktop. Don’t spend any money and just install Windows 8. Also, Linux is nice and all, but if you’re a Windows person, you’re not going to be able to or care to use Linux no matter how simple the interface is.

The only downside is that you first have to make sure there are enough drivers for your computer that will support Windows 8. A lot of updated Windows 7 drivers will actually run fine on Windows 8 too. Also, it depends on whether you really care to run a lot of desktop apps on this old PC running Windows 8. Since it’s not your primary machine, I suggest just using it for the Metro apps and not even worrying about installing a lot of desktop apps.

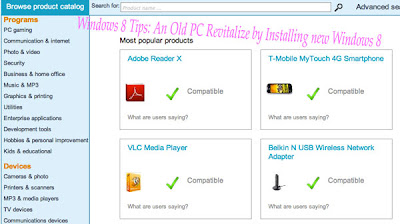
Also, there are some ways you can make sure your system is actually compatible. The first place to go is the Windows 8 Compatibility Center, which is right now still showing for the Release Preview since Windows 8 hasn’t been officially launched yet, but it’ll be the same site.

Windows 8 Tips: An Old PC Revitalize by Installing new Windows 8

Here you can basically check to make sure the programs you want to have on Windows 8 will actually work. Also, you can check whether your graphics card, printers, scanners, and other devices will work with Windows 8. The other way to check and the more detailed process is by actually downloading Windows 8 from Windows.com.

 If you are running Windows XP, Vista, or 7, you’ll be able to download Windows 8 straight from Windows.com starting on October 26th.

Included is the Windows 8 Upgrade Assistant, which will go ahead and check to make sure your system is actually able to run Windows 8.

Windows 8 Tips: An Old PC Revitalize by Installing new Windows 8

Note that depending on your system, you’ll only get certain stuff moved over to Windows 8. Here’s the breakdown:Windows XP – You only get personal files transferred, nothing else. I prefer this actually because it’s the best thing to doing a clean install.

Windows Vista – You get to transfer Windows settings and personal files.Windows 7 – You can transfer apps, Windows settings and personal files.

This was great for me because I wanted to basically wipe my old PC that was running Windows XP and install a fresh copy of Windows 8. The $40 is only for Windows 8 upgrade, but since only files can be transferred, you basically get a fresh install of Windows 8.

 Then, if you need to add more apps, you can do that after Windows 8 is installed.So what are your thoughts of bringing back on old machine to life with Windows 8? Bad idea? Good idea? Tell us your thoughts in the comments. 


"Windows 8 Tips: An Old PC Revitalize by Installing new Windows 8 "


Reference : online-tech-tips.com


Windows 8 TIPS: Desktop Icon Spacing Change in Windows 8

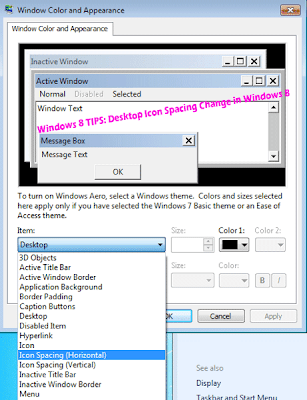
In Windows 8, there is no easy way to adjust the desktop icon spacing as we used to be able to do in Windows 7. There you could go to Personalize, choose Window Color and then click on Change advanced appearance settings.

Windows 8 TIPS: Desktop Icon Spacing Change in Windows 8

Then the dialog Window Color and Appearance box above would pop up and you could adjust all kinds of settings. Now that is gone unfortunately in Windows 8. Instead, if you want to change some of these settings like Icon Spacing (Horizontal) or Icon Spacing (Vertical), you have to edit the registry!

Before doing this, make sure you backup the registry in case something goes wrong. I tried it on my machine and it works pretty well. You have to open the registry editor in Windows 8 by going to the Start Screen, right-clicking, choosing All apps and then clicking on Run.

Go ahead and type in regedit and then navigate to the following registry key:

Windows 8 TIPS: Desktop Icon Spacing Change in Windows 8

You will see two values here: IconSpacing and IconVerticalSpacing. They are defaulted to this odd number -1125. You can adjust the horizontal spacing by changing the value of IconSpacing. The range of values is -480 to -2730. Close to -480 will be less horizontal space and close to -2750 will be more horizontal space. Note that this is not really the space between the icons on the desktop. It’s the space of the bounding box for the desktop icon. Here’s what I mean:

Windows 8 TIPS: Desktop Icon Spacing Change in Windows 8

As you can see above, I have change the value of IconSpacing to -2000. This means that width of the bounding box around each icon is increased, but the actual spacing between the icon plus box is very small. So if you go to a lower value like -500, the text will actually get cut off:

Windows 8 TIPS: Desktop Icon Spacing Change in Windows 8

For some reason, the vertical spacing key works slightly differently. It doesn’t actually increase the area of the bounding box, but instead increases the actual space between the icon plus box. Here’s what I mean:

Windows 8 TIPS: Desktop Icon Spacing Change in Windows 8

As you can see, the bounding boxes are all small, but the actual space between the icons has increased when I changed the value to -2000 for IconVerticalSpacing. You can also mess around with other values under the WindowMetrics key. For example, I changed the BorderWidth to 25 instead of -15. This makes the border of any window 25 pixels! The range of values here is 0 to 50 pixels. The negative numbers is some different type of calculation method called twips that you don’t need to worry about for this setting.

Windows 8 TIPS: Desktop Icon Spacing Change in Windows 8

Check out my huge border in Explorer on Windows 8! Like I said, make sure you backup your system before you do this. You can tweak a lot of desktop settings here and Microsoft even has a link that tells you what each value does:

http://technet.microsoft.com/en-us/library/cc951790.aspx

Even though Windows 8 does not provide a GUI for customizing the look and feel like Windows 7 did, you can still do it yourself via the registry and a little playing around. If you have managed to customize something using these keys in the registry, post a comment and let us know. Enjoy!


"Windows 8 TIPS: Desktop Icon Spacing Change in Windows 8"


Reference : online-tech-tips.com


Computer Tips: Five Ways Automate Your Computer When You are Not Using It

If you’re like most people, your home computer probably sits idly most of the day. Maybe you’re at work or watching the kids or grocery shopping or watching TV. Whatever the case, 80% of the time my computer at home is just sitting around doing nothing.

What a waste! I recently decided that I wanted to get more done without having to physically be on my computer. What kind of tasks did I want my computer to do while I was not there? All kinds of stuff! Stuff like

1- Download torrents automatically

2- Upload photos and videos to my cloud accounts on Drop box and Google Drive and then automatically perform tasks on those files

3- Converting AVCHD videos from my camcorder to a format view able on my iPad and iPhone

4- Automatically backup my computer locally and in the cloud

5- Automate other random tasks on my computer like resizing photos, emailing those photos, etc.

After doing quite a bit of research and playing around with lots of software, I eventually managed to get most of these items working fairly well. In this article, I’ll write about the different programs and services you can use to automate tasks on your computer when you’re not using it.

Of course, if you have written a script or use a different service or program, feel free to post a comment here and let us know how you get the maximum use out of your computer! There are tons of ways to automate your computer, so we would love to hear from you the reader.

Download Torrents Automatically

If you are a heavy torrent user, you probably could benefit from having your torrents downloading automatically while you are sleeping and available for your viewing pleasure when you get up! It’s really easy to setup and all you need is u Torrent and some RSS feeds.

First, you need to find a torrent site that actually has RSS feeds. A few of them include:

http://thepiratebay.org/rss

http://www.torrentreactor.net/

http://www.ezrss.it/

Then you need to setup the feeds in u Torrent. Basically, click on Feeds, then click on Add RSS Feed and paste in the feed URL.

Computer Tips: Five Ways Automate Your Computer When You are Not Using It

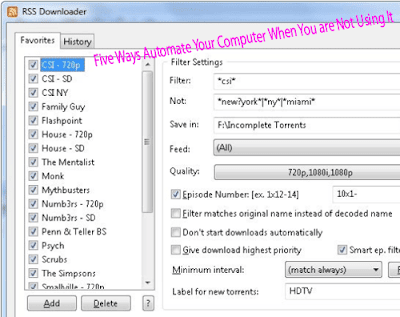
Make sure to choose the Do not automatically download all items radio button. Click OK and then go to Options – RSS Downloader and create a filter for what you want to download.

Computer Tips: Five Ways Automate Your Computer When You are Not Using It

I won’t go through the details here, but you can read more on the u Torrent site here:

http://www.utorrent.com/documentation/rss

Automating Uploads to Cloud Services I use Drop box quite a bit and I also use Google Drive. Automating uploads to both of these services was a little tricky. Once the files are uploaded to Drop box, there are all kinds of awesome online tools and services you can use to automatically perform tasks on those uploaded files, which I’ll mention soon. However, firstly I wanted the files to get transferred automatically too.

In my case, what I ended up doing was downloading the Drop box and Google Drive programs for Windows and Mac and then used a free utility to automatically move files into those cloud folders, which would then automatically sync up to the cloud.

Computer Tips: Five Ways Automate Your Computer When You are Not Using It

Once I had the Drop box app installed on my Mac and PC, I used a program called File Mover to automatically move new files to the appropriate Drop box folders. Now when I download pictures from my camera or H D videos from my camcorder, File Mover will check that folder and then move those files based on their file extension to the appropriate Drop box folder on my PC. 

Once it’s moved there, Drop box will automatically sync those files to the cloud .I’ve previously written about File Mover and how you can use it to automatically copy and move files on your PC. Now once the files were uploaded to Drop box, there are literally a million things you can do with those files. There is a service called Wapp wolf Automator whereby you can create specific actions associated with each of your Drop box folders. When a new file is uploaded, the actions will be run against that file.


Computer Tips: Five Ways Automate Your Computer When You are Not Using It

What exactly can you do? Well check out the graphic above! You can convert documents, post videos to your Facebook wall or page, add effects to pictures, email files, zip files, upload files to other cloud services, and all kinds of other stuff.

Automatically Convert Videos To Different Formats

You pretty much have to convert videos today if you want to be able to watch them on multiple devices. Unfortunately, different devices record and play only certain video formats and therefore you are forced to convert videos to all kinds of formats to get them to work on your particular device.

My favorite program for this task is Handbrake! It works on Windows and Mac and it’s free. You can use it to easily convert videos into compatible formats for your iPhone, iPad, etc.

Computer Tips: Five Ways Automate Your Computer When You are Not Using It

So is is possible to automate Handbrake? Yes! You can use a program called Drop Folders, which is also free.

Computer Tips: Five Ways Automate Your Computer When You are Not Using It

The program is fairly easy to use and you can check out the website for more documentation. Basically, it will monitor a folder and anytime a file is added to the folder, Drop Folders will run Hand Brake using command line arguments. Hand Brake will do all the conversion and the files will be placed into the destination folder.

Now I can just copy all my videos to a specific folder on my computer and Drop Folders will automatically start converting them using Hand Brake.I even have it setup so that the destination folder is a folder in Drop box, so all those video files get automatically uploaded to the cloud. Sweet!

Automatically Backing up my Computer
For this task, I ended up going with a online service called Crash Plan. You’ve probably heard of it before as it’s gotten to be pretty popular. You can download it and use it for free, though the free version includes ads and only lets you backup locally, not to the cloud.

For about $25 a year, you can backup 1 computer to the cloud with 10 GB of storage. $50 a year will give you unlimited storage for 1 computer and $120 a year will give you unlimited storage for up to 10 computers. I personally backup all my important files to Drop box and Google Drive so I did not really care for their cloud storage options.


Computer Tips: Five Ways Automate Your Computer When You are Not Using It

Basically, I use the free version to backup my PC and Mac to another computer that I have that is used only for backups. It has two hard drives in a RAID configuration with data security, meaning if one drive fails, I still have an exact copy on the other drive.

Of course, the backups are all automated, so once you set it up, you really don’t have to worry about it anymore. If you don’t backup your files anywhere else other than your PC, then the cloud options for Crash Plan might be a good choice.

 There are lots of other ways to automatically backup your computer, so feel free to tell you what you use in the comments. I find Crash Plan to be very robust and simple to use.

Automating Other Tasks
Lastly, I wanted to perform some other random automated tasks on my computer when I’m not using it and a great program for that is Actions.

Computer Tips: Five Ways Automate Your Computer When You are Not Using It

Actions is a nifty little program for Mac and Windows that lets you build workflows to complete repetitive tasks quickly. For example, if you need to resize a bunch of photos or apply a filter to them, etc, you can do that with Actions by just dragging and dropping the actions into the workflow.

 No coding or programming needed. I’ve used it to quite a bit for photo resizing and also renaming files. You can use it for a lot of other stuff too, so be sure to check out the website.

Overall, I accomplished what I had set out to do and I feel way more productive! I’m sure I’m still missing a lot of cool automated ways to use my PC, so feel free to pitch in your idea and thoughts. Enjoy!


"Five Ways Automate Your Computer When You are Not Using It"


Reference : online-tech-tips.com


Computer Tips: Email Contents and Encrypt Text to Secure Data

Previously, I wrote about a service called LockBin that lets you quickly send short encrypted emails to whoever you want. They have a free service plus some additional premium services and overall it works fairly well. The recipient has to know the secret password you create (and tell them via phone or something other than email) and then they type that into the site and can view the message.

This is definitely convenient because you don’t have to install any desktop software or import public keys etc to send a simple encrypted message. However, if you find yourself sending and receiving encrypted messages a lot from a few people, it might be a good idea to try something more robust like BCTextEncoder Utility.

It’s free and has a lot of good features. Of course, as with all types of encryption in which you want to send the encrypted text to someone else, they will also need to have the program installed. If you’re using a web client like Gmail, it’s always running over SSL, which means everything that is sent to Google from your computer is encrypted already. But that is just during transit.

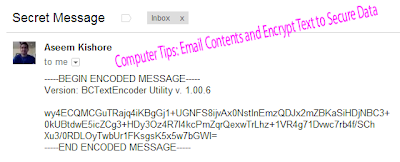
If you need extra security and want someone to receive an email that looks like the one below, them you’ll need to use a program like BCTextEncoder.

Computer Tips: Email Contents and Encrypt Text to Secure Data

Sweet eh!? So even if someone see that email, they will have no idea what to do with it. You can encrypt a message using this utility with a password or with a certificate. The program can even create public/private keys for you, which you can then send (the public key), so people can send you back encrypted messages.

To get started with keys, download the program and run it. There is no need to install it, which is nice! This means you can easily copy it to your USB drive and use it on any computer. Here’s the main interface:

Computer Tips: Email Contents and Encrypt Text to Secure Data

The simplest way to use the program is to type in your secret message in the top box (Decoded plain text) and then click the Encode button at the top right. By default, it is set to password, so it will use a password to generate the encrypted text.

Computer Tips: Email Contents and Encrypt Text to Secure Data

You will see the encrypted message in the bottom window.

Computer Tips: Email Contents and Encrypt Text to Secure Data


You can now copy and paste this text into an email or you can click on the buttons at the top to copy to clipboard or save it to a text file.

Computer Tips: Email Contents and Encrypt Text to Secure Data

There is also a button that will automatically email the recipient using your default desktop email client. Now the recipient just needs to download the program, run it, paste the encrypted text into the bottom window and click Decode. They will be asked to type in the password and then the message will appear.

Like I mentioned earlier, you can also use public and private keys and people can use your public key to encrypt data and then send it to you. You’ll be the only person to be able to decrypt it since you’ll have the private key, which is stored in the BCTextEncoder database.So, just to summarize, if you want to send encrypted messages and you do not have someone else’s public key, choose the password method. 

If you want someone else to send you encrypted messages, you can have them use the password method or you can create a public/private key and just send them the public key, which they can then import into the program and choose in the Encode by drop down.

To do this, just click on Key and then Generate New Public/Secret Pair.

Computer Tips: Email Contents and Encrypt Text to Secure Data

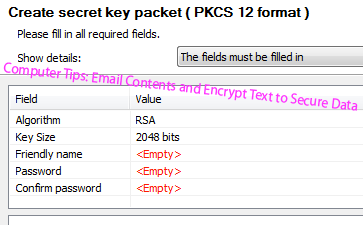
The wizard will pop up and you can choose Generate new private key and check the box that says “Create public key file“.

Computer Tips: Email Contents and Encrypt Text to Secure Data

Click Next and you’ll need to type in a name and then a password.

Computer Tips: Email Contents and Encrypt Text to Secure Data

Click next and then next again and you’ll have to randomly press keys on your keyboard to generate a random seed buffer that is used to create the keys.

Computer Tips: Email Contents and Encrypt Text to Secure Data

Now if you go to Key and choose Manage Key Database, you can copy the public key for sending to someone else.

Computer Tips: Email Contents and Encrypt Text to Secure Data

That’s about it! It’s definitely not as convenient as just typing an email in Gmail and sending it, but if you really need to send some very confidential information to someone else and electronically is the only option, you should probably encrypt it using a program like this. If you have any questions about encrypting text or data or email, etc, post a comment and I’ll try to help. Enjoy!


"Computer Tips: Email Contents and Encrypt Text to Secure Data"


Reference : online-tech-tips.com