Up until a few days ago, I was using my MacBook Pro with the Mail app to manage all my email accounts. Unfortunately, my Mac hard drive crashed and I was left with nothing but a Windows 7 PC I had just setup a few days earlier.
You want to make sure that Get folder unread count for subscribed folders is checked. It would be nice if the counts were updated immediately, but they don’t. However, you can do a Send/Receive more often if you need the count updated quickly.
Now in order to get your Google Calendar synced with your Outlook calendar, just download Google Calendar Sync.
http://support.google.com/calendar/bin/answer.py?hl=en&answer=89955
Install it, type in your Google account info and choose how you want to sync:
Since I like using a desktop app, I ended up using Outlook 2010 for my email rather than Thunderbird or other choices. Outlook is familiar and I just like it’s interface more.However, configuring Outlook 2010 with Gmail for optimal settings is not that straight-forward. It took me a while to figure out how to get everything setup properly so that my labels showed up as folders, sent emails showed up in Gmail Sent folder, Google Calendar synced with Outlook calendar, etc.
The only thing you can’t get to work is the Drafts folder. For whatever reason, there is no way to map the Outlook 2010 drafts folder to the Gmail IMAP Drafts folder. Minor annoyance, but just so you know.Otherwise, you can get everything else working just fine. In this article, I’ll walk you through the steps to properly configure Gmail with Outlook 2010.To get started, open Outlook 2010 and click on File and then Add Account.
Go ahead and choose E-Mail Account and then type in your name, email address and Gmail password. Note that if you are using Google with 2-factor authentication, you’ll need to use an application-specific
password instead of your normal Gmail password.
Now Outlook should be able to detect all the proper settings for you and configure Gmail with the correct incoming and outgoing settings. You should get a Microsoft Outlook test message in your Gmail account
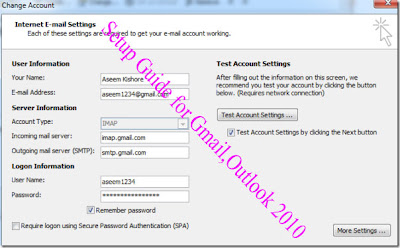
once it has finished. If, for any reason, you have to manually enter the settings for the server, here is what it should look like:
Then click on More Settings to configure the rest of the settings. Click on Sent Items first and make sure you choose Do not save copies of Sent Items. If you try to save them to the Sent IMAP folder on the server, every time you send a message, you’ll see a duplicate in the Sent mail folder. Anything sent through IMAP automatically gets put into the Sent mail folder on the server, so you don’t have to save copies of sent items.
Next click on Deleted Items. Here is where things get a little tricky.
So there are a couple of things you can do for deleted items. The first option “Move deleted items to the following folder on the server” can be set to the Gmail Trash folder as seen above.
However, this is different than the way Gmail deletes emails. For example, if you go to the web interface and delete an email in Gmail, it will simply remove all the labels, including Inbox, and will move the email to the All Mail folder. This is kind of a catch all folder.
So in theory, nothing actually ever gets deleted from your Gmail account.
If you choose the setting mentioned above, the email will go to the Trash, meaning it won’t show up in the All Mail folder either. Basically, it’s really gone. So make sure that’s what you really want to do.
Secondly, ONLY choose the Trash folder when choosing this option. Do not try to move deleted items to the All Mail folder or any other label. Just move it to Trash or you’ll see some funky behavior.If you want the normal behavior of Gmail, you need to select Mark items for deletion but do not move them automatically. Make sure you check Purge items when switching folders while online.
Then you need to go to Gmail, Settings and click on Forwarding and POP/IMAP. If you leave the IMAP access settings as is, then when you delete a message in Outlook and then do a purge, it will auto-expunge
(remove the label) and move the item to the All Mail folder.
You can also turn that off and then choose what you want to do when you do a purge in Outlook. You can archive (which is the default) or move it to the Trash or delete it forever. I suggest leaving Auto-Expunge on
and having the message archived. If you really want items deleted, then choose to move deleted items to the Trash Gmail folder like shown above.
Next click on Advanced tab and these settings should be set already. Incoming server uses port 993 and SSL and outgoing server uses port 587 and TLS.
The one thing you’ll want to add is [Gmail] as the root folder path. This basically removes the extra folders and makes Gmail work more seamlessly with Outlook. The only thing is that all your labels will disappear when you do this! Whoops. Not to worry.
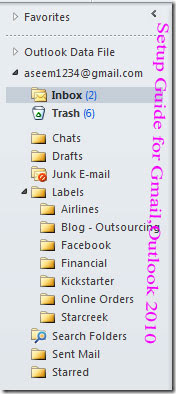
All you have to do is go to Settings in Gmail, click on Labels and create a new label called [Gmail]/Labels. You can choose anything for the word “labels”. Then, you have to move all the labels you want to see in Outlook under [Gmail]/Label. You basically have to nest those labels under the newly created label.
Now your Outlook should look something like this:
Pretty sweet! Now people have complained that there are times when they don’t see an updated new message count under some of their Gmail labels. The way to fix this is by scheduling a Send and Receive All every so often. You can do this by going to the Send /Receive tab and then clicking on Send/Receive Groups and clicking on Define Send/Receive Groups.
Make sure that the group name All Accounts has the check box Schedule and automatic send/receive every x minutes enabled. Note that your labels will not have their new message counts updated the second you get a new email under those labels. For whatever reason, a Send/Receive has to be done and then the counts get updated. Also, click on Edit and make sure your settings match:
You want to make sure that Get folder unread count for subscribed folders is checked. It would be nice if the counts were updated immediately, but they don’t. However, you can do a Send/Receive more often if you need the count updated quickly.
Now in order to get your Google Calendar synced with your Outlook calendar, just download Google Calendar Sync.
http://support.google.com/calendar/bin/answer.py?hl=en&answer=89955
Install it, type in your Google account info and choose how you want to sync:
I would recommend 2-way since it allows you to add events to either Outlook or Google Calendar and they will sync automatically. After the sync is finished, you’ll see events appear in your Outlook calendar:
Now for the final part, which is the most fun! Basically, starting fresh in Outlook, you will have nothing in your auto-complete list. When you go to type an email address, you’ll get no auto-complete suggestions. This kind of sucks. So how can you import your Gmail contacts into Outlook and have them show up in the auto-complete list?
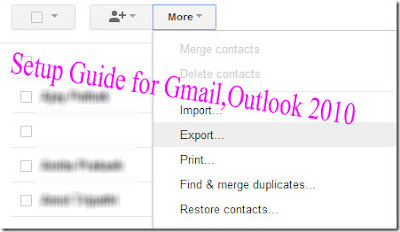
Here’s how. First, you need to go to Google Contacts and export your contacts.
https://www.google.com/contacts/u/0/#contacts
Choose Outlook CSV format and choose which contacts you want to export. You can either export all (which may be a ton) or you can choose from a group. You can also create a group, add the emails to that group and then export. That way you won’t have a ton of useless contacts in Outlook after the import.
Next, go to Outlook and click on File, Open and then Import.
Choose Import from another program or file and click Next.
Then choose Comma Separated Values (Windows) and click Next.
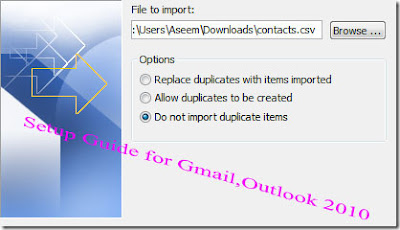
Go ahead and browse to the location of the CSV file and choose Do not import duplicate items.
Choose Contacts for the destination and click Next.
Click Finish and everything will be imported. Now that is step one. You’ll notice all your contacts are in the address book, but when you go to type an email, it still won’t auto-complete anything. That’s where you have to download a third-party tool called NK2View. Don’t worry about how it works, just follow the instructions below. First, shut down Outlook.
http://www.nirsoft.net/utils/outlook_nk2_autocomplete.html
Then, scroll down to the bottom of the web page and download NK2View. Then unzip it and run the EXE file. It will look something like this:
Basically, whatever shows up in that list is what is currently saved in the auto-complete list. This tool lets you import anything you want! So now you can simply import the entire address book, which we just populated with all the Gmail contacts. So click on File and then click on Add Items From Address Book.
Go ahead and press SHIFT + click to select all the items. Then click the To-> button at the bottom. Then click OK.
That’s it! Now exit the program and open Outlook. Go to type an email and voila! Your auto-complete list will have all the emails from Gmail:
Now you can enjoy Outlook 2010 nicely connected and working with your Gmail account! Hopefully, this intensive guide helps someone out there! Feel free to post a comment if you have opinions, comments, questions, etc.
"Computer Tips: Setup Guide for Gmail,Outlook 2010,Ultimate Setup Guide "
Reference : online-tech-tips.com


0Awesome Comments!